EHK 744G - 1969 Super - Interior coming along nicely
-
Pog
- Posts: 142
- Joined: Sat Aug 24, 2013 4:55 pm
- Club Member: Yes
- Car Model: 1969 Super 'Betty'
- Location: Northampton, UK
- Has thanked: 10 times
- Been thanked: 37 times
Re: EHK 744G - 1969 Super
The interior took 9 x 400ml cans of colour, 3 x 750ml cans of high build and about 8 x 400ml cans of zinc primer. I realise this might not be the most cost effective route for painting, but for me I'm more than happy as cans are super convenient with no clean up required, more than worth it for me. Especially when I get to say, I did that!
Pog
Pog
Young Imp Members Registrar
-
The Nun
- Posts: 2928
- Joined: Tue Jan 23, 2007 7:02 pm
- Club Member: Yes
- Car Model: Imp
- Location: South
- Has thanked: 76 times
- Been thanked: 104 times
Re: EHK 744G - 1969 Super
Aerosols are convenient as you say but aren't exactly cheap, will you do the exterior too?
I remember at a classic car show a guy had painted his entire Spitfire with Duplicolor aerosols, he said it was something like 400 tins worth, it looked superb so it can be done but at about a tenner a can it cost around 4 grand.
I remember at a classic car show a guy had painted his entire Spitfire with Duplicolor aerosols, he said it was something like 400 tins worth, it looked superb so it can be done but at about a tenner a can it cost around 4 grand.
Peter Nunn...ey im member 00033
-
Pog
- Posts: 142
- Joined: Sat Aug 24, 2013 4:55 pm
- Club Member: Yes
- Car Model: 1969 Super 'Betty'
- Location: Northampton, UK
- Has thanked: 10 times
- Been thanked: 37 times
Re: EHK 744G - 1969 Super
400 cans?! That can't be right, unless they were the tiny 150ml ones? In total I've used 21 cans of colour so far. That's for the entire underside, engine bay, luggage bay and interior. So yes it's added up, but still a darn sight cheaper than paying for a body shop to do the work!
I haven't fully decided how I want to do the exterior. I've been happy with the finish I've managed to achieve so far, so I reckon I could make a good job of it if I tried. But there's just this nagging doubt about doing a 'rattle can paint job', worried it might not be as durable or last as long as a professional job with a gun. But then paint is paint isn't it? It's all in the prep? What do people think?
Pog
Young Imp Members Registrar
-
bazzateer

- Posts: 1269
- Joined: Sun Apr 02, 2006 12:27 pm
- Club Member: Yes
- Car Model: 68 Chamois Sport, 72 Imp Sport, 76 Datsun 260Z
- Location: Watford and very occasionally Fareham
- Has thanked: 68 times
- Been thanked: 88 times
Re: EHK 744G - 1969 Super
I say give it a try if your happy to.
If I told you I was a pathological liar, would you believe me?
Barry Blackmore - Chiltern ACO, apparently.......................
Barry Blackmore - Chiltern ACO, apparently.......................
-
The Nun
- Posts: 2928
- Joined: Tue Jan 23, 2007 7:02 pm
- Club Member: Yes
- Car Model: Imp
- Location: South
- Has thanked: 76 times
- Been thanked: 104 times
Re: EHK 744G - 1969 Super
It would have been the smaller cans you used to get Duplicolor in from Halfords and the like, and it all depends how much you put on of course as flatting and polishing could remove half of it.
I think Andy Gill aerosoled his IMP wonder how much he used?
I think Andy Gill aerosoled his IMP wonder how much he used?
Peter Nunn...ey im member 00033
-
617sqn

- Posts: 1146
- Joined: Fri Dec 05, 2003 11:17 pm
- Club Member: Yes
- Car Model: Hillman Imp 1972
- Location: Sussex, England.
Re: EHK 744G - 1969 Super
Certainly not 400 ! I used "professional" cans in 2 pack. Outdoors in warm weather, plus clear lacquer, also 2 pack, from C and C car colours near Gatwick. Etch primed and flatted where necessary. I reckon no more than 10 or 12 of colour. I might still have receipts in Stans history file, so I'll check later on.
Andy G
Andy G
Member No. 7500, and Stan's best mate.
-
Pog
- Posts: 142
- Joined: Sat Aug 24, 2013 4:55 pm
- Club Member: Yes
- Car Model: 1969 Super 'Betty'
- Location: Northampton, UK
- Has thanked: 10 times
- Been thanked: 37 times
Re: EHK 744G - 1969 Super
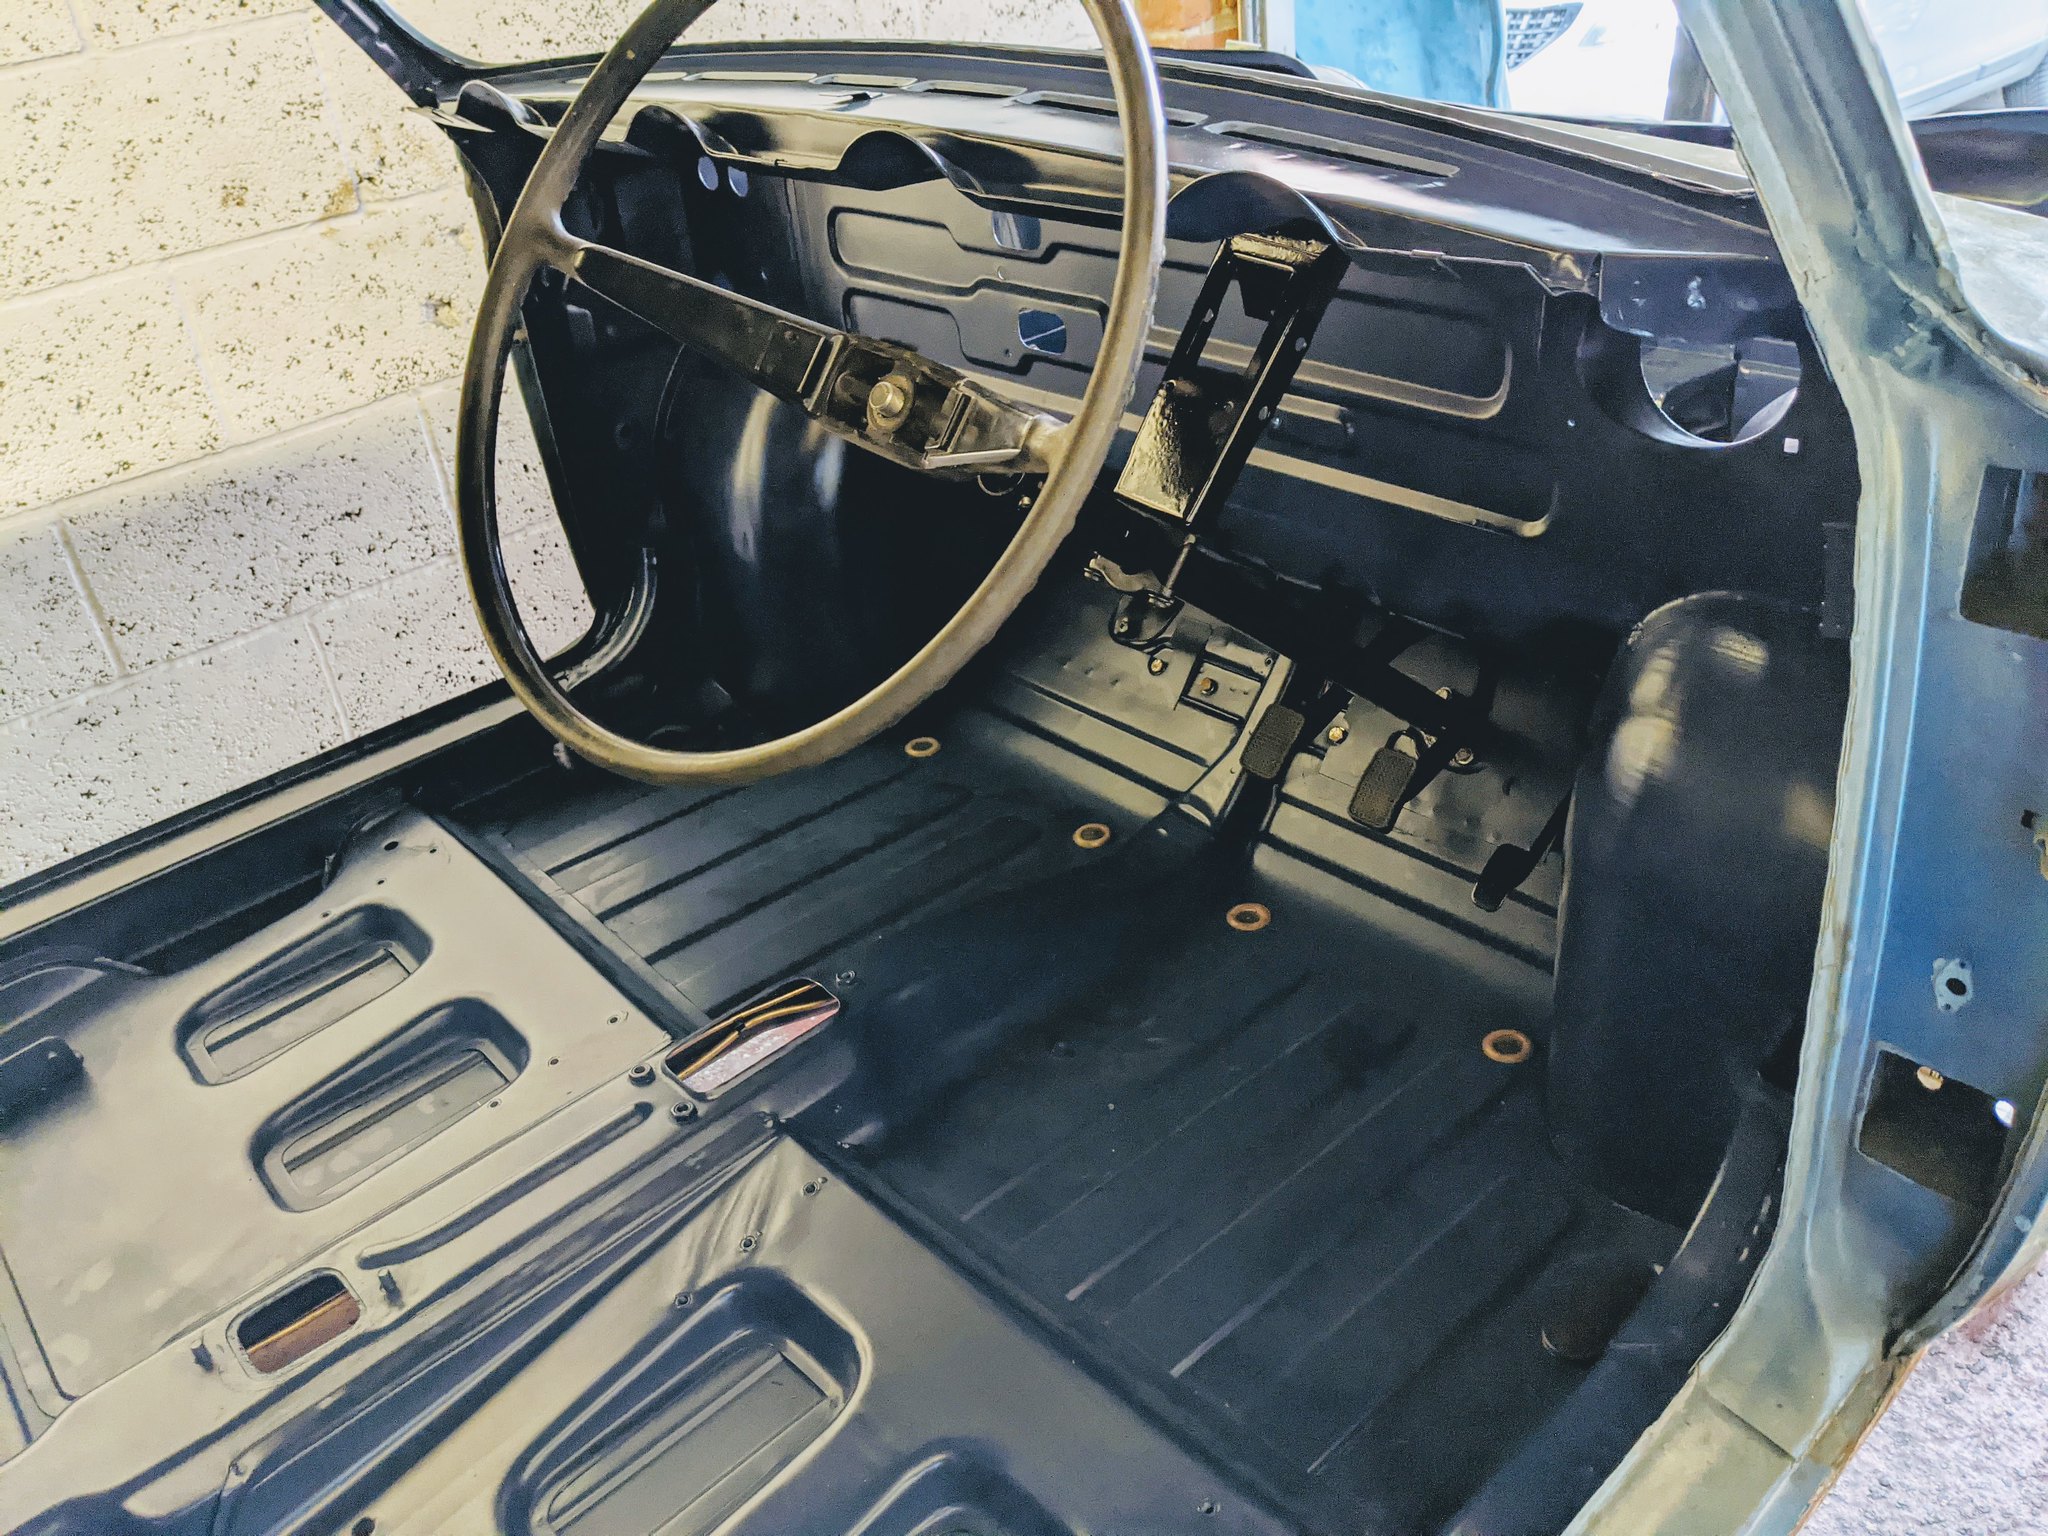
Well the rebuild begins! Time to start bolting things back onto the car to get it back to a rolling shell. From there I'll be able to move the car out onto the drive, which will allow me to deep clean the garage prior to tackling the exterior bodywork.
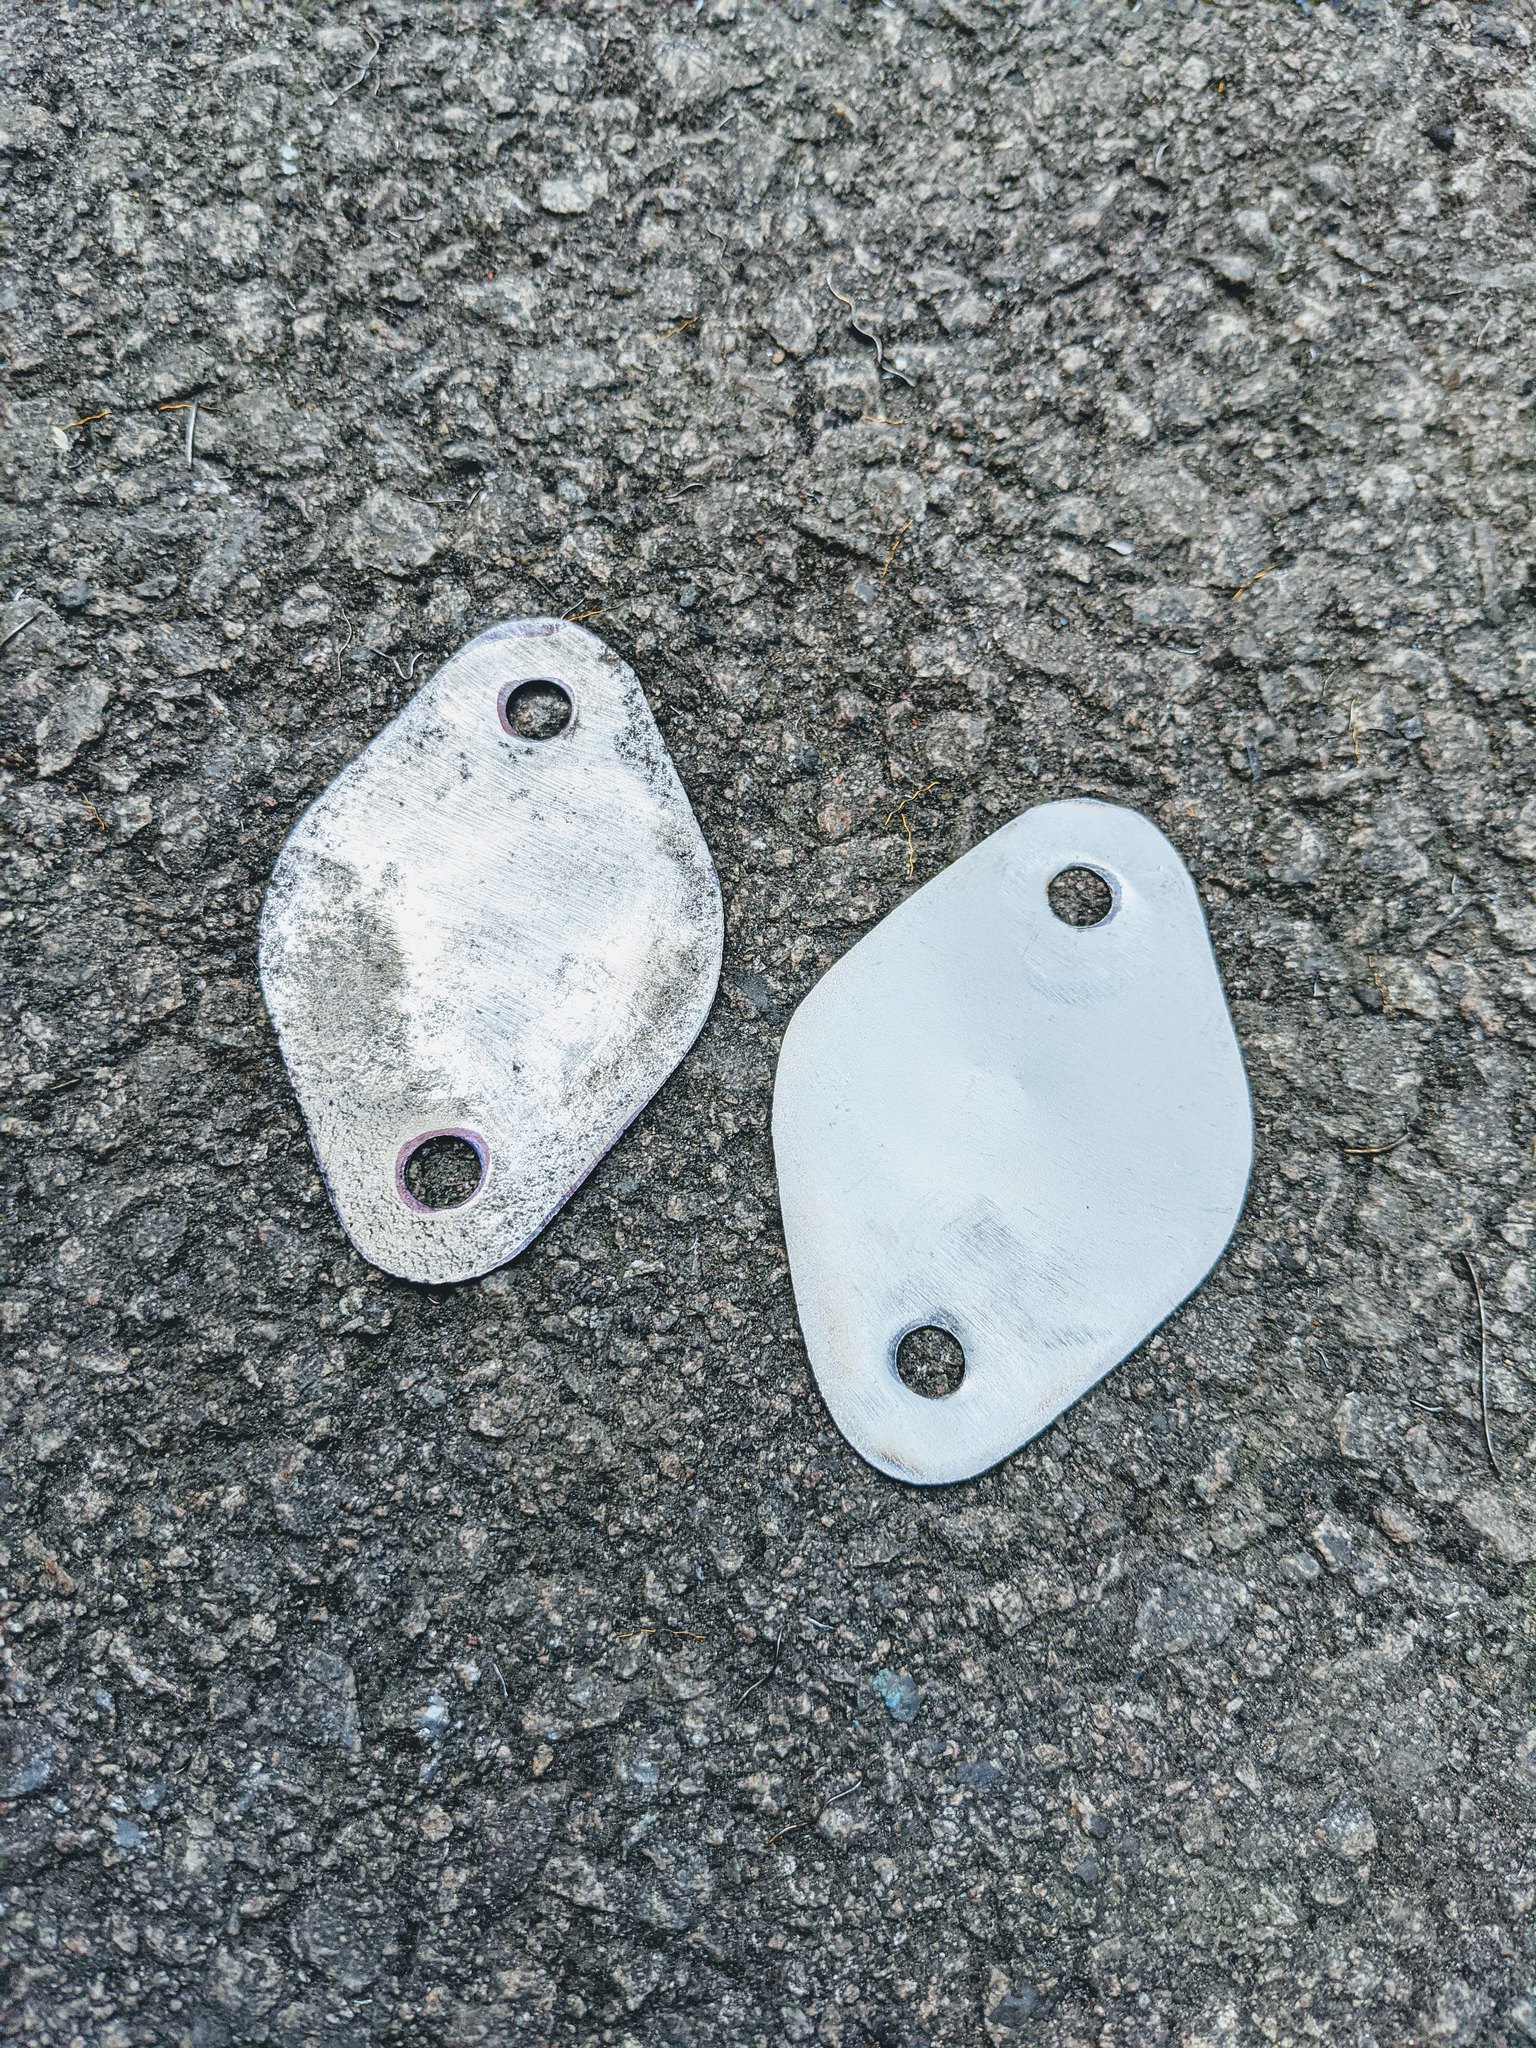
The LHD column blanking plate was a little too pitted to re-use, so I made another using the old one as a template:
 IMG_20200614_134110 by Godfrey Hatton, on Flickr
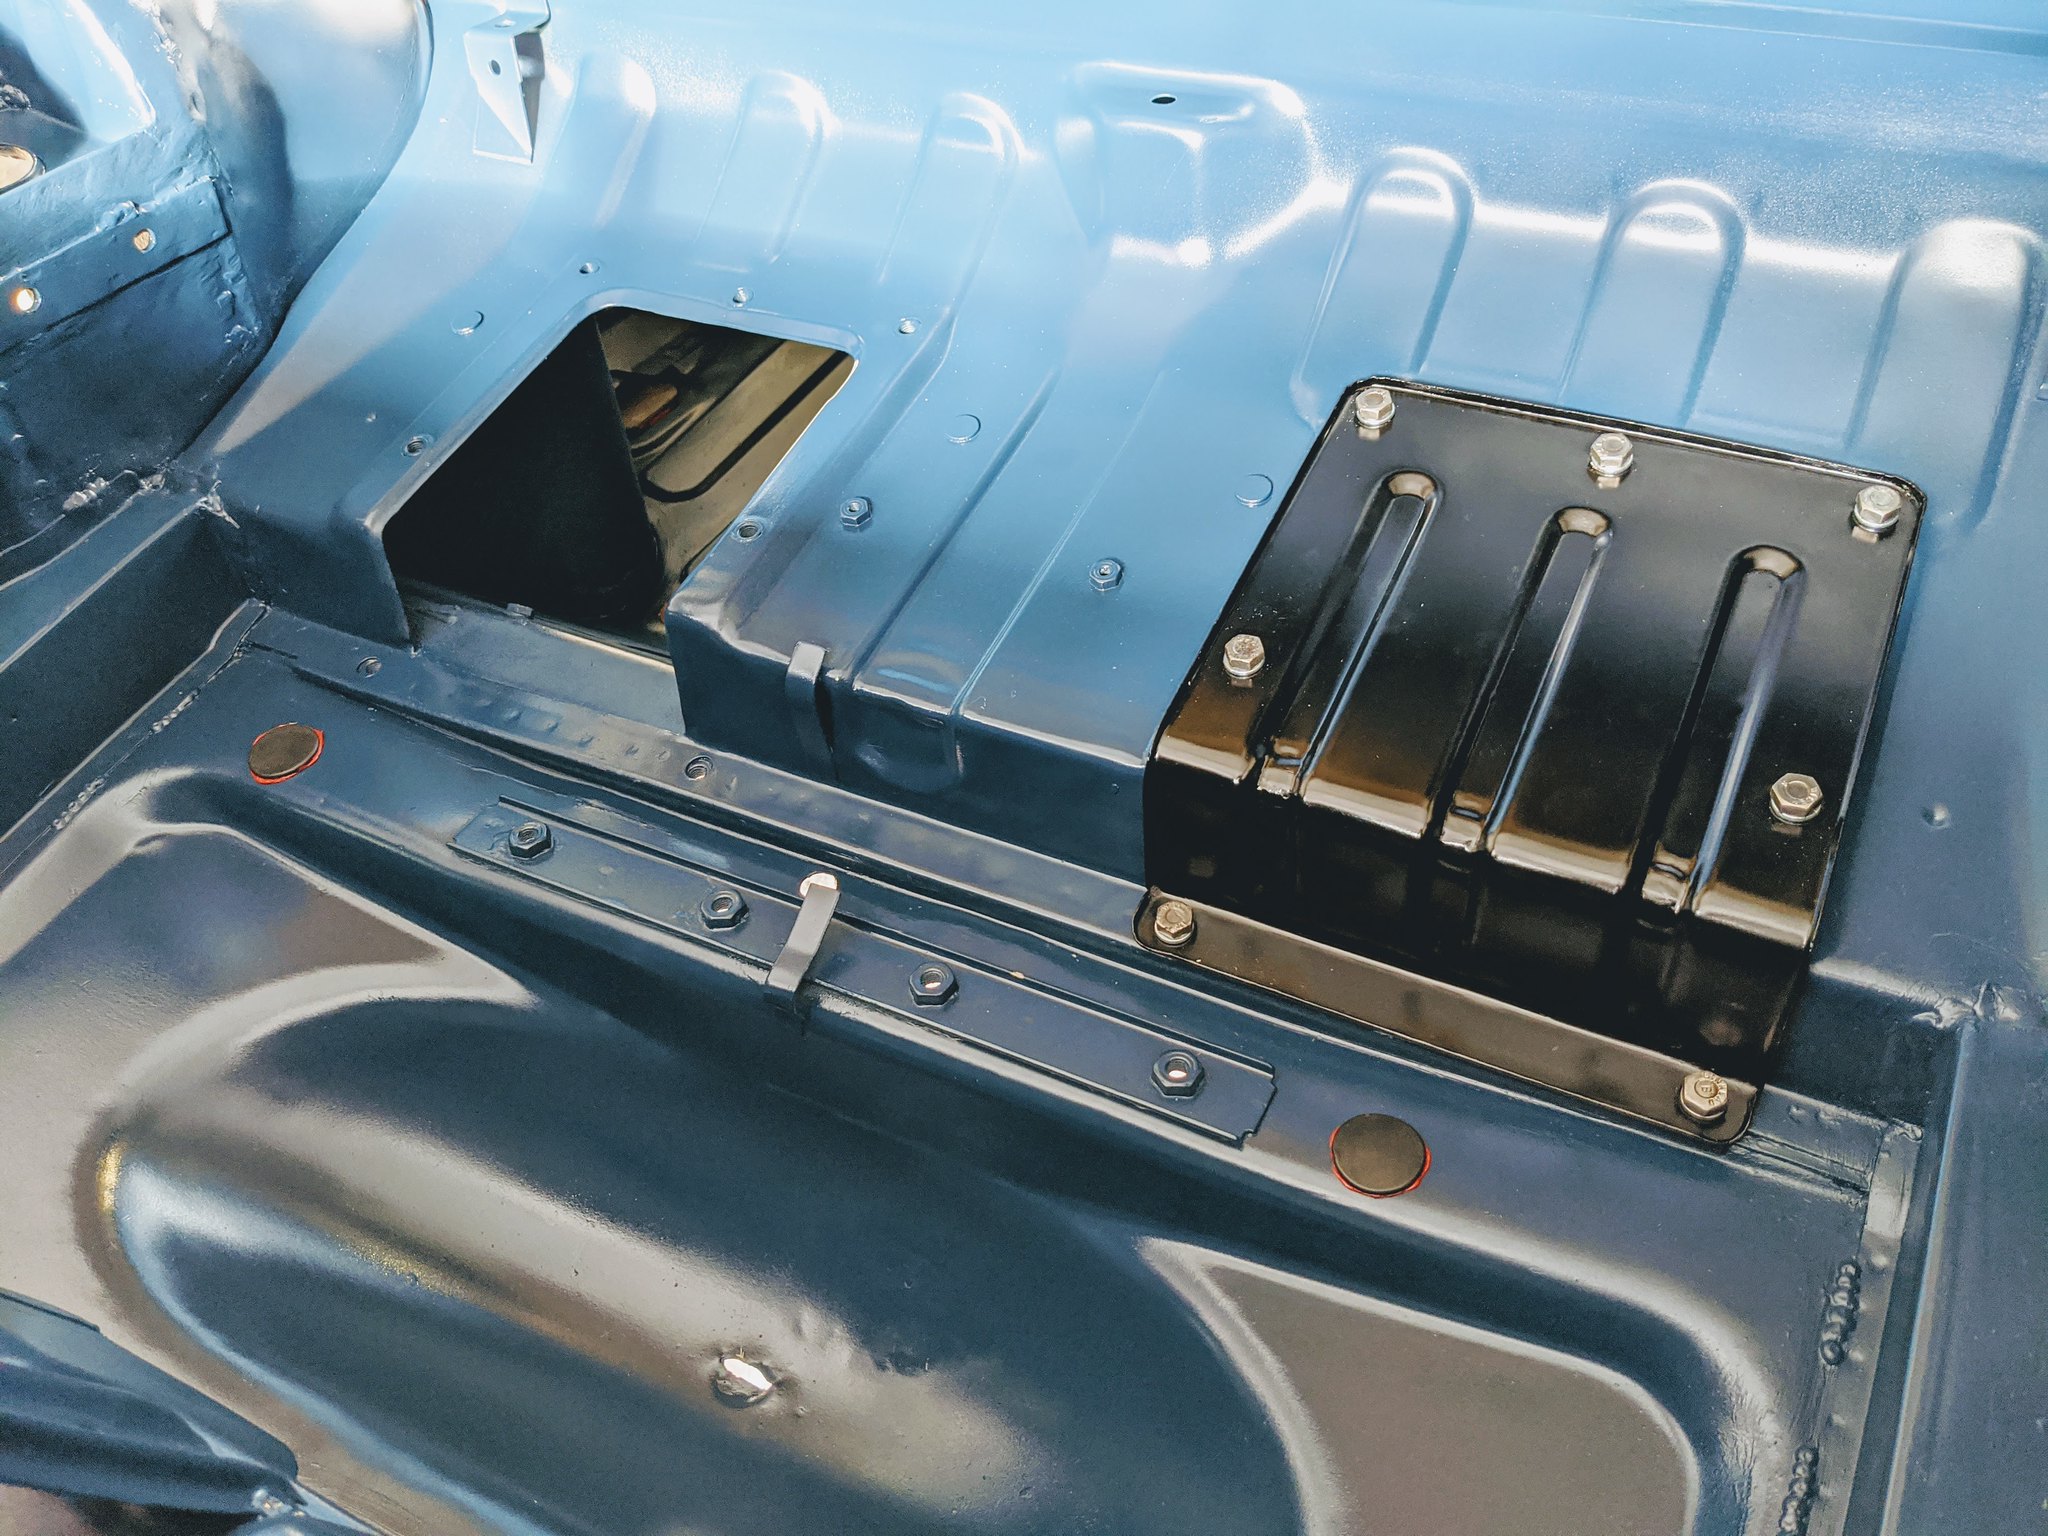
The LHD pedal box blanking plate looked a little sorry too, so I stripped that back ready for a new coat of paint:
 IMG_20200614_140447 by Godfrey Hatton, on Flickr
Once painted, I also took each bolt and cleaned them back with the wire wheel so everything looks as shiny and new as possible when bolted back on. A literal nut and bolt restoration!
 IMG_20200614_190516 by Godfrey Hatton, on Flickr
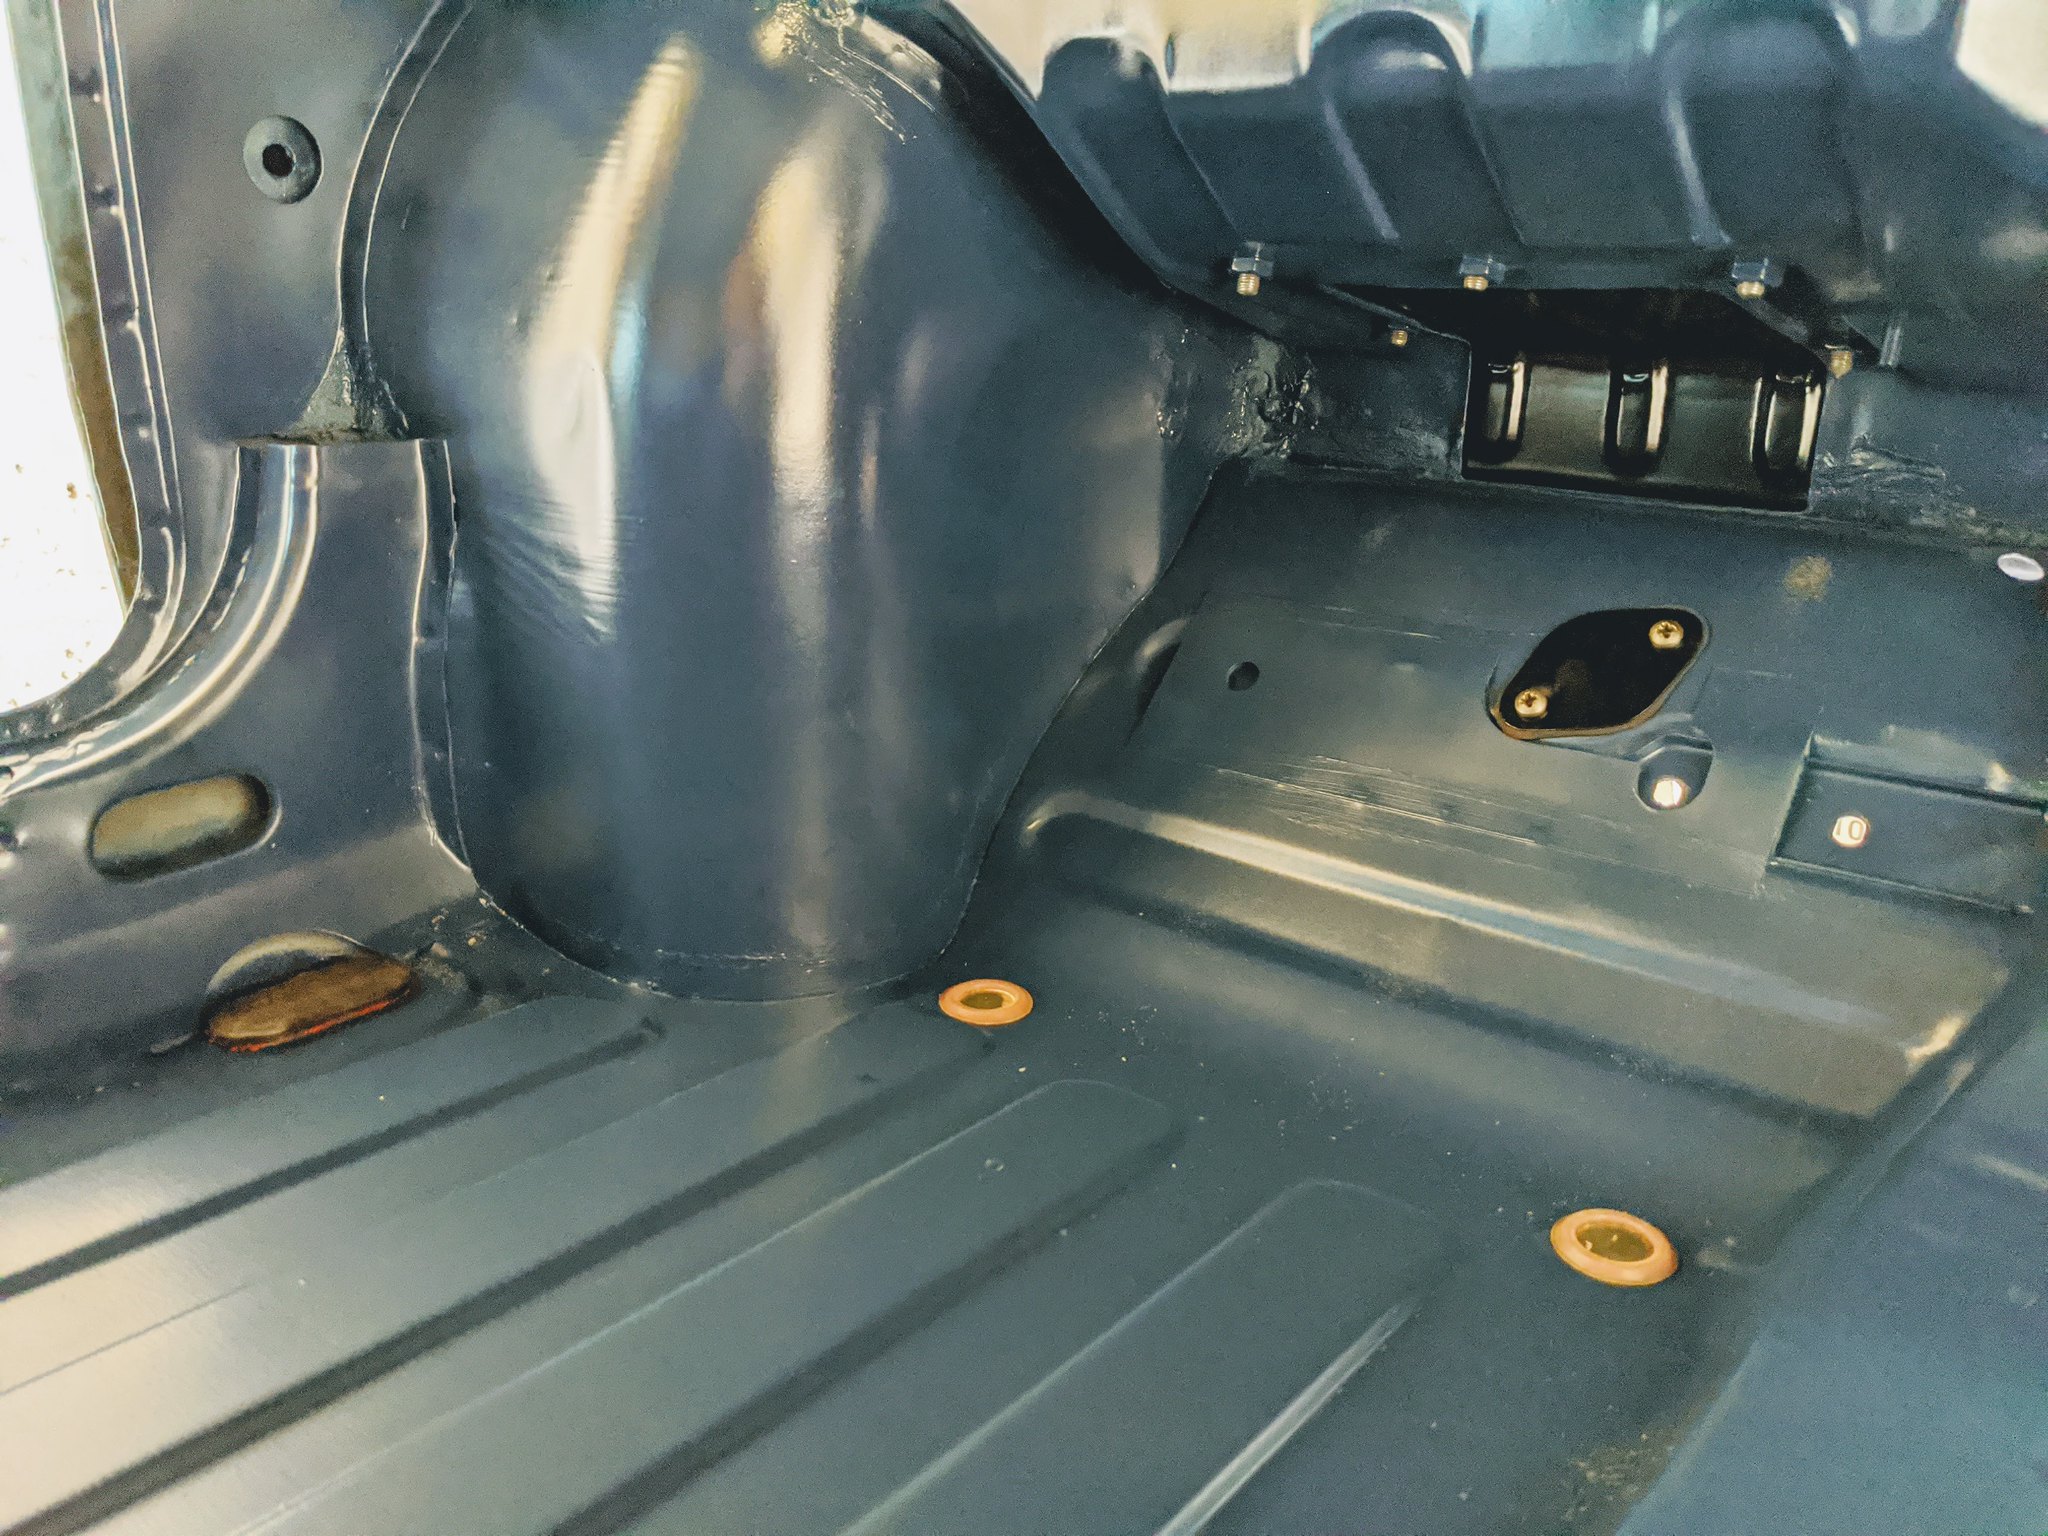
Grommets for various holes start to go back in their place too. Quick question, I had 4 of those long oblong plugs from the floor in my labelled bag, but there's only two holes in the floor at the front. Do the holes on the side of the cills have the same plugs in them? Don't remember taking them off, but that's the only place I can think they'd go:
 original_6ce647a6-9a5b-4cd2-b790-1e12f3444e5a_MVIMG_20200614_191317 by Godfrey Hatton, on Flickr
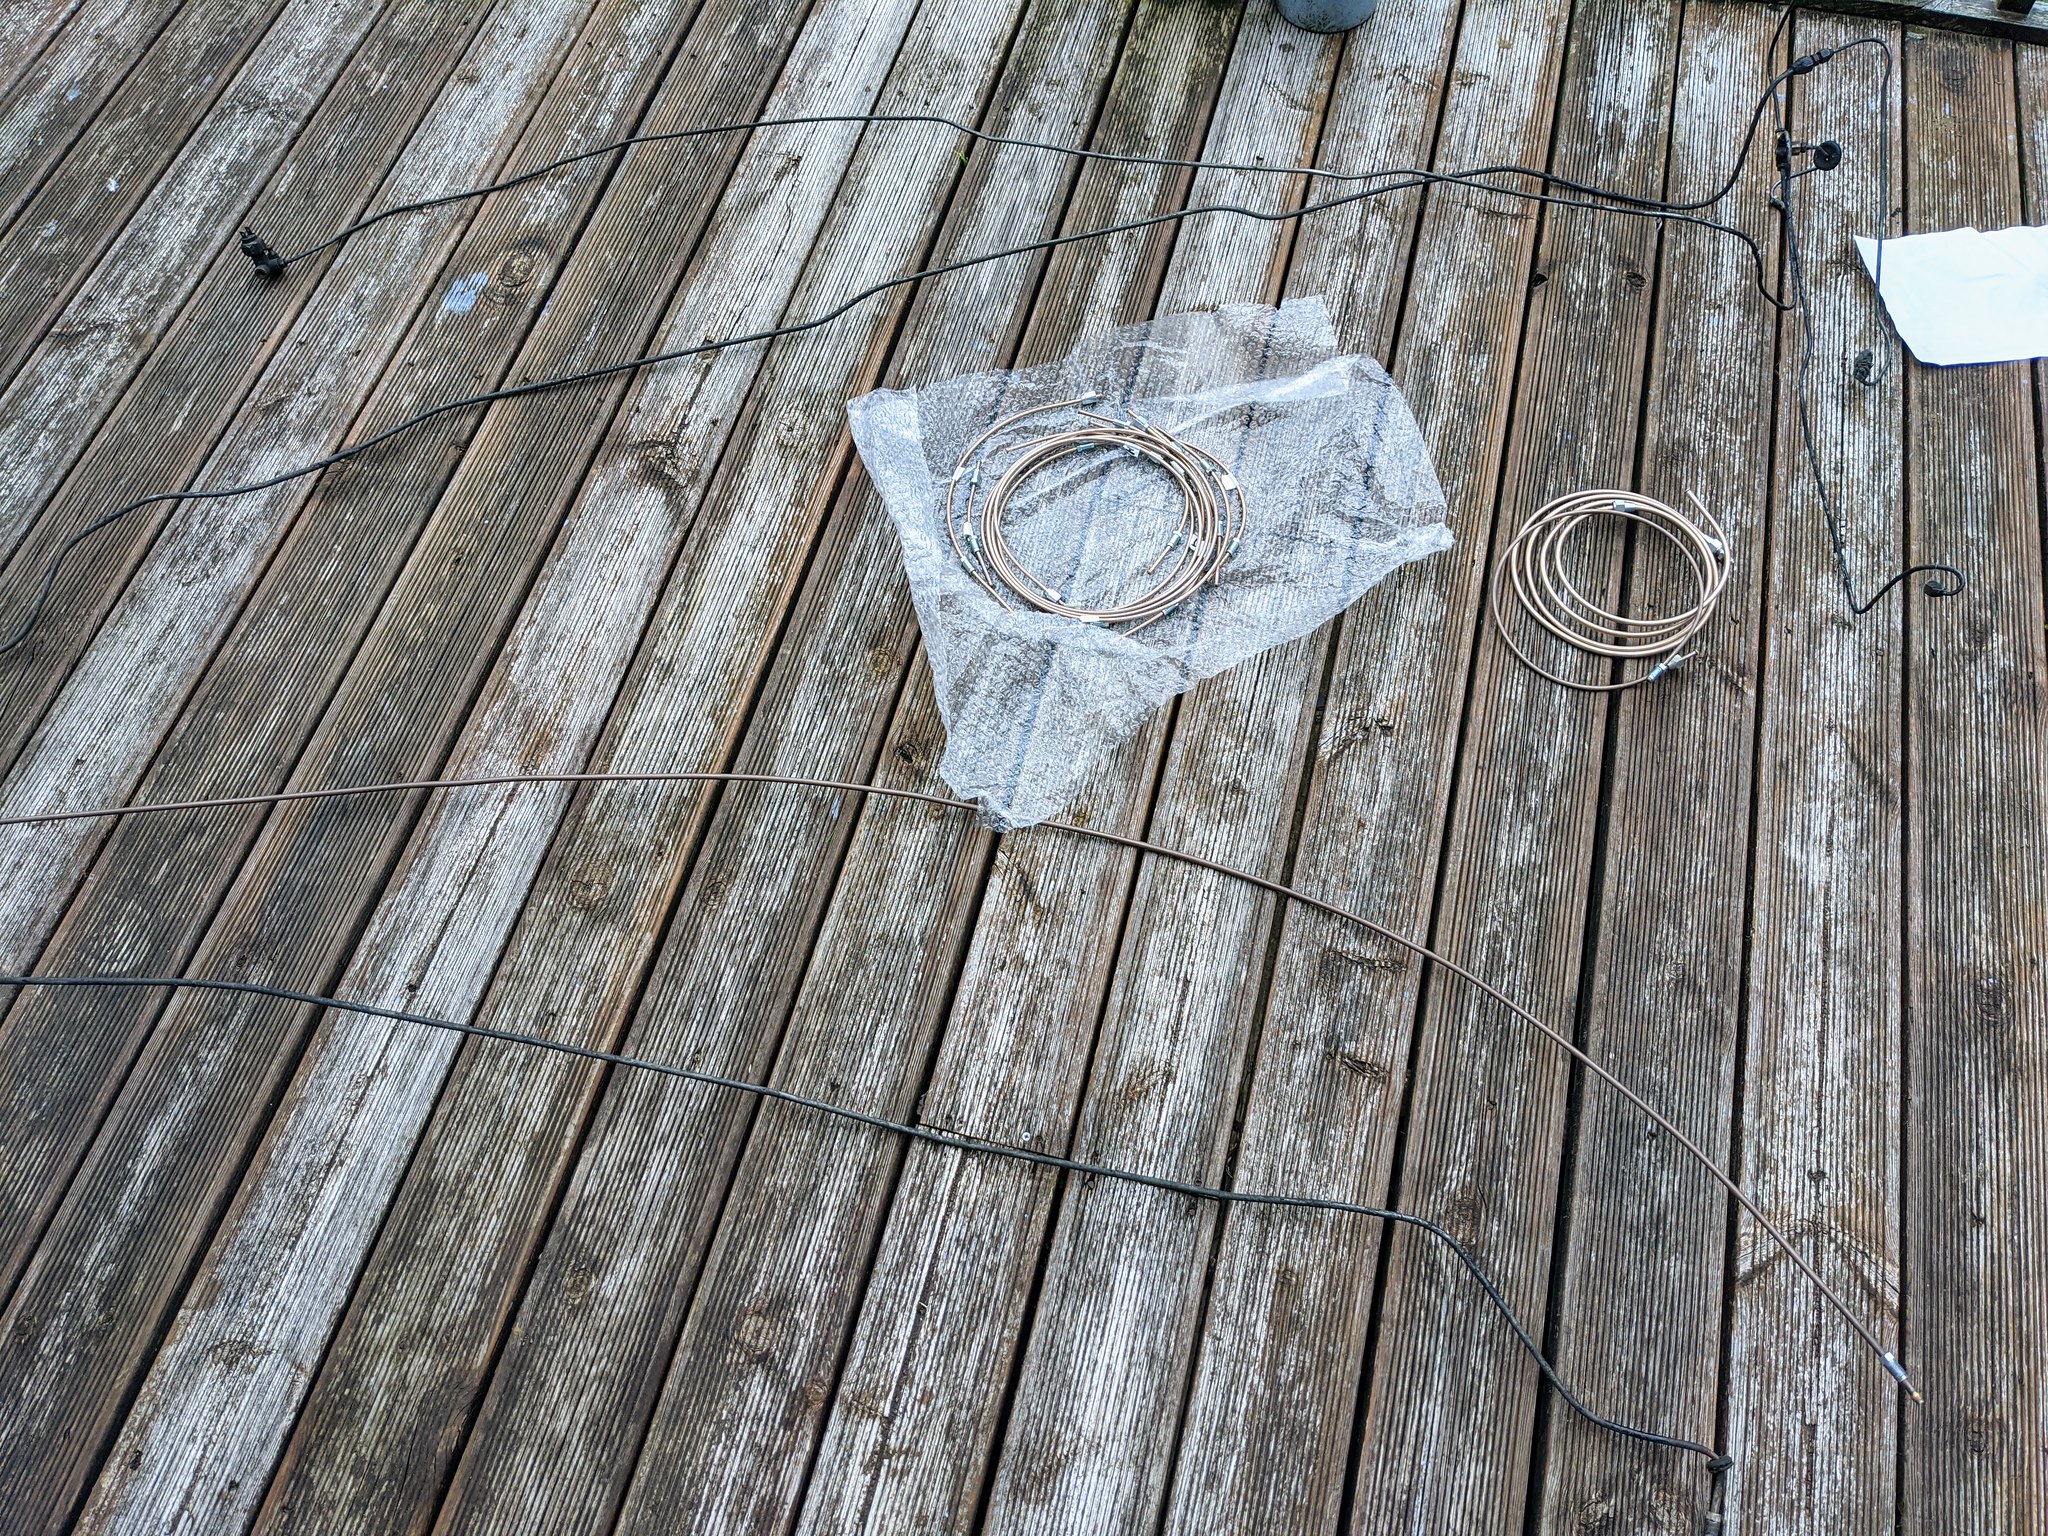
Earlier in the week I had a rather exciting delivery, been waiting 6 weeks for them to arrive, I can't wait to get these fitted:
 IMG_20200610_192138 by Godfrey Hatton, on Flickr
The project is really starting to take shape now, I'll keep you all updated.
Pog
The LHD column blanking plate was a little too pitted to re-use, so I made another using the old one as a template:
IMG_20200614_134110 by Godfrey Hatton, on FlickrThe LHD pedal box blanking plate looked a little sorry too, so I stripped that back ready for a new coat of paint:
IMG_20200614_140447 by Godfrey Hatton, on FlickrOnce painted, I also took each bolt and cleaned them back with the wire wheel so everything looks as shiny and new as possible when bolted back on. A literal nut and bolt restoration!
IMG_20200614_190516 by Godfrey Hatton, on FlickrGrommets for various holes start to go back in their place too. Quick question, I had 4 of those long oblong plugs from the floor in my labelled bag, but there's only two holes in the floor at the front. Do the holes on the side of the cills have the same plugs in them? Don't remember taking them off, but that's the only place I can think they'd go:
original_6ce647a6-9a5b-4cd2-b790-1e12f3444e5a_MVIMG_20200614_191317 by Godfrey Hatton, on FlickrEarlier in the week I had a rather exciting delivery, been waiting 6 weeks for them to arrive, I can't wait to get these fitted:
IMG_20200610_192138 by Godfrey Hatton, on FlickrThe project is really starting to take shape now, I'll keep you all updated.
Pog
Young Imp Members Registrar
-
philgsmith
- Posts: 298
- Joined: Mon Jan 03, 2011 9:26 pm
- Club Member: Yes
- Car Model: Imp - deluxe, BMW320d Touring, MGF, MGTF
- Has thanked: 36 times
- Been thanked: 20 times
Re: EHK 744G - 1969 Super
Pog
You're doing some great work there. I remember when you turned up at Wicked Welsh (day trip by train?) to have a look at some Imps and someone took you out for a short run - wow, you've come a long way since that weekend. The way you are going at this car you're going to end up with a really nice Imp. Well done and thanks for sharing the pictures. You're showing what can be achieved.
Phil
When you're in a hole - stop digging/too much to do, too little time
-
Pog
- Posts: 142
- Joined: Sat Aug 24, 2013 4:55 pm
- Club Member: Yes
- Car Model: 1969 Super 'Betty'
- Location: Northampton, UK
- Has thanked: 10 times
- Been thanked: 37 times
Re: EHK 744G - 1969 Super
Thanks Phil! That's so kind of you to say. Blimey I can't believe anyone would recall me doing that! That's right, it was 2013 and I didn't even have a car let alone an Imp. I was given a ride in a lovely blue Imp on one of the runs and then one person even let me drive her dark green car around the field - That day definitely started the bug for me!
And I think if anyone showed us what can be achieved, it's you guys with Hilda! Seriously, your thread has been a huge inspiration. I'll be sure to drop you a line when I'm ready for a new headlining!
Pog
And I think if anyone showed us what can be achieved, it's you guys with Hilda! Seriously, your thread has been a huge inspiration. I'll be sure to drop you a line when I'm ready for a new headlining!
Pog
Young Imp Members Registrar
-
bazzateer
- Posts: 1269
- Joined: Sun Apr 02, 2006 12:27 pm
- Club Member: Yes
- Car Model: 68 Chamois Sport, 72 Imp Sport, 76 Datsun 260Z
- Location: Watford and very occasionally Fareham
- Has thanked: 68 times
- Been thanked: 88 times
Re: EHK 744G - 1969 Super
Ah yes, I think I remember you at WWW as well. About time time you got an Imp on the road then!
If I told you I was a pathological liar, would you believe me?
Barry Blackmore - Chiltern ACO, apparently.......................
Barry Blackmore - Chiltern ACO, apparently.......................
-
philgsmith
- Posts: 298
- Joined: Mon Jan 03, 2011 9:26 pm
- Club Member: Yes
- Car Model: Imp - deluxe, BMW320d Touring, MGF, MGTF
- Has thanked: 36 times
- Been thanked: 20 times
Re: EHK 744G - 1969 Super
Hi Pog
2013 was the first WWW for Hilda so it was memorable for us. We're now part of the organising team and we 're now holding WWW at Llangorse Lake - be great to see you and car when you can get along.
Lesley is doing headlinings and a few other interior vinyl pieces including visors to keep her busy. Hilda is fine, we've used her a few times recently to check on my mum, so she's getting some use.
Keep the photos coming... and good luck
Phil
When you're in a hole - stop digging/too much to do, too little time
-
Pog
- Posts: 142
- Joined: Sat Aug 24, 2013 4:55 pm
- Club Member: Yes
- Car Model: 1969 Super 'Betty'
- Location: Northampton, UK
- Has thanked: 10 times
- Been thanked: 37 times
Re: EHK 744G - 1969 Super
Hi all,
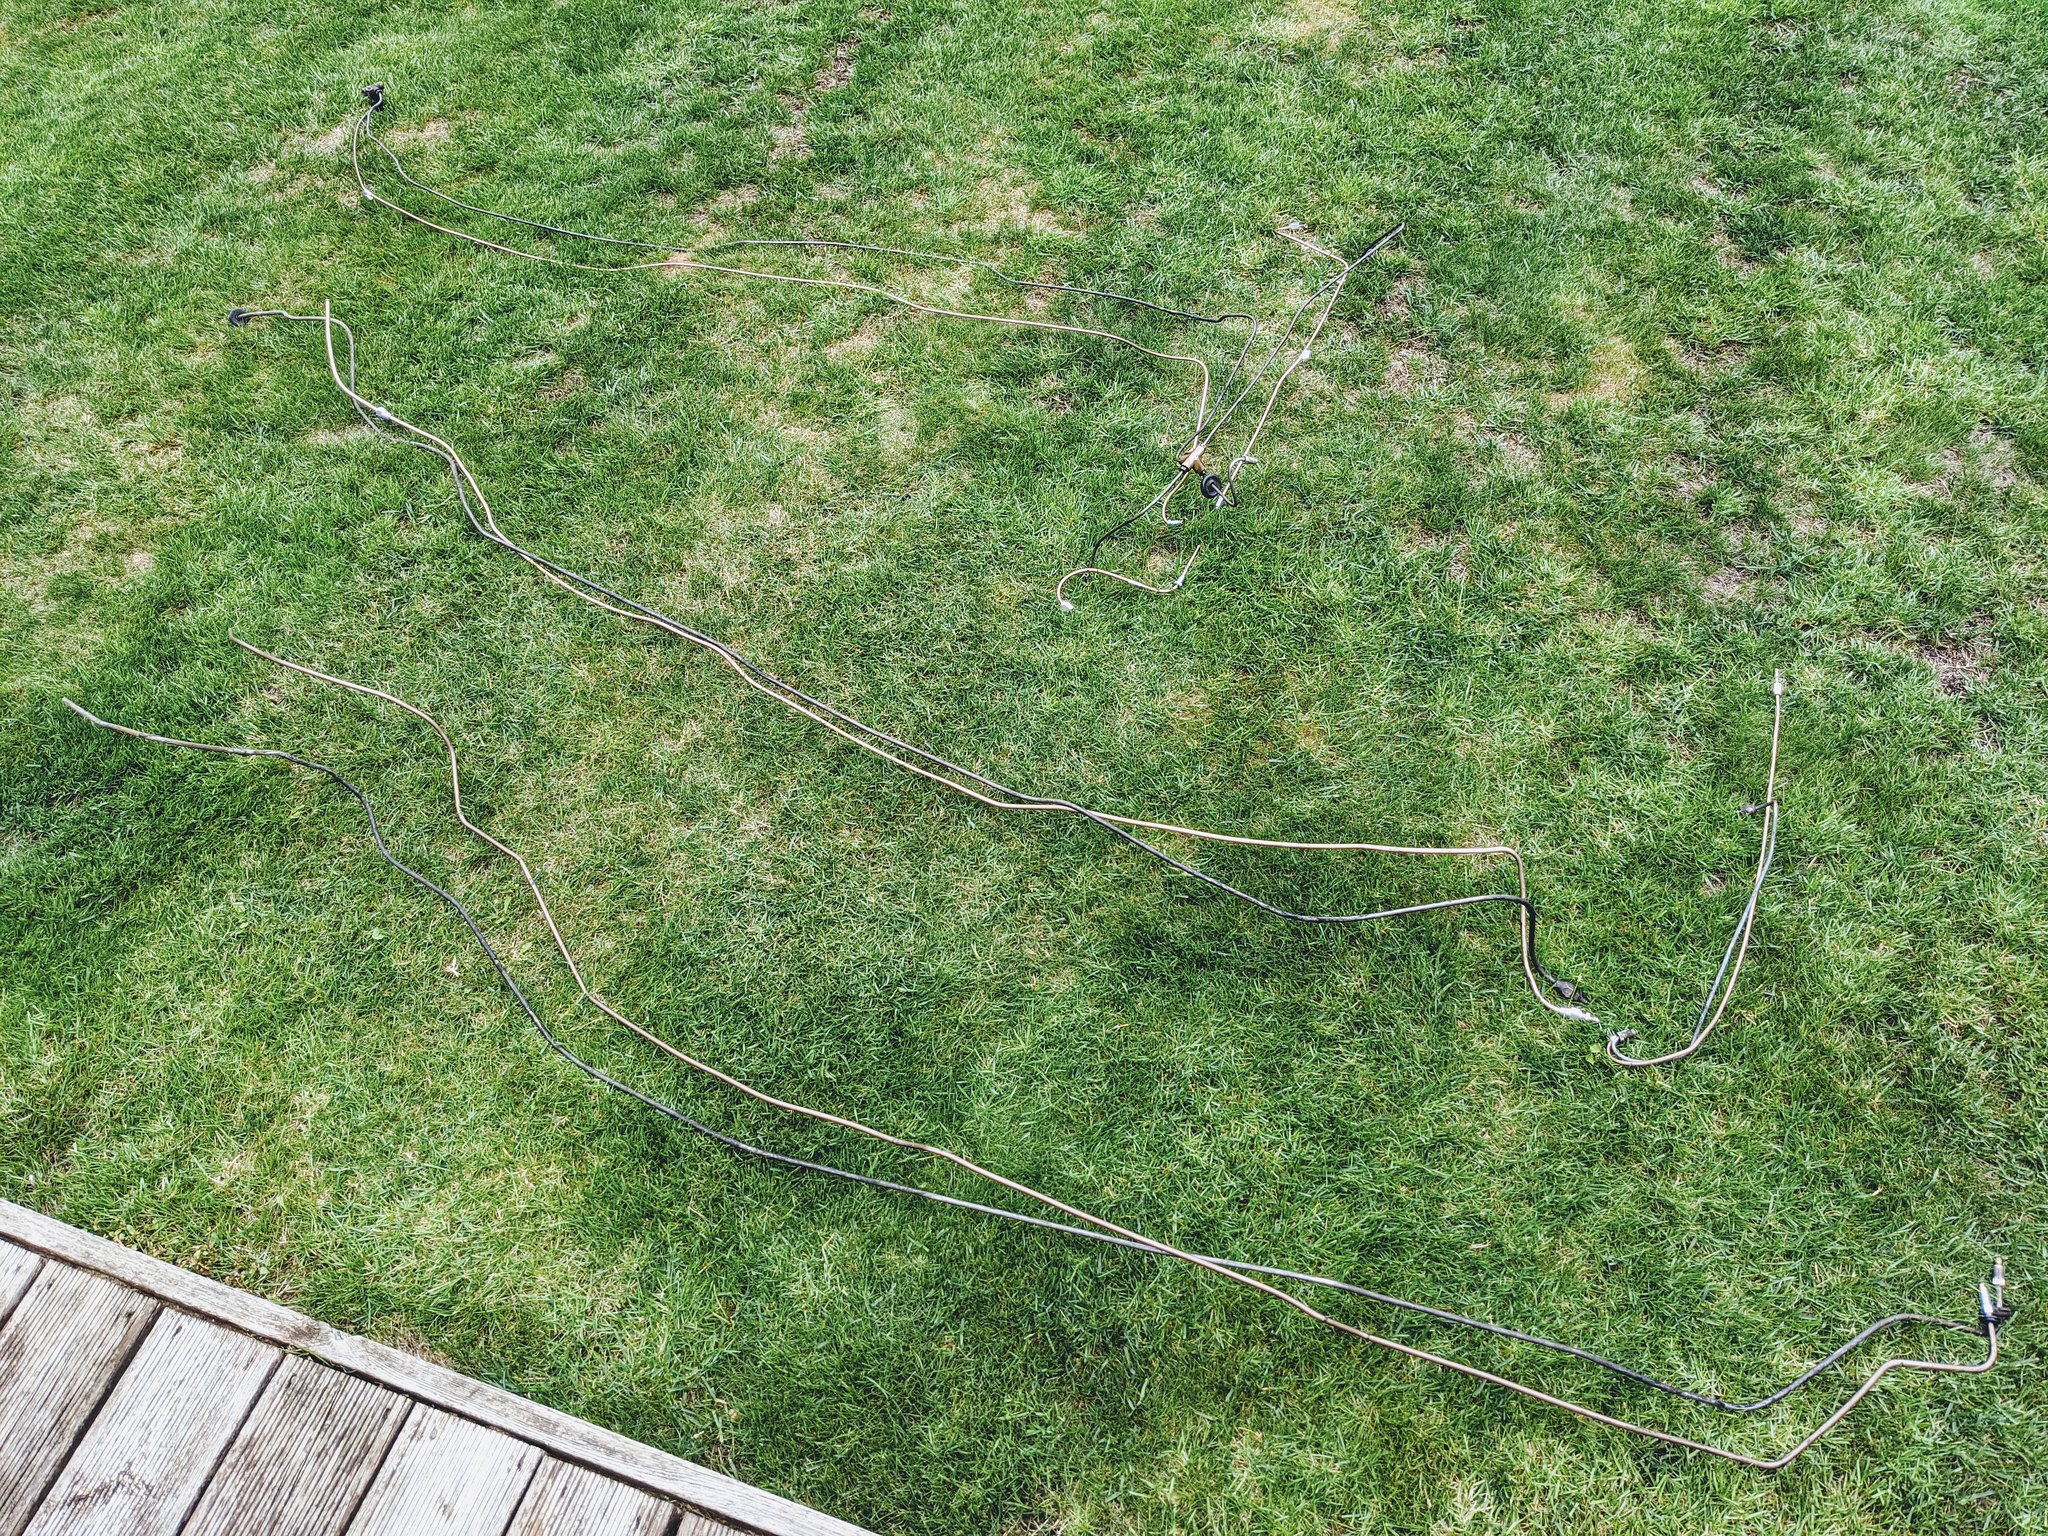
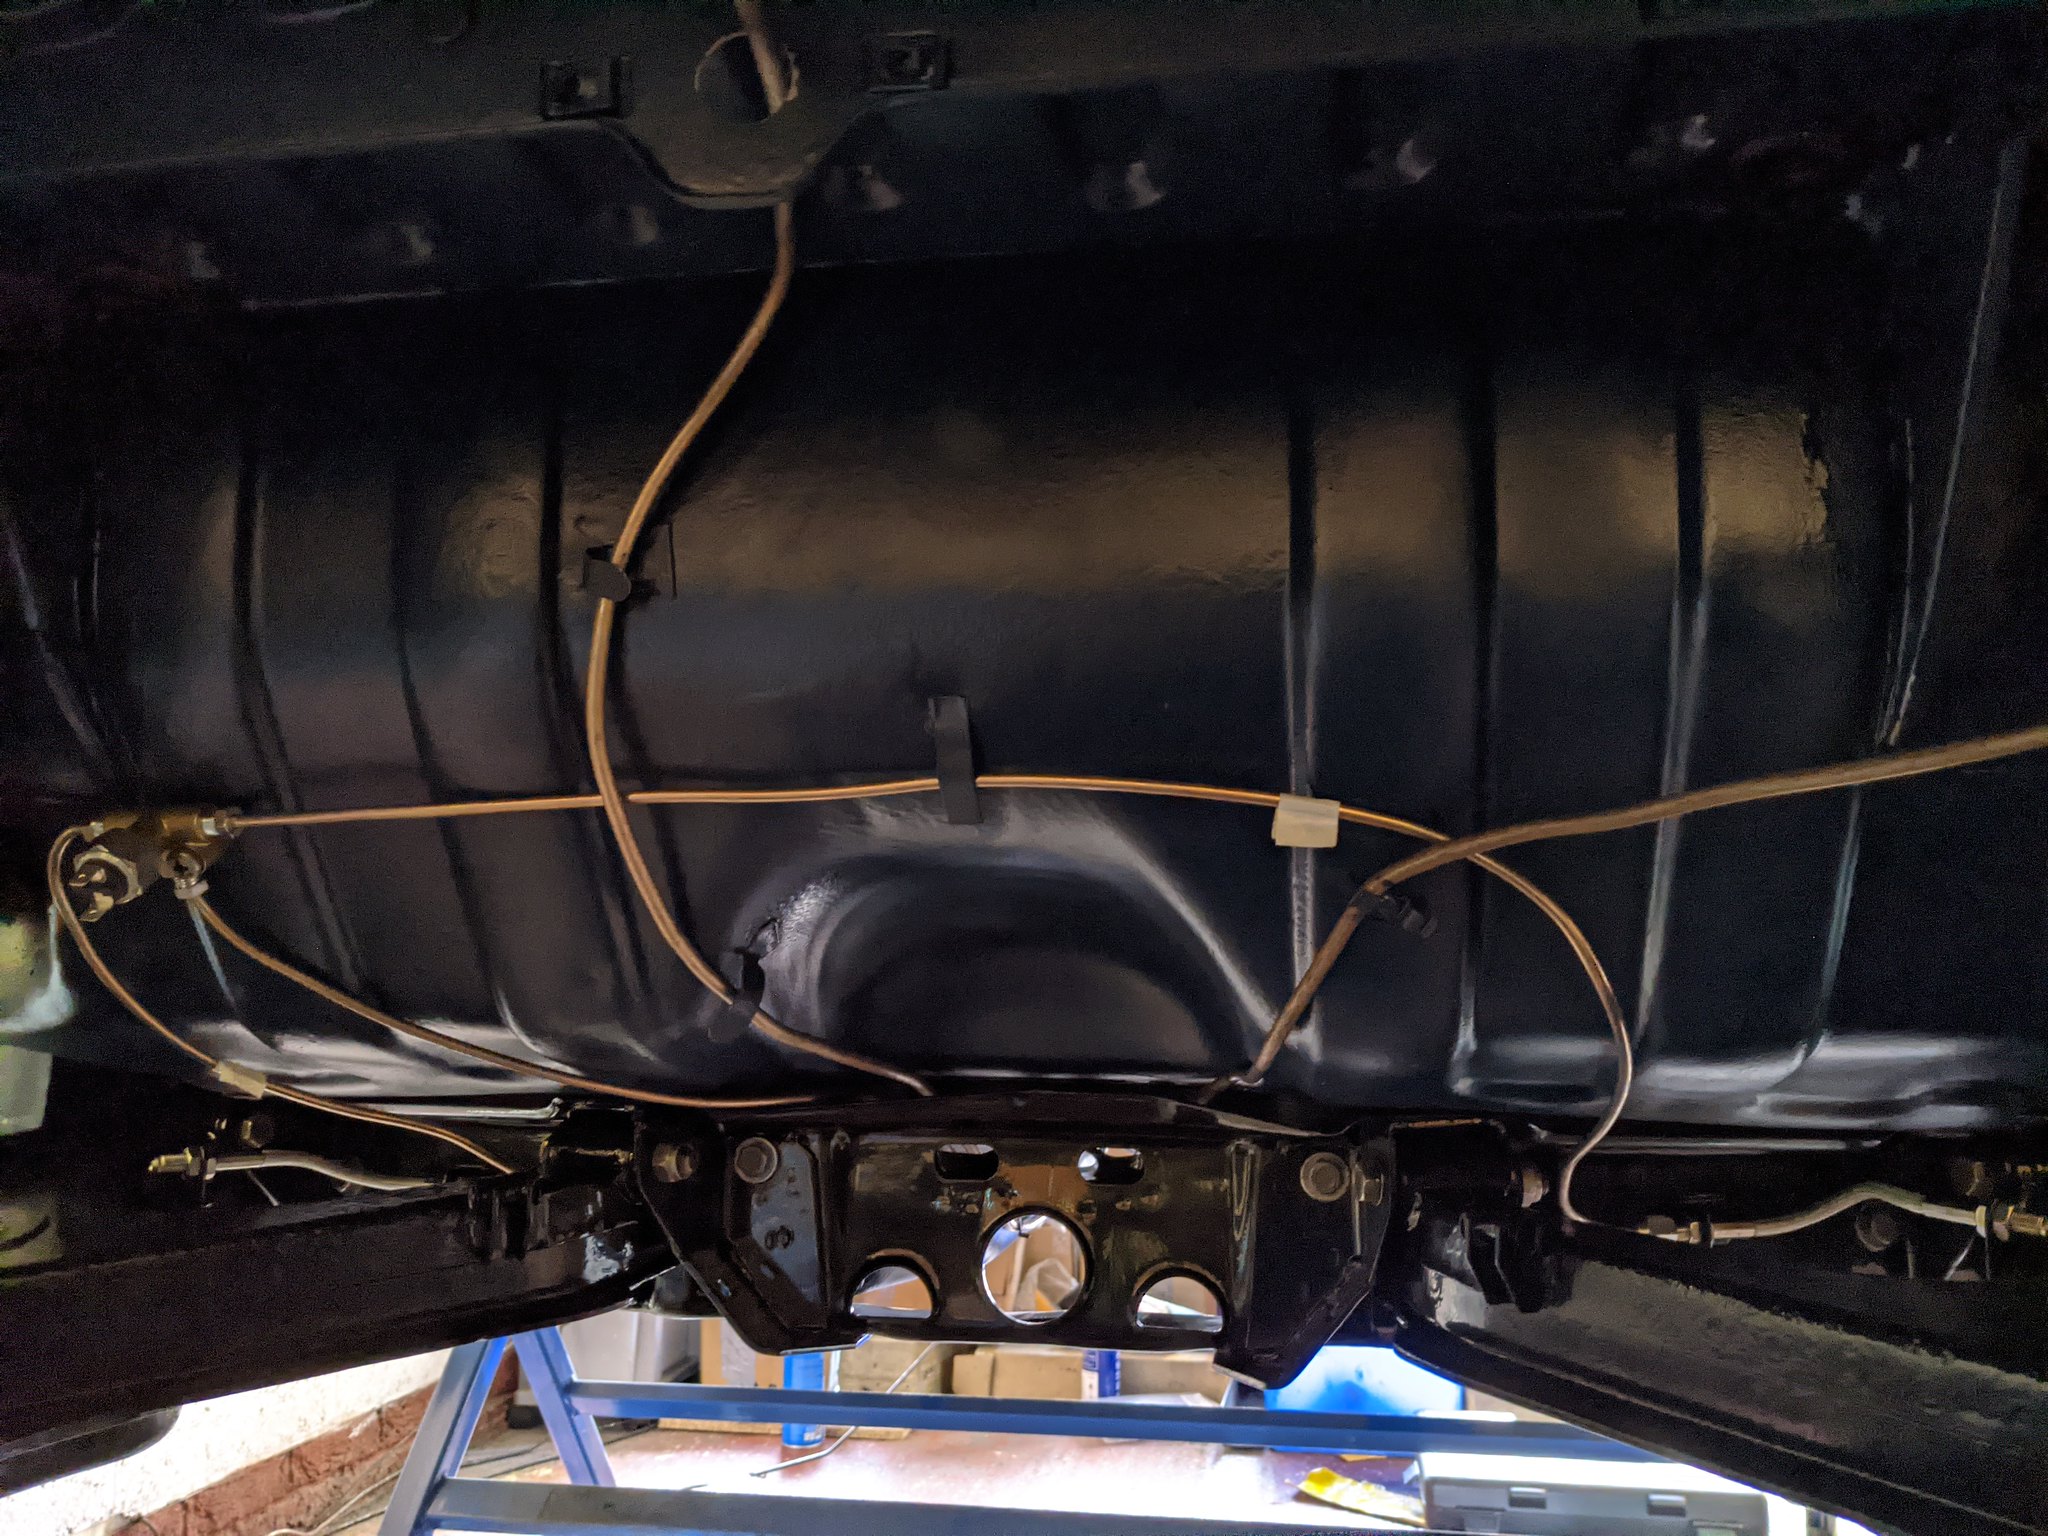
It's been hard to find the time to work on the project since being back at work, but managed to find a few hours this weekend to bend (nearly) all of the lines for under the car. I kept all the old ones as patterns, which made the job a whole lot easier as I could just copy the bends.
 IMG_20200718_121208 by Godfrey Hatton, on Flickr
 IMG_20200718_144821 by Godfrey Hatton, on Flickr
No doubt they'll need some tweaking when i offer them up to the car, but at least the basic shape is there. The new clutch lines are a slightly different length to the old, the first section is longer and the other section shorter, so I might have to make up a route that works. I was hoping to reuse the old brass junctions, but I simply couldn't remove the old pipes due to being seized solid, the nuts were starting to round off. I plan to run silicone brake fluid, so I figure it's probably a good idea to fit new ones anyway so everything is fresh, just waiting for them to turn up from Bob at spares.
Now I say nearly of the lines, for some reason the rear brake lines were already removed from the car so I don't have them for a pattern. Please may someone post a photo or two of the route these rear lines take? I'd greatly appreciate it.
Pog
It's been hard to find the time to work on the project since being back at work, but managed to find a few hours this weekend to bend (nearly) all of the lines for under the car. I kept all the old ones as patterns, which made the job a whole lot easier as I could just copy the bends.
IMG_20200718_121208 by Godfrey Hatton, on FlickrIMG_20200718_144821 by Godfrey Hatton, on FlickrNo doubt they'll need some tweaking when i offer them up to the car, but at least the basic shape is there. The new clutch lines are a slightly different length to the old, the first section is longer and the other section shorter, so I might have to make up a route that works. I was hoping to reuse the old brass junctions, but I simply couldn't remove the old pipes due to being seized solid, the nuts were starting to round off. I plan to run silicone brake fluid, so I figure it's probably a good idea to fit new ones anyway so everything is fresh, just waiting for them to turn up from Bob at spares.
Now I say nearly of the lines, for some reason the rear brake lines were already removed from the car so I don't have them for a pattern. Please may someone post a photo or two of the route these rear lines take? I'd greatly appreciate it.
Pog
Young Imp Members Registrar
-
Pog
- Posts: 142
- Joined: Sat Aug 24, 2013 4:55 pm
- Club Member: Yes
- Car Model: 1969 Super 'Betty'
- Location: Northampton, UK
- Has thanked: 10 times
- Been thanked: 37 times
Re: EHK 744G - 1969 Super
Hi all,
Made some good progress on the car - here's what I've been up to:
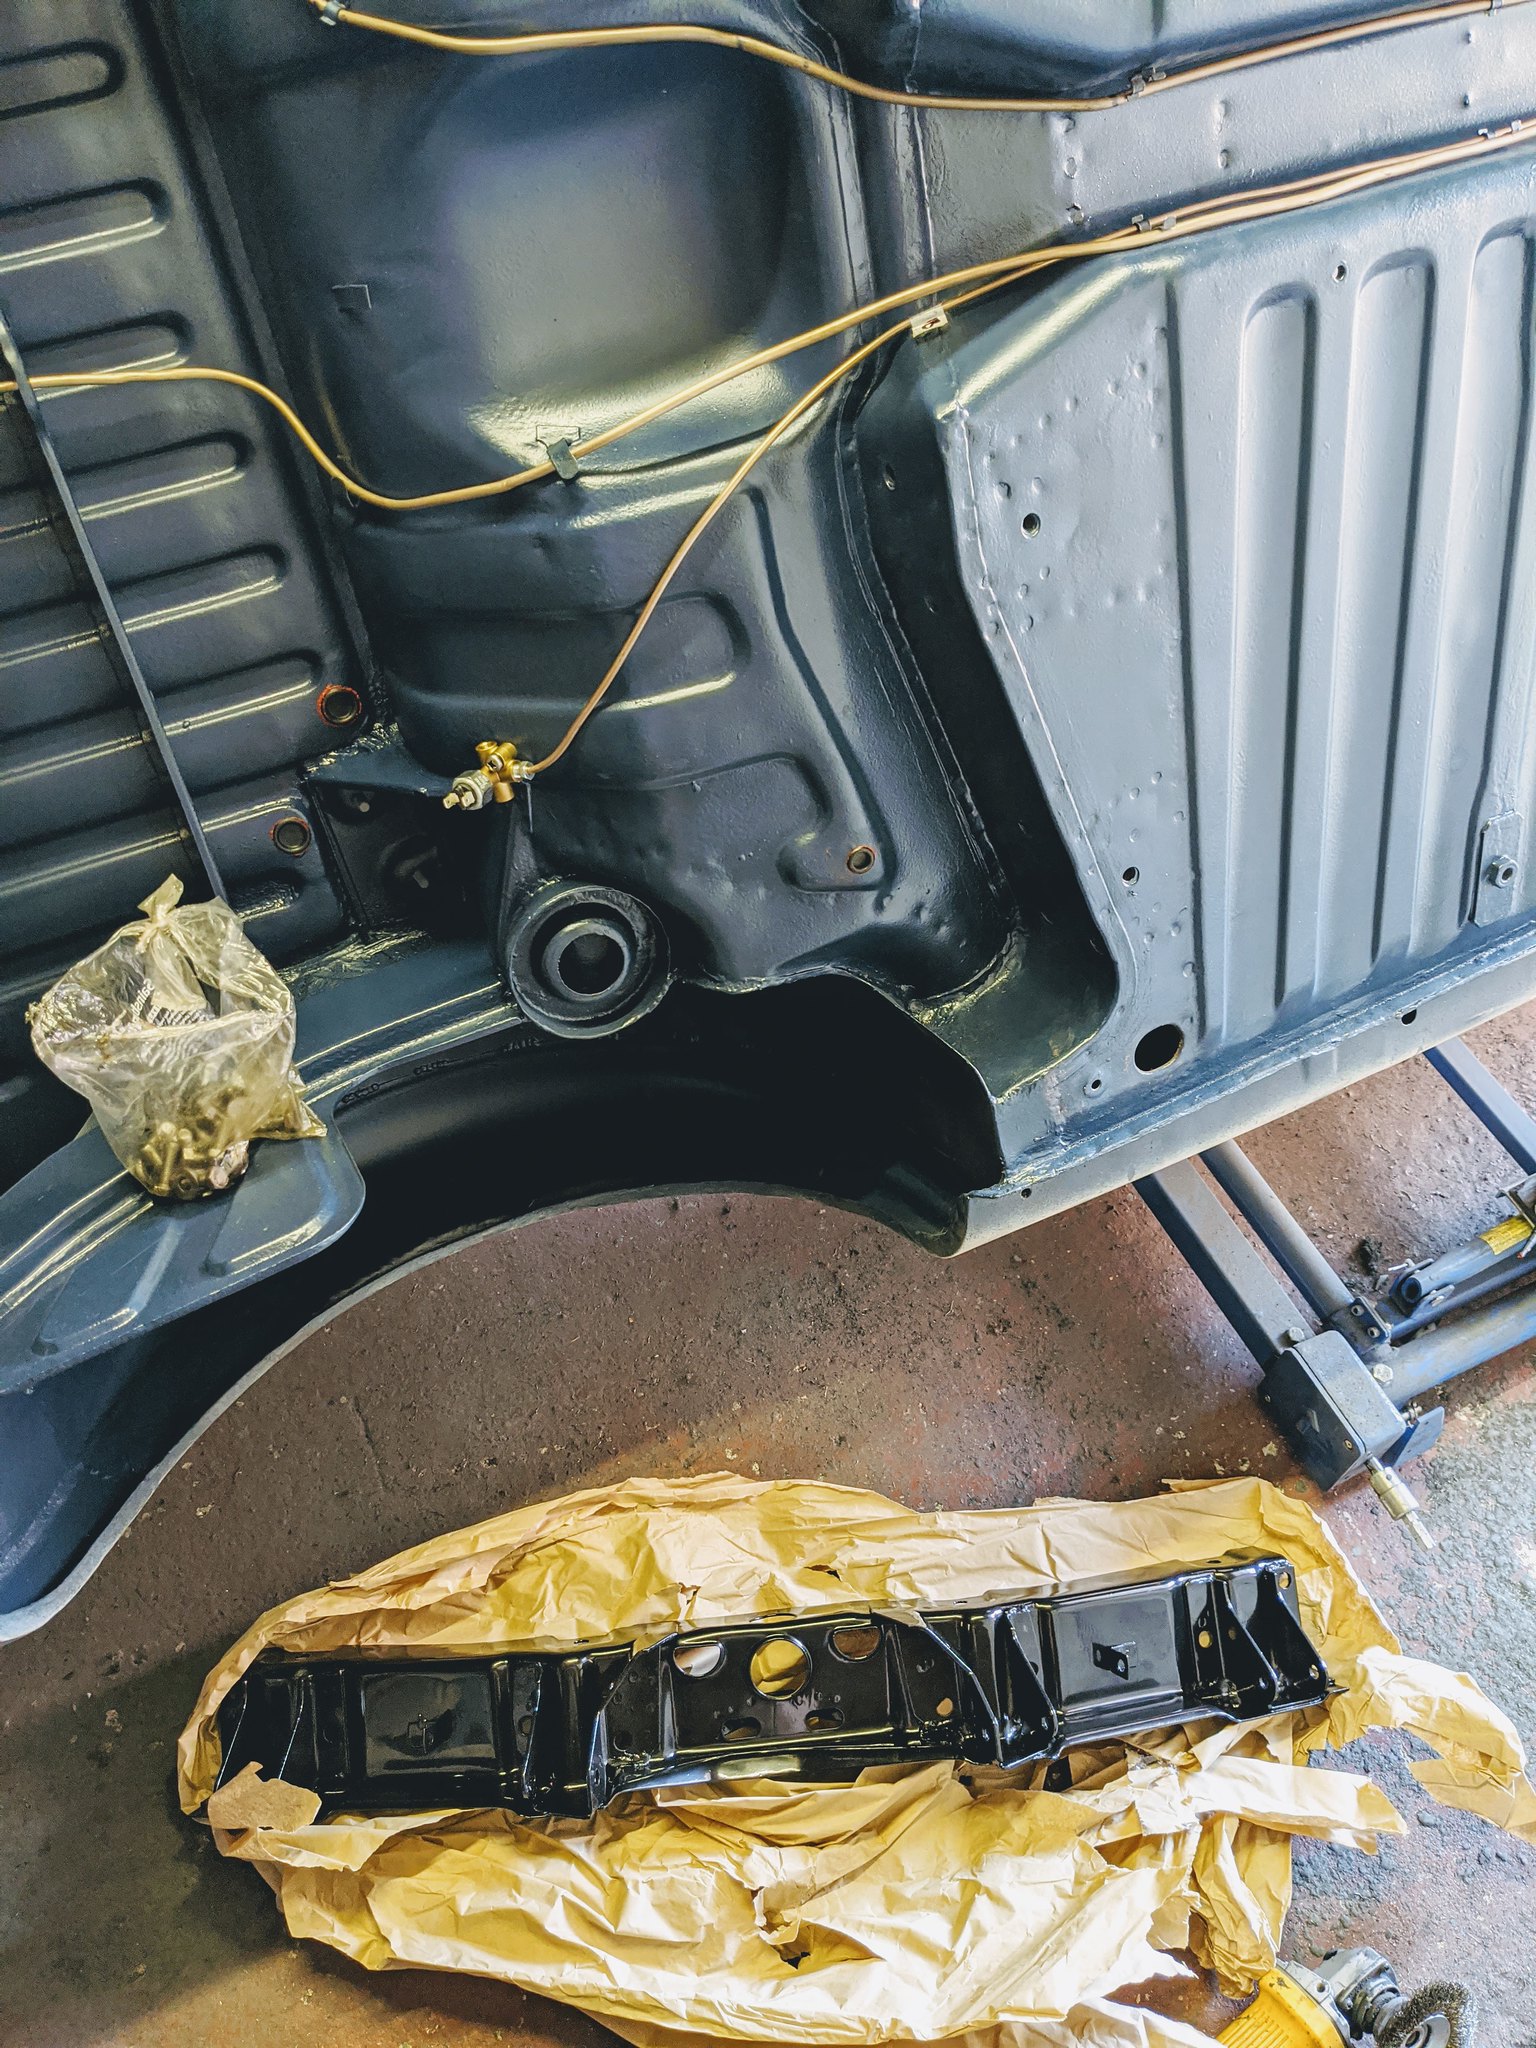
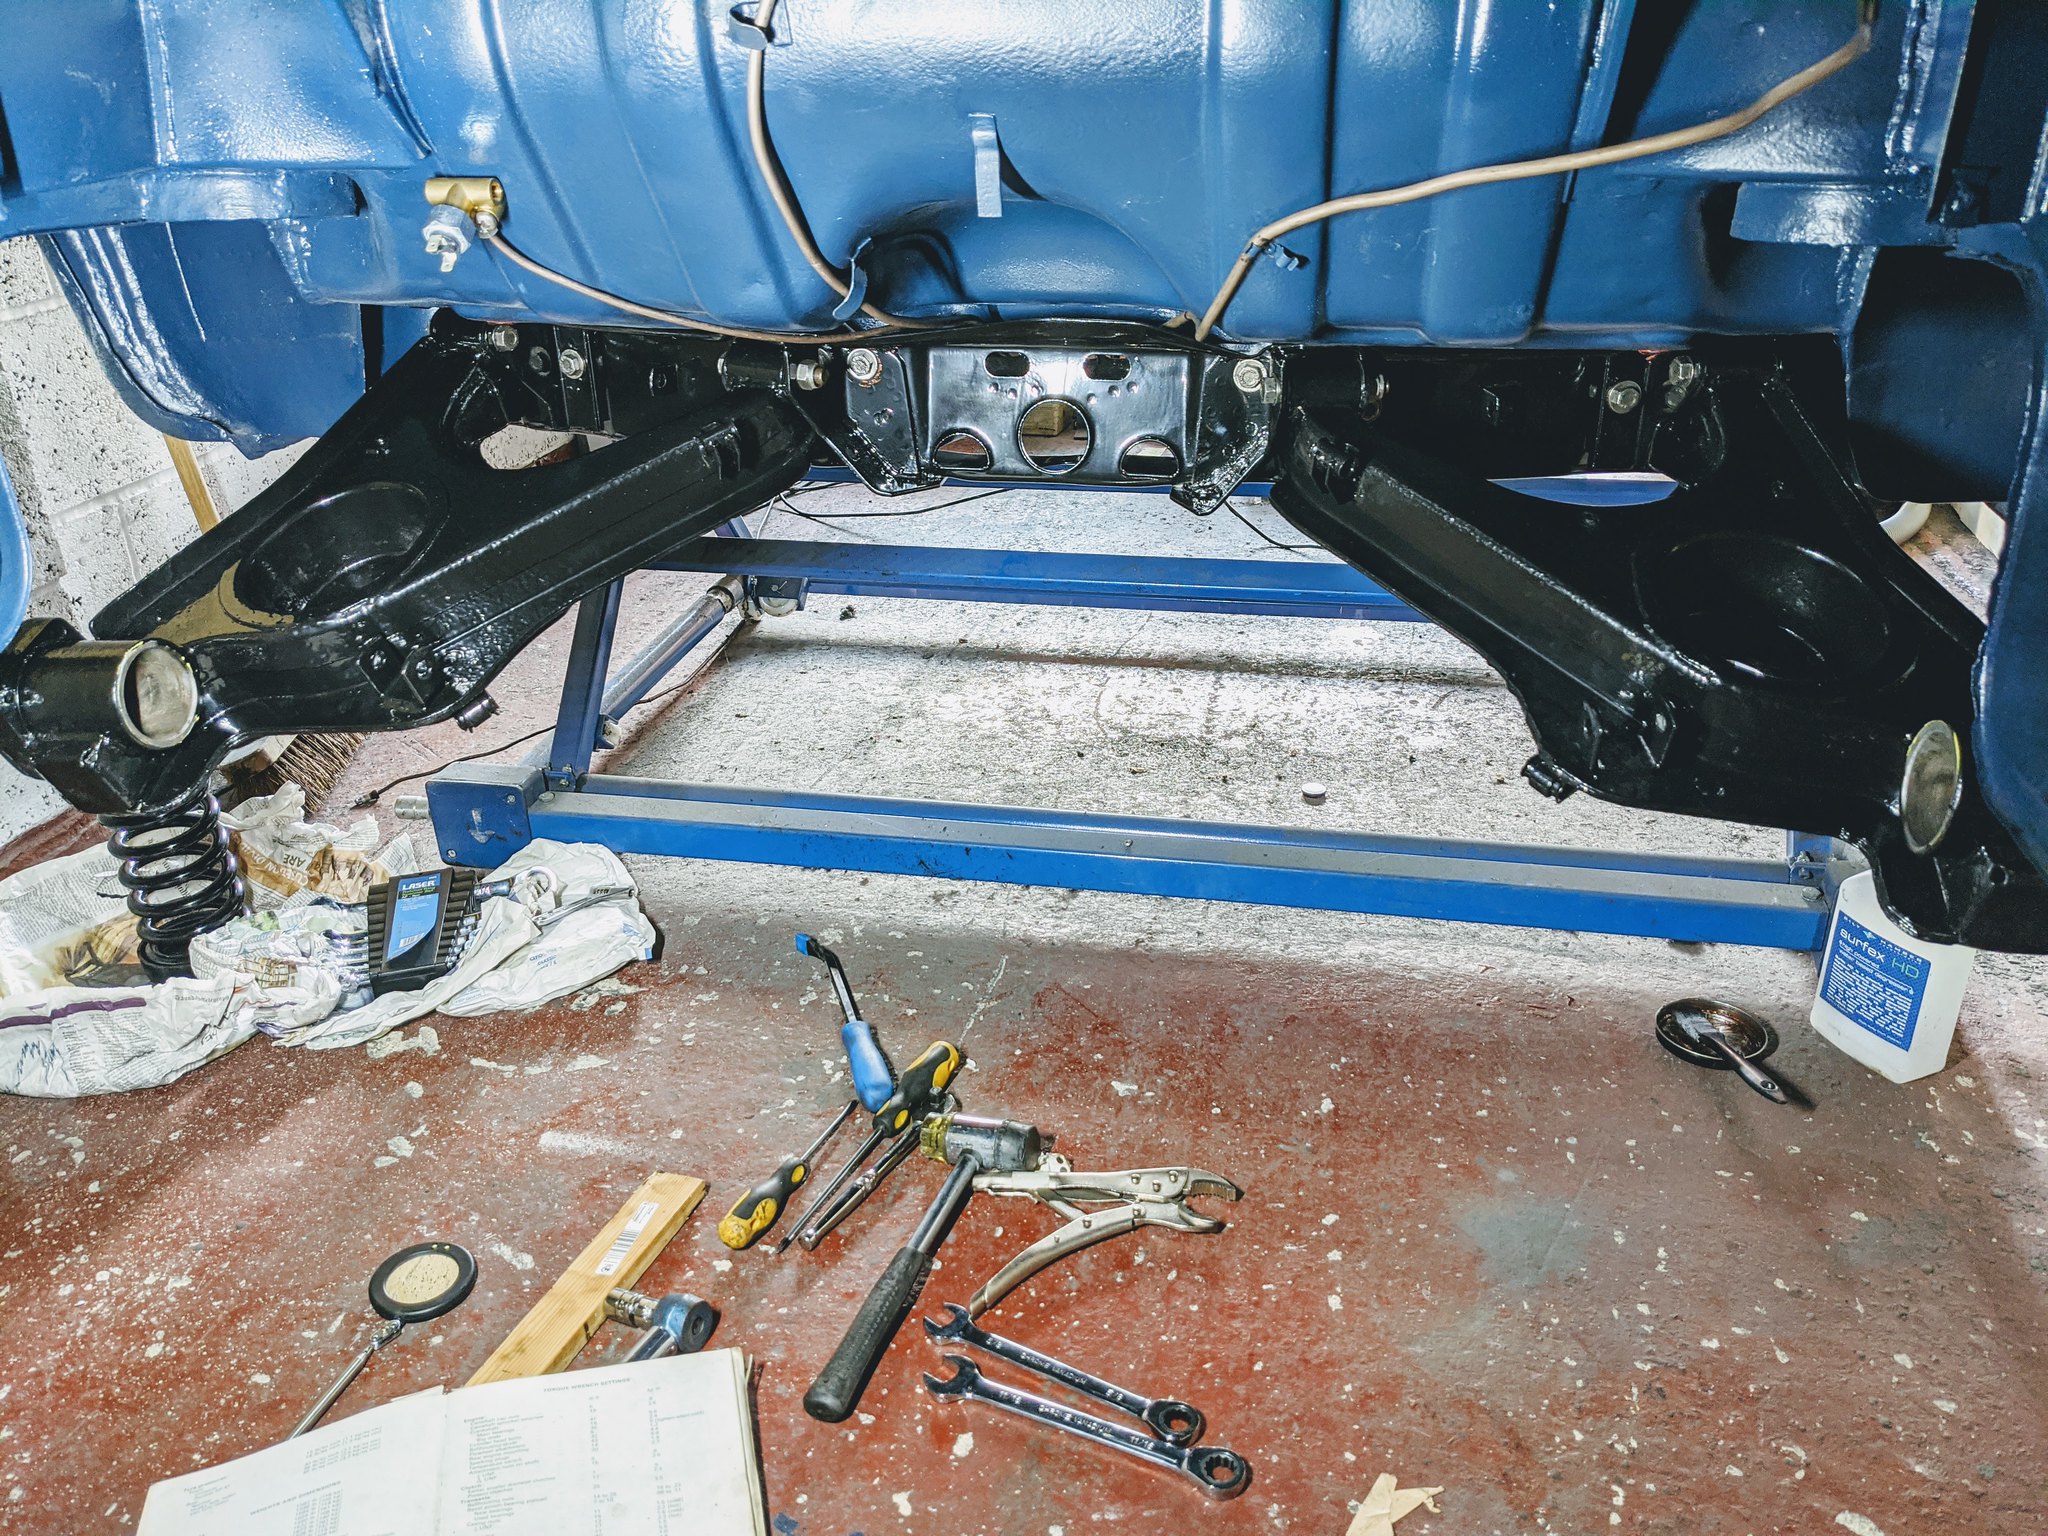
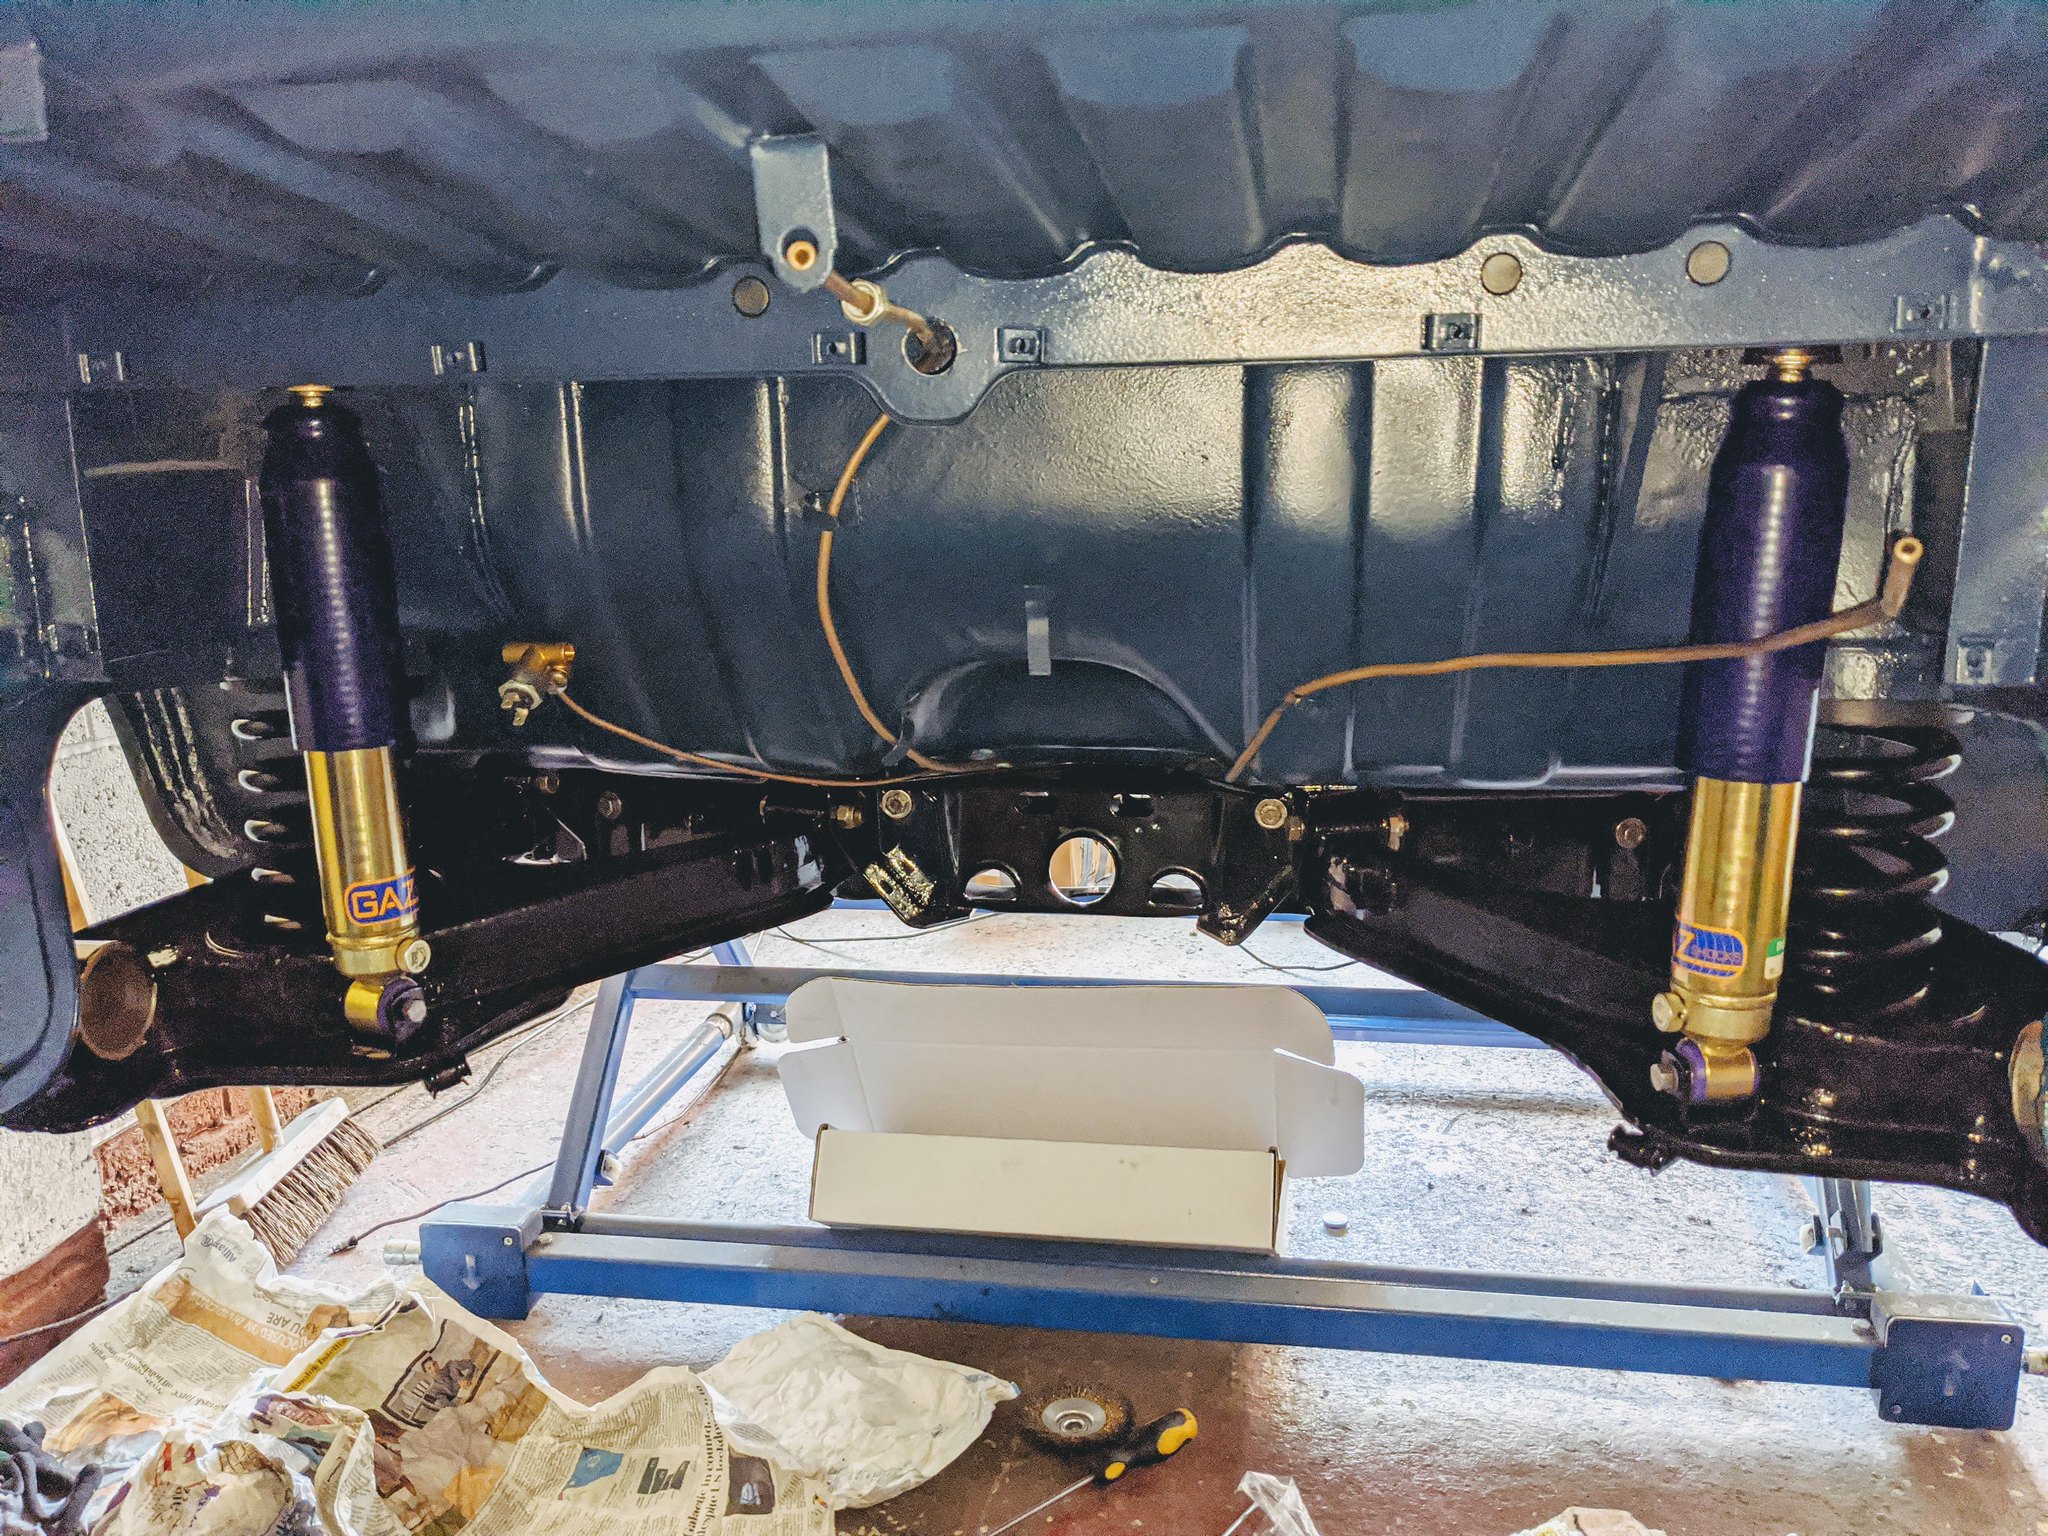
Roughly fitted all the brake/fuel and clutch lines to the car, which my word is a pig of a job! I do still have the pipes to both master cylinders to do, but I'll tackle that later. Getting these lines in meant that I could start bolting the rear suspension back together!
 IMG_20200811_120605 by Godfrey Hatton, on Flickr
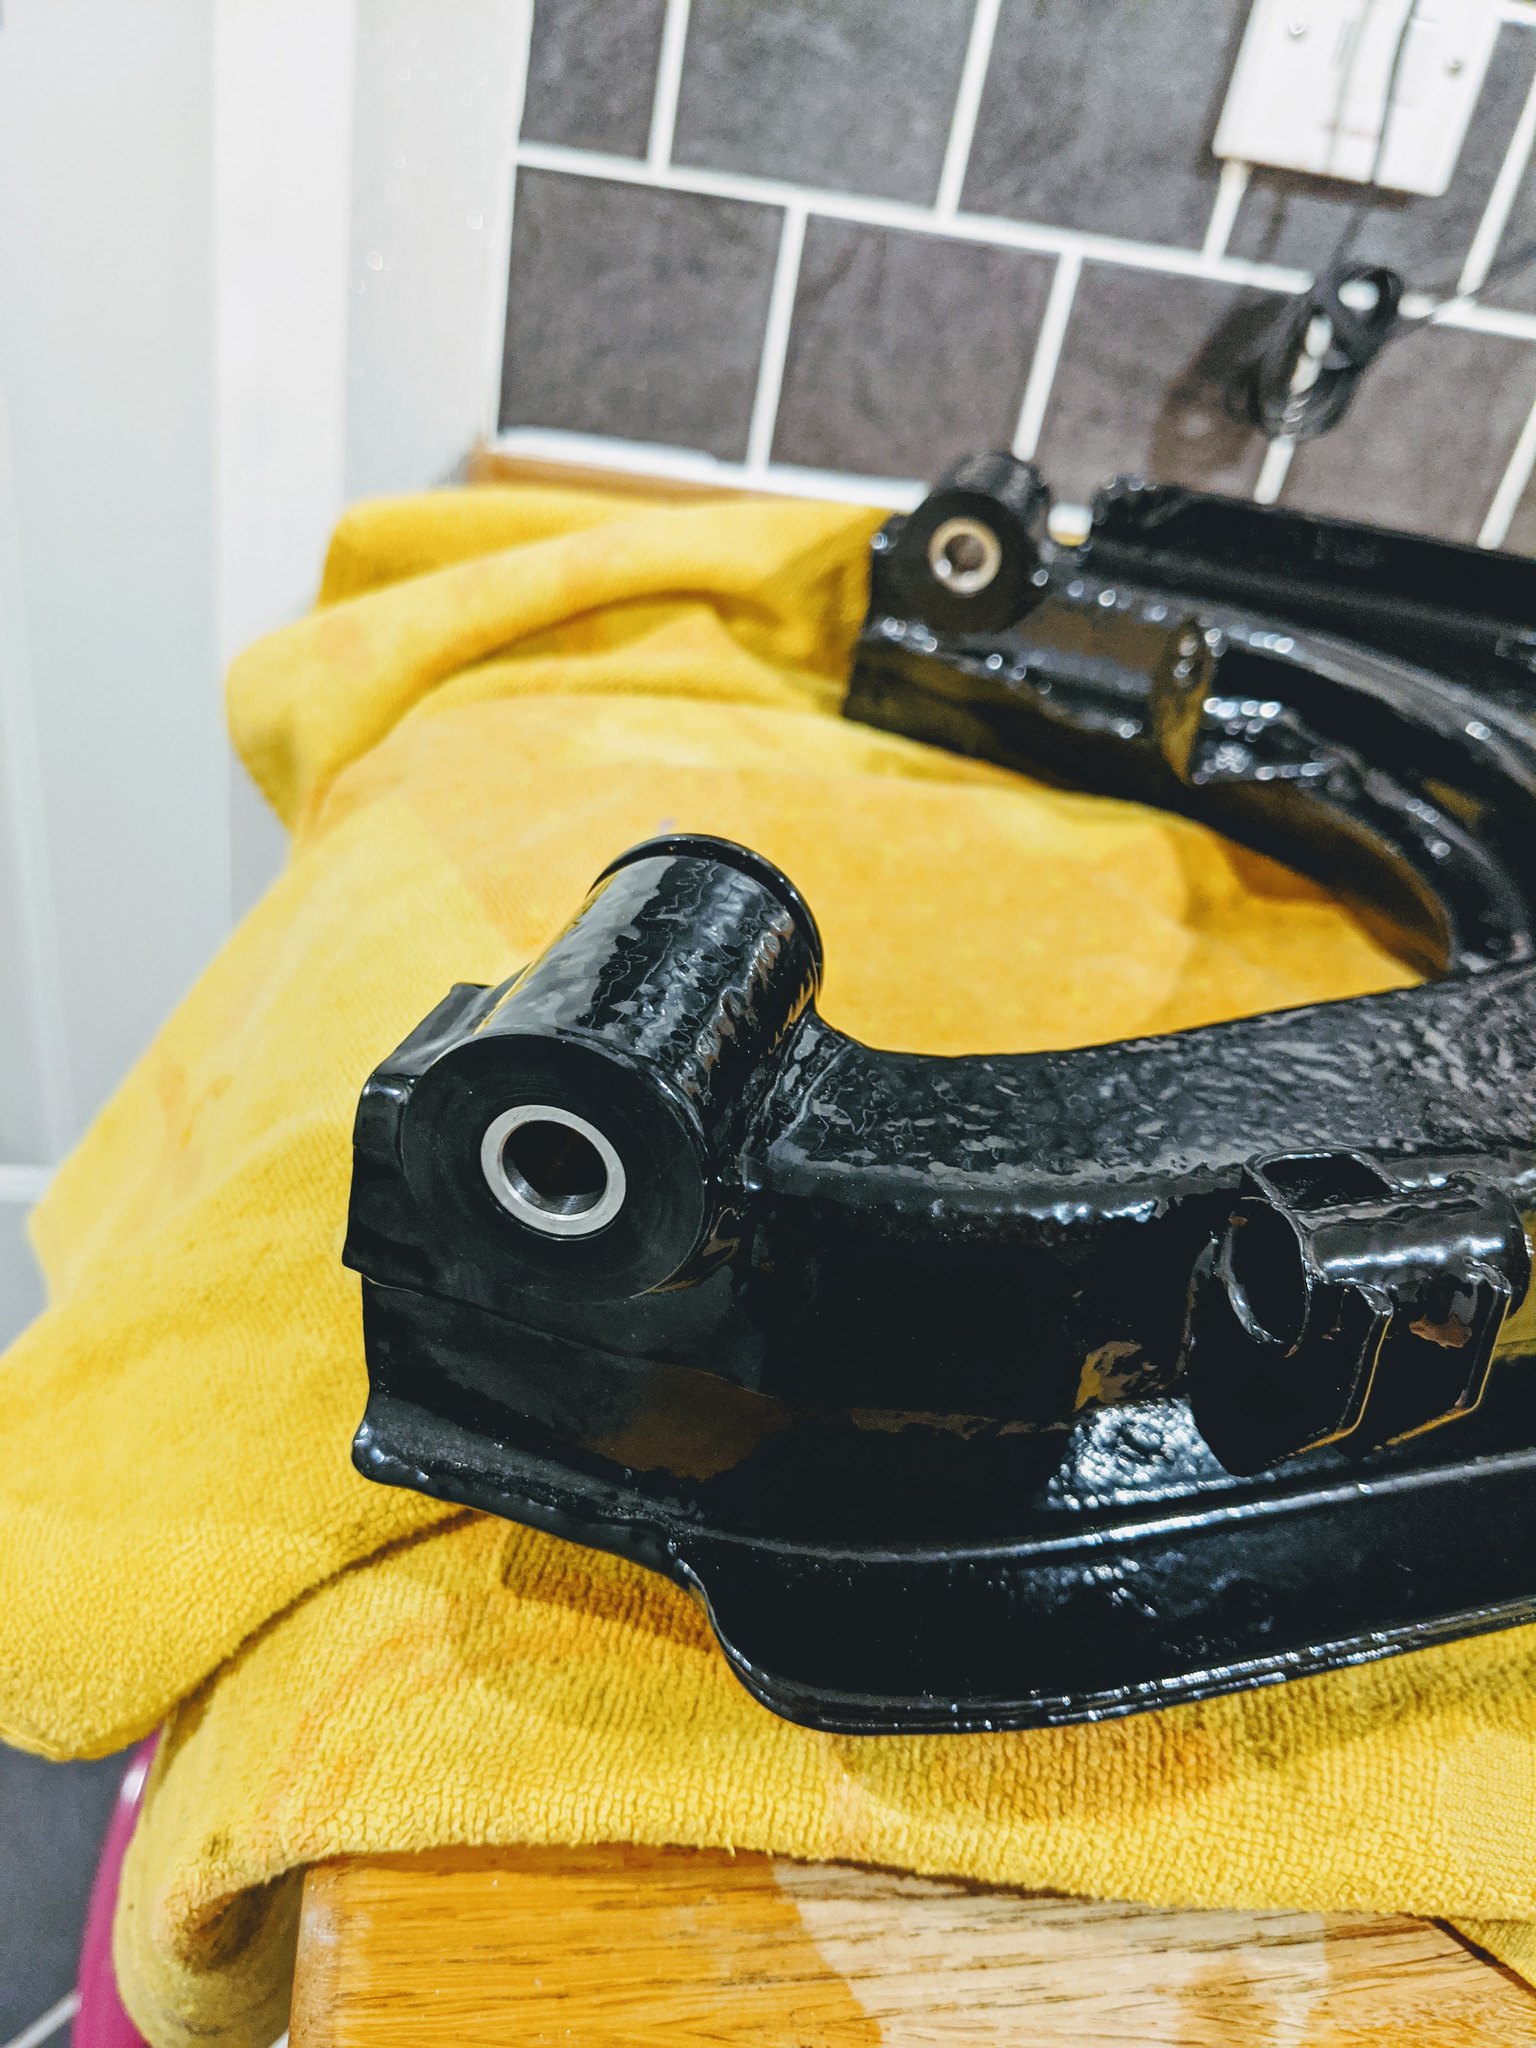
I sent all the suspension components away for blasting and powedercoating, it's awesome to be bolting them back on looking so new. With the cross member bolted and torqued down I could move onto the trailing arms. I've gone for polybushes for their longevity and improved handling. Putting the bushes in the freezer and leaving the arm in the sun for 20mins made the job of pressing them in much easier:
 IMG_20200811_215804 by Godfrey Hatton, on Flickr
Next went the trailing arms onto the crossmember. I assumed that bolting things on would be much easier than taking them apart, but my word was it a struggle getting the bolt holes lined up on my own! Probably didn't help that I tried this in the 30 degree heatwave we were having, but ah well. It's all character building stuff eh
 IMG_20200812_163038 by Godfrey Hatton, on Flickr
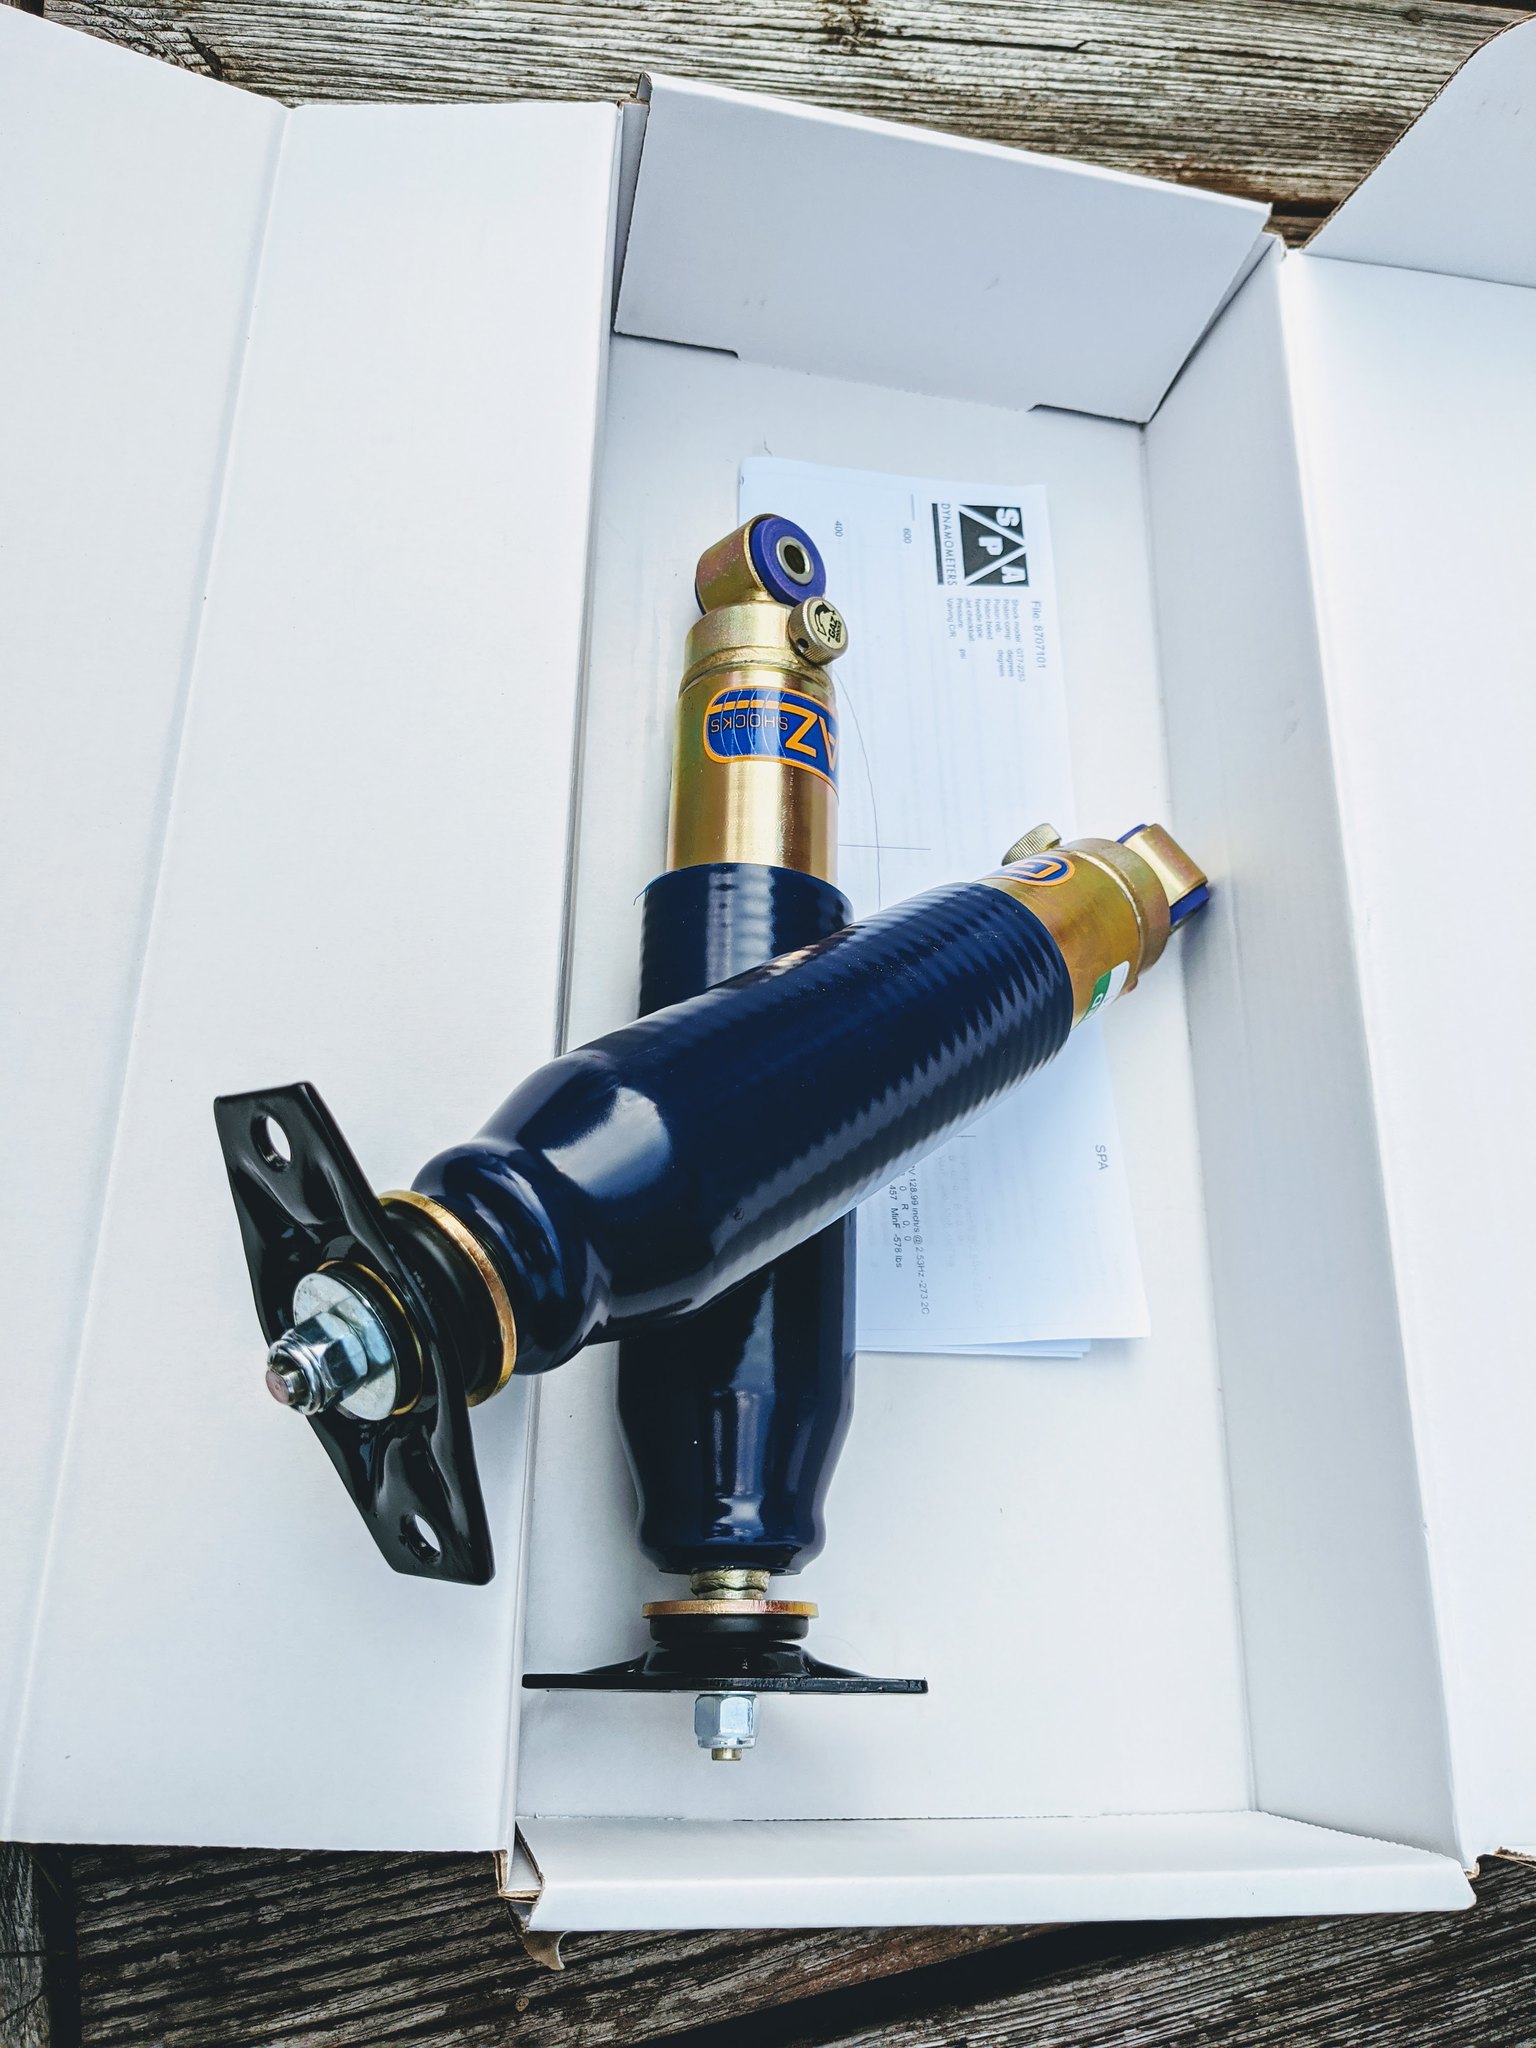
Before I could offer the springs/dampers up I wanted to tidy up the brackets from the old dampers as they looked terrible next to everything shiny and new. So I stripped them down and painted them so they were like new too:
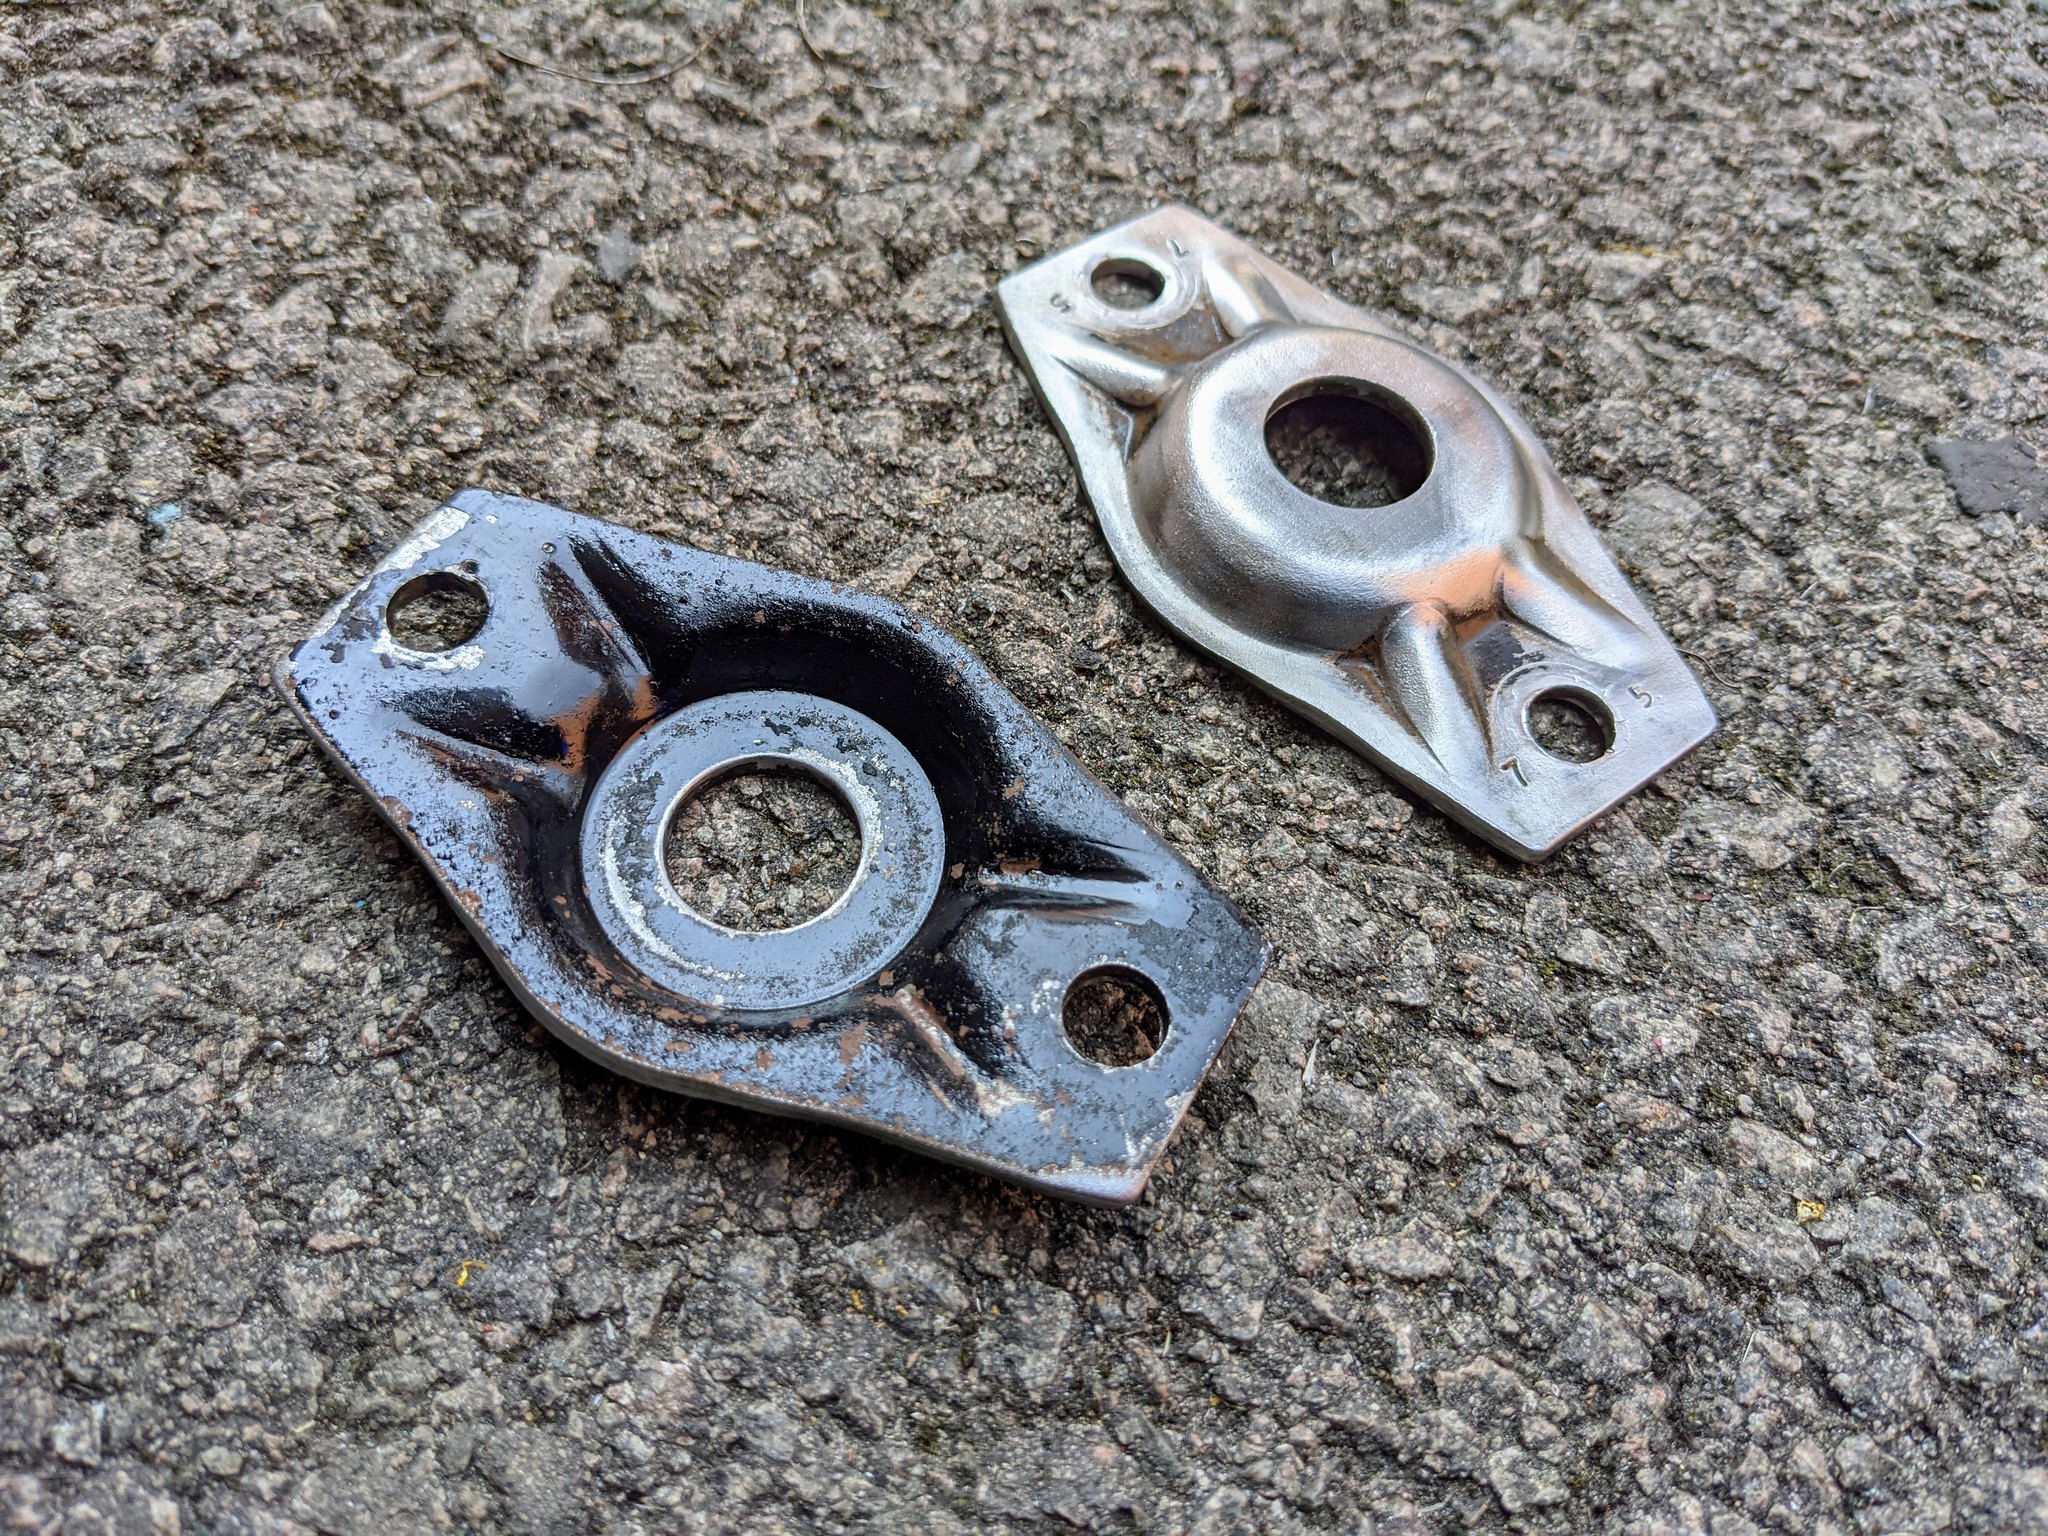 IMG_20200812_124445 by Godfrey Hatton, on Flickr
 IMG_20200812_163437 by Godfrey Hatton, on Flickr
Much better! With the brackets fitted to the new dampers, I soon realised a problem - the original dampers have a very thin sleeved nut so that it sits within the recess of the bracket. You can see that Gaz supply their dampers with a standard Nyloc nut and that the top of the thread actually protrudes the top of the bracket, this means it fowls the body under the parcel shelf when I tried offering up the new shock. Has anyone else come across this same issue? It only seems to be fouling by a few mm, could I simply grind a bit off that's sticking proud of the nut? Or I could put some washers between the nuts that hold the damper on to act as spacers (although I'm not keen on the damper sitting higher than it should do)? Or would you recommend I contact Gaz? Can't really be bothered with the hassle though and I understand that not all aftermarket items are a straight swap, so it's expected some modifications might be required? Once again this is new ground for me, so I welcome your advice!
Pog
Made some good progress on the car - here's what I've been up to:
Roughly fitted all the brake/fuel and clutch lines to the car, which my word is a pig of a job! I do still have the pipes to both master cylinders to do, but I'll tackle that later. Getting these lines in meant that I could start bolting the rear suspension back together!
IMG_20200811_120605 by Godfrey Hatton, on Flickr I sent all the suspension components away for blasting and powedercoating, it's awesome to be bolting them back on looking so new. With the cross member bolted and torqued down I could move onto the trailing arms. I've gone for polybushes for their longevity and improved handling. Putting the bushes in the freezer and leaving the arm in the sun for 20mins made the job of pressing them in much easier:
IMG_20200811_215804 by Godfrey Hatton, on FlickrNext went the trailing arms onto the crossmember. I assumed that bolting things on would be much easier than taking them apart, but my word was it a struggle getting the bolt holes lined up on my own! Probably didn't help that I tried this in the 30 degree heatwave we were having, but ah well. It's all character building stuff eh
IMG_20200812_163038 by Godfrey Hatton, on FlickrBefore I could offer the springs/dampers up I wanted to tidy up the brackets from the old dampers as they looked terrible next to everything shiny and new. So I stripped them down and painted them so they were like new too:
IMG_20200812_124445 by Godfrey Hatton, on FlickrIMG_20200812_163437 by Godfrey Hatton, on FlickrMuch better! With the brackets fitted to the new dampers, I soon realised a problem - the original dampers have a very thin sleeved nut so that it sits within the recess of the bracket. You can see that Gaz supply their dampers with a standard Nyloc nut and that the top of the thread actually protrudes the top of the bracket, this means it fowls the body under the parcel shelf when I tried offering up the new shock. Has anyone else come across this same issue? It only seems to be fouling by a few mm, could I simply grind a bit off that's sticking proud of the nut? Or I could put some washers between the nuts that hold the damper on to act as spacers (although I'm not keen on the damper sitting higher than it should do)? Or would you recommend I contact Gaz? Can't really be bothered with the hassle though and I understand that not all aftermarket items are a straight swap, so it's expected some modifications might be required? Once again this is new ground for me, so I welcome your advice!
Pog
Young Imp Members Registrar
-
617sqn
- Posts: 1146
- Joined: Fri Dec 05, 2003 11:17 pm
- Club Member: Yes
- Car Model: Hillman Imp 1972
- Location: Sussex, England.
Re: EHK 744G - 1969 Super
Looking great : fabulous progress there  . As for the dampers, i assume that they are metric treaded whereas the originals are unlikely to be, so the sleeve nut wont work as a straight swap. So... You could dismantle the top mount and grind off a little of the thread, providing the nylon part of the nyloc is still contacting the thread properly. Or, how about sourcing some suitable metric half nuts and using them - nut and locking nut fashion ? That might give you another option but still you would need to remove some of the thread... Could you (or would you even want to) give the shelf a little nudge in the right place to give clearance ? Lastly, a washer or two on the top of the damper rod prior to fitting the rubbers might make it low enough ? I think that clearance will be required to prevent the damper rod from touching the shelf as, under certain conditions, the rubber will compress enough for contact to be made. Might transfer some noise....
Andy G
Andy G
Member No. 7500, and Stan's best mate.
-
The Nun
- Posts: 2928
- Joined: Tue Jan 23, 2007 7:02 pm
- Club Member: Yes
- Car Model: Imp
- Location: South
- Has thanked: 76 times
- Been thanked: 104 times
Re: EHK 744G - 1969 Super
The original shock top nuts were staked in 3 positions too to hold them secure, I would use a locking fluid when you assemble them this time.
Peter Nunn...ey im member 00033
-
Pog
- Posts: 142
- Joined: Sat Aug 24, 2013 4:55 pm
- Club Member: Yes
- Car Model: 1969 Super 'Betty'
- Location: Northampton, UK
- Has thanked: 10 times
- Been thanked: 37 times
Re: EHK 744G - 1969 Super
Thanks guys, good to know my initial thought of simply grinding off the top thread is indeed an acceptable solution. That top bit that sticks out from the nut isn't threaded anyway, so shouldn't be any issues. As this project progresses I do feel like I'm getting better at spotting potential issues and actually knowing how to resolve them. Good advice about the loctite, I'll be sure to use that.
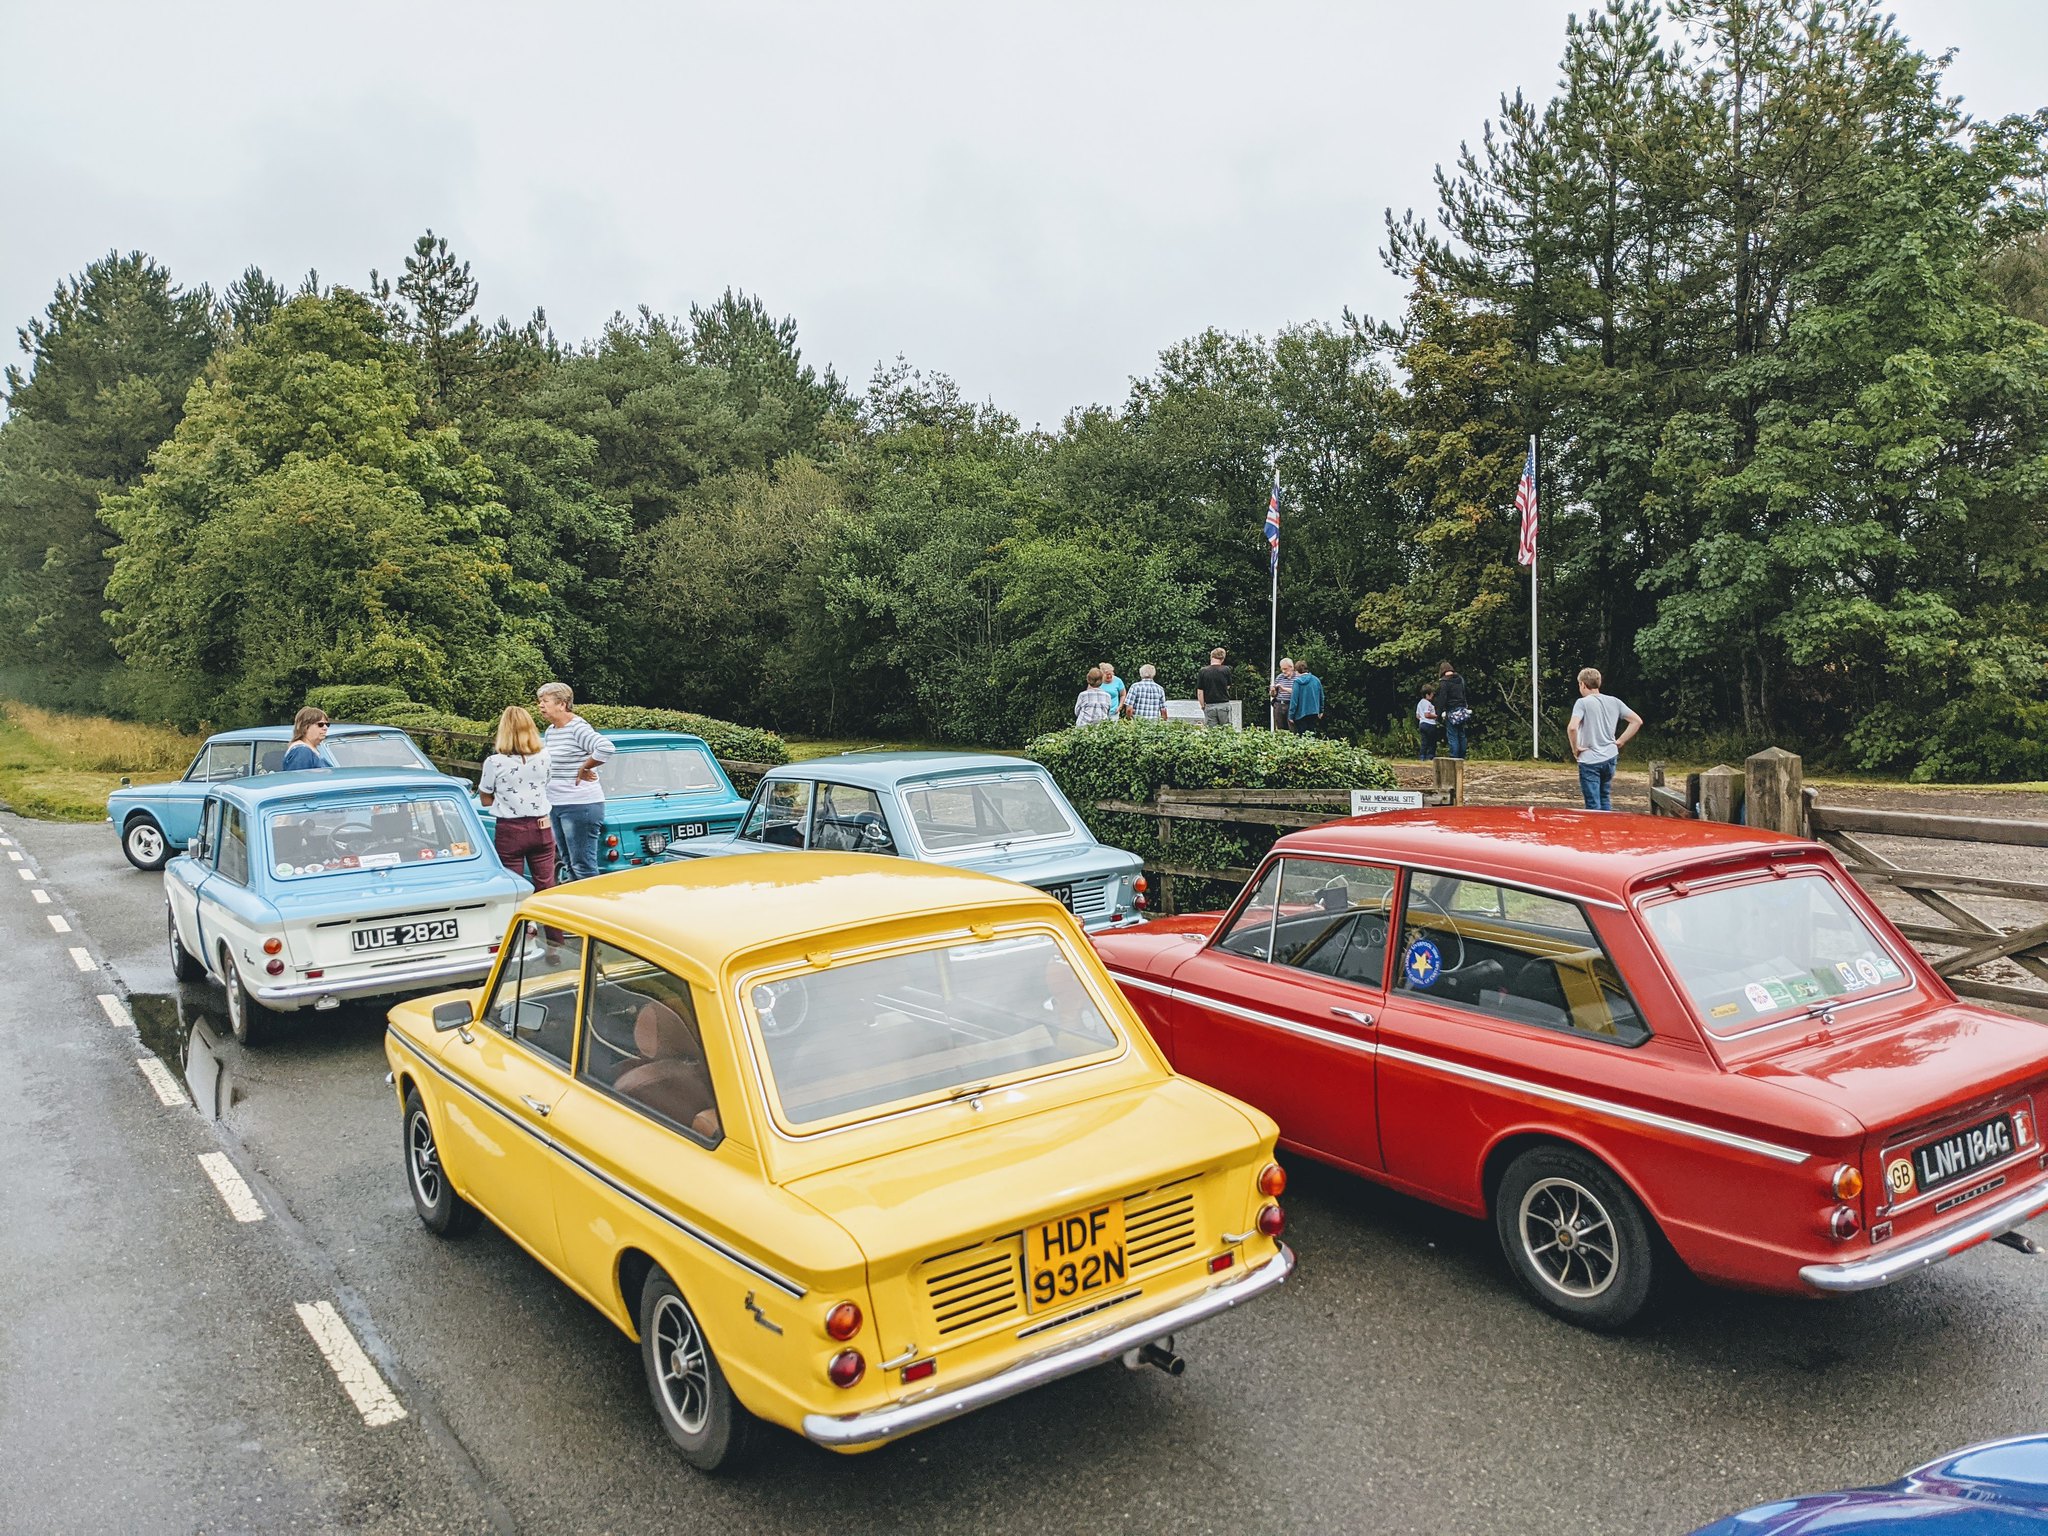
I want to share how my Sunday was spent, as it was most enjoyable and very much related to my project - it was the Northampton Area Centre socially distant run, where a total of 6 imps and a few moderns (myself included) all met in Stoke Bruerne before driving round some fine Northamptonshire countryside until we stopped at Twywell Gullet for a socially distant picnic and good catch up. What was particularly funny was passing the Northampton Classic Mini club doing the same thing! You can imagine the comments from both sides with windows down, very amusing indeed
 IMG_20200816_113042 by Godfrey Hatton, on Flickr
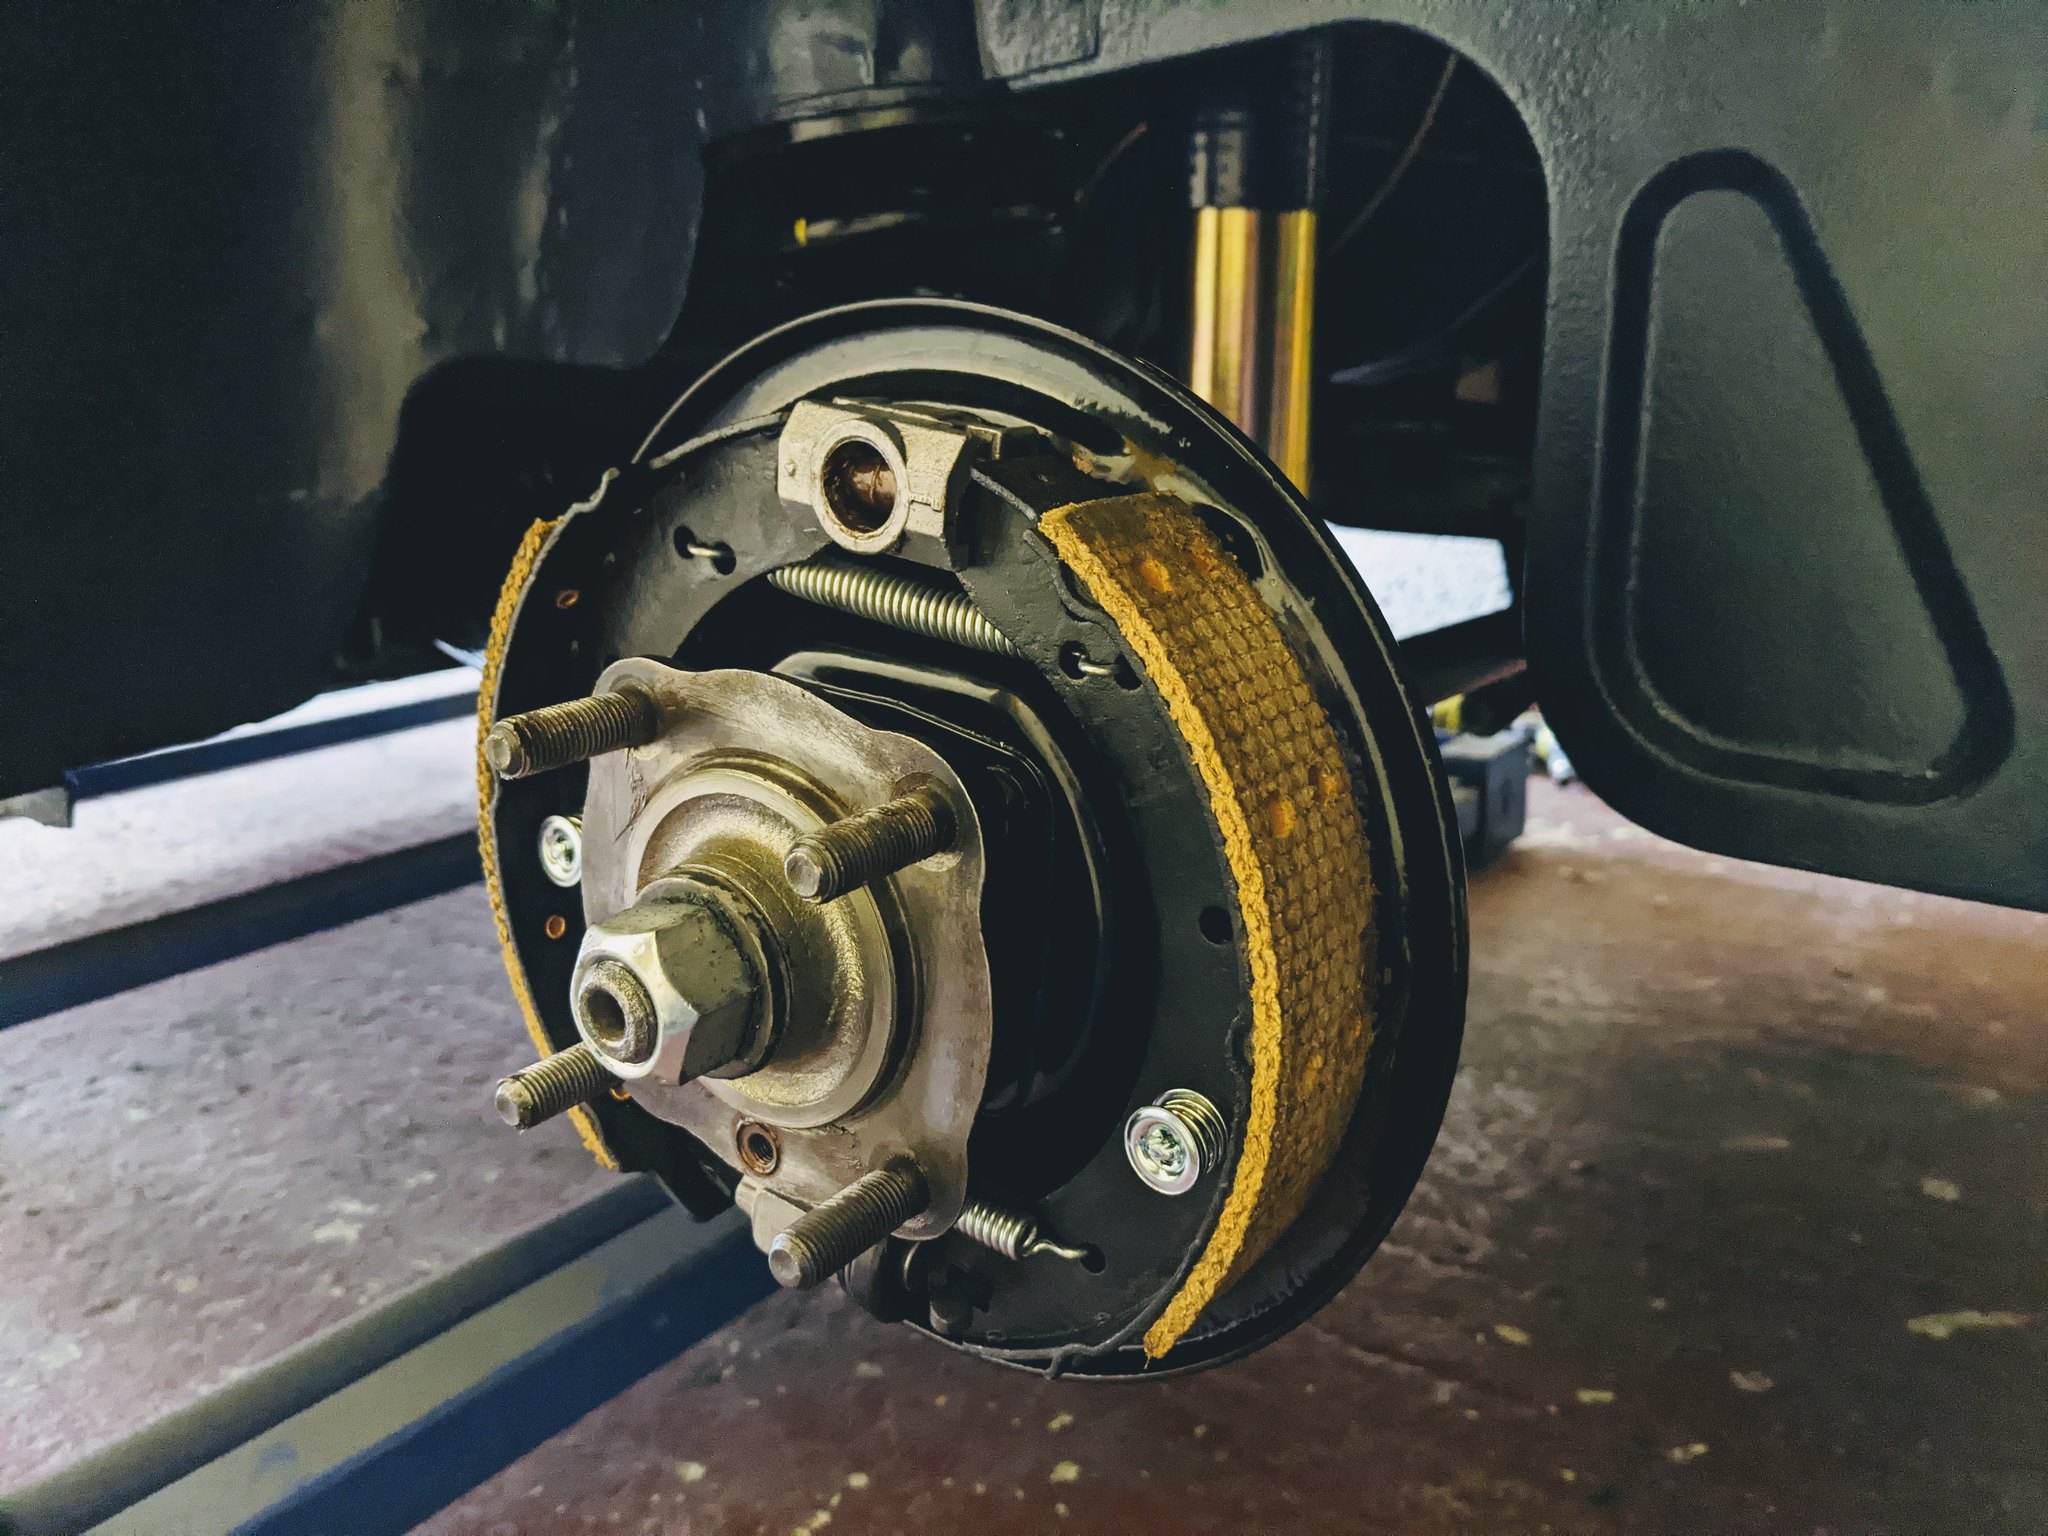
Now I thought I'd bring along a little group activity to keep us all entertained and make the most of more experienced impers than myself - I brought along everything I needed to build up my drum brakes! Everything behind the drums were already removed from my car when I got it, so I had no idea what order things went back on. Everyone thought I was mad wanting to do this in the middle of a field, but told everyone that I need the practice fixing my car in the middle of nowhere! Something I'm sure every Imp owner experiences at least once
 IMG-20200816-WA0001 by Godfrey Hatton, on Flickr
We successfully built up one of the rears, however found that I'd been inadvertently sent an incorrect set of horse shoe clips to do the other rear. And found that the fronts really need to be built in a vice or on the car as the front shoe springs are much stiffer and we couldn't get the leverage on them. Nevertheless, I'm delighted with what we achieved and am now confident to tackle the rest on my own now I've been shown how to do it properly. It's truly what the Imp Club is all about and I love being part of such a wonderful, helpful group of people.
Pog
I want to share how my Sunday was spent, as it was most enjoyable and very much related to my project - it was the Northampton Area Centre socially distant run, where a total of 6 imps and a few moderns (myself included) all met in Stoke Bruerne before driving round some fine Northamptonshire countryside until we stopped at Twywell Gullet for a socially distant picnic and good catch up. What was particularly funny was passing the Northampton Classic Mini club doing the same thing! You can imagine the comments from both sides with windows down, very amusing indeed
IMG_20200816_113042 by Godfrey Hatton, on FlickrNow I thought I'd bring along a little group activity to keep us all entertained and make the most of more experienced impers than myself - I brought along everything I needed to build up my drum brakes! Everything behind the drums were already removed from my car when I got it, so I had no idea what order things went back on. Everyone thought I was mad wanting to do this in the middle of a field, but told everyone that I need the practice fixing my car in the middle of nowhere! Something I'm sure every Imp owner experiences at least once
IMG-20200816-WA0001 by Godfrey Hatton, on FlickrWe successfully built up one of the rears, however found that I'd been inadvertently sent an incorrect set of horse shoe clips to do the other rear. And found that the fronts really need to be built in a vice or on the car as the front shoe springs are much stiffer and we couldn't get the leverage on them. Nevertheless, I'm delighted with what we achieved and am now confident to tackle the rest on my own now I've been shown how to do it properly. It's truly what the Imp Club is all about and I love being part of such a wonderful, helpful group of people.
Pog
Young Imp Members Registrar
-
johnh875
- Posts: 166
- Joined: Fri Sep 19, 2003 7:52 am
- Club Member: Yes
- Car Model: 64 Grp N race car, 66 Mk2, 68 Super
- Location: Melbourne Aust
- Has thanked: 8 times
- Been thanked: 12 times
Re: EHK 744G - 1969 Super
I trust there were some "nice car, but it's back to front" comments!
Imping (on & off) for 20+ years
-
Pog
- Posts: 142
- Joined: Sat Aug 24, 2013 4:55 pm
- Club Member: Yes
- Car Model: 1969 Super 'Betty'
- Location: Northampton, UK
- Has thanked: 10 times
- Been thanked: 37 times
Re: EHK 744G - 1969 Super
I was in my modern M**i a few cars back so didn't hear - I know, ironic right, driving a M**i on an Imp meet and passing the classic M**i club!
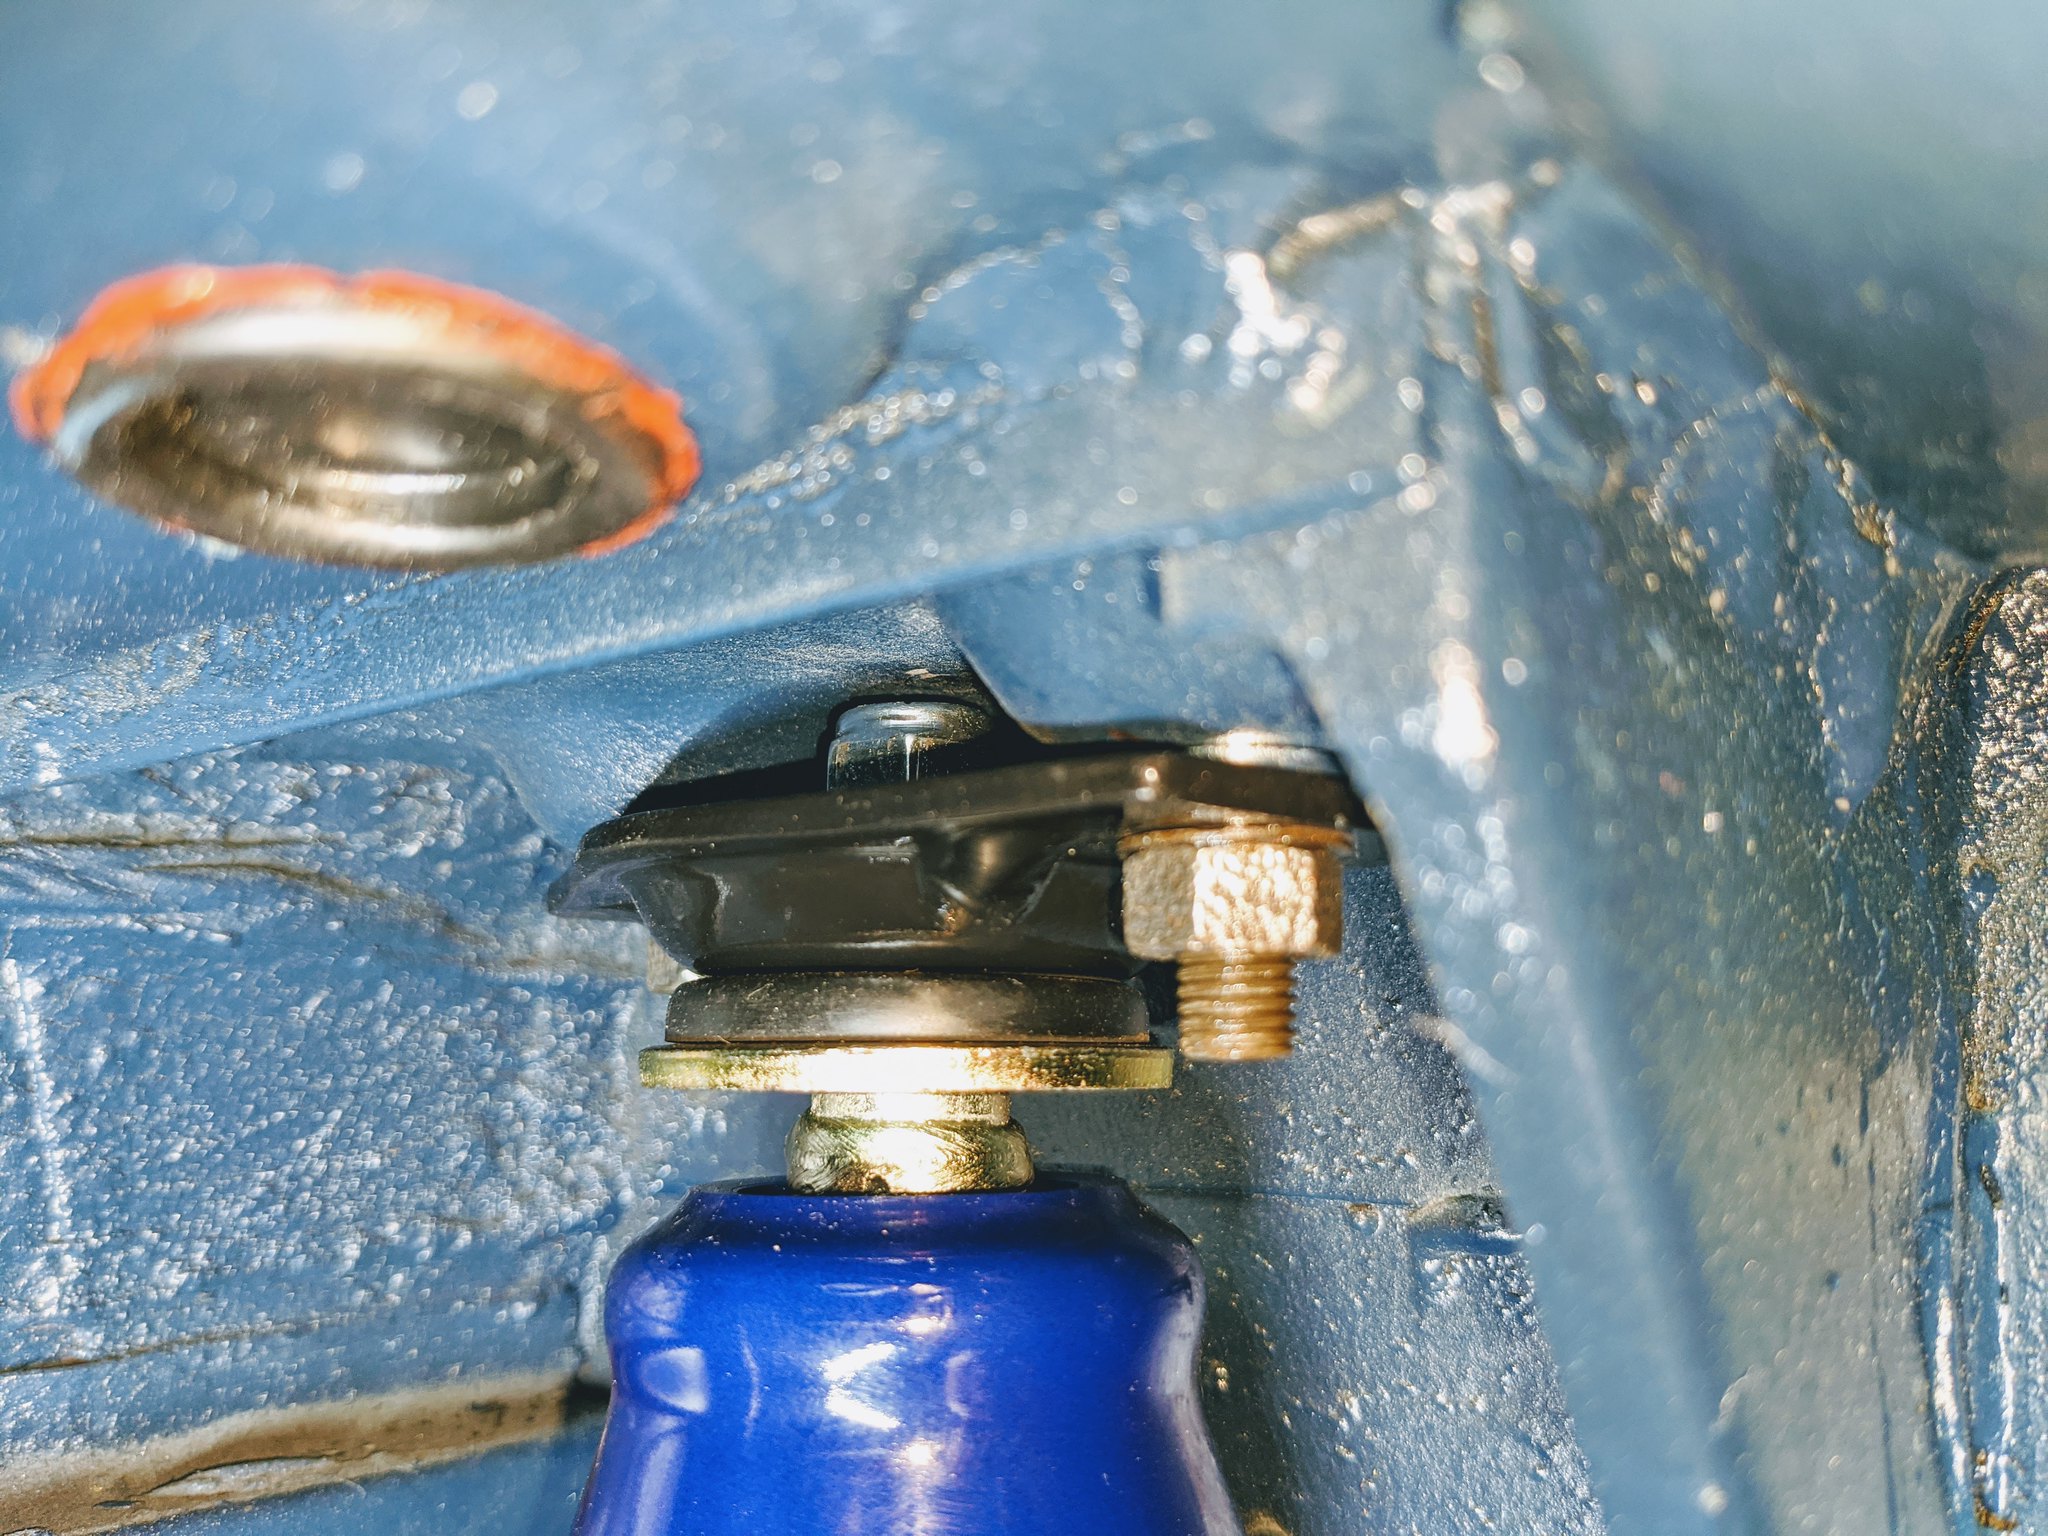
Made some more progress on the project. Pretty happy with how the rear dampers turned out - I ground down the unthreaded part that stuck out of the nut and added washers under the bracket to give a bit more clearance. It's tight but the damper doesn't foul the body anymore with a few mm spare, fingers crossed it's enough!
 IMG_20200823_115305 by Godfrey Hatton, on Flickr
With the dampers sorted I could get the springs in and bolt everything back together, which was a bit of a struggle on my own! But I made do with a jack and block of wood to raise the trailing arm enough for me to slide the lower damper bolt in place, seemed to work OK (if not a bit terrifying, compressed springs are scary things, now I understand!). Everything looks awesome now it's back on!
 IMG_20200823_125916 by Godfrey Hatton, on Flickr
I do have one slight concern - I've used Robin Human's (brilliant service) newly made rear spring rubbers. I did check with him that I was fitting them correctly as they didn't seem to fit in place as nice as the originals, but he's happy that I have. He's hoping that they will continue to settle but at the moment they do stick proud of the cone slightly. Could this cause any problems?
 received_324491358703041 by Godfrey Hatton, on Flickr
Pog
Made some more progress on the project. Pretty happy with how the rear dampers turned out - I ground down the unthreaded part that stuck out of the nut and added washers under the bracket to give a bit more clearance. It's tight but the damper doesn't foul the body anymore with a few mm spare, fingers crossed it's enough!
IMG_20200823_115305 by Godfrey Hatton, on FlickrWith the dampers sorted I could get the springs in and bolt everything back together, which was a bit of a struggle on my own! But I made do with a jack and block of wood to raise the trailing arm enough for me to slide the lower damper bolt in place, seemed to work OK (if not a bit terrifying, compressed springs are scary things, now I understand!). Everything looks awesome now it's back on!
IMG_20200823_125916 by Godfrey Hatton, on FlickrI do have one slight concern - I've used Robin Human's (brilliant service) newly made rear spring rubbers. I did check with him that I was fitting them correctly as they didn't seem to fit in place as nice as the originals, but he's happy that I have. He's hoping that they will continue to settle but at the moment they do stick proud of the cone slightly. Could this cause any problems?
received_324491358703041 by Godfrey Hatton, on FlickrPog
Young Imp Members Registrar
-
The Nun
- Posts: 2928
- Joined: Tue Jan 23, 2007 7:02 pm
- Club Member: Yes
- Car Model: Imp
- Location: South
- Has thanked: 76 times
- Been thanked: 104 times
Re: EHK 744G - 1969 Super
When you think the originals have been under compression for 50 years they are bound to be seated and squashed more.
Peter Nunn...ey im member 00033
-
moose
- Posts: 1109
- Joined: Wed Jan 28, 2004 11:41 am
- Club Member: Yes
- Car Model: rally imp
- Location: forton lancashire north england
- Has thanked: 4 times
- Been thanked: 212 times
Re: EHK 744G - 1969 Super
Car is coming along nicely and looking good. Couple of tips for you those nylocs will tap on the shell with the weight of the car acting against the damper. Do you have the original top hat nuts of your old dampers? Do GAZ use a UNF thread? if they do not you cannot use the top hat nuts off your old dampers or any say from club spares, i could make you some stainless steel top hat nuts if you want. When you have correct nuts take out the spacing washers and fit Nylocs and use coppasslip on the stud threads. When trying to seat the rubber cups use brake cleaner this makes the rubber as slippy as a slippy thing and push it home, then fit the spring into the rubber so it is sat square hold it up with your hand and then jack up arm (slight re-alignment to get bottom of spring into arm required but allows you to control the position of spring in rubber and get it held by the arm before any load is added) then jack up arm to compress spring as it is not properly and securely captive.
If you wanted to protect the area between rubber and shell you could always brush on some Dinitrol or waxoyl to the shell and the rubber cup this will also make it slippy and seat in the shell easily.
If you wanted to protect the area between rubber and shell you could always brush on some Dinitrol or waxoyl to the shell and the rubber cup this will also make it slippy and seat in the shell easily.
Regards Moose imp competition secretary
-
Pog
- Posts: 142
- Joined: Sat Aug 24, 2013 4:55 pm
- Club Member: Yes
- Car Model: 1969 Super 'Betty'
- Location: Northampton, UK
- Has thanked: 10 times
- Been thanked: 37 times
Re: EHK 744G - 1969 Super
Thank you all for your advice. I've ordered some more suitable nuts for the rear dampers so I can improve on what's already fitted. Until they arrive I wanted to make a start on the front suspension, but I can't crack on with that until the rest of the plumbing to the master cylinders is done... And I can't do that until the pedal box and new master cylinders are refurbished! Car restoration is just a series of little snowballs isn't it 
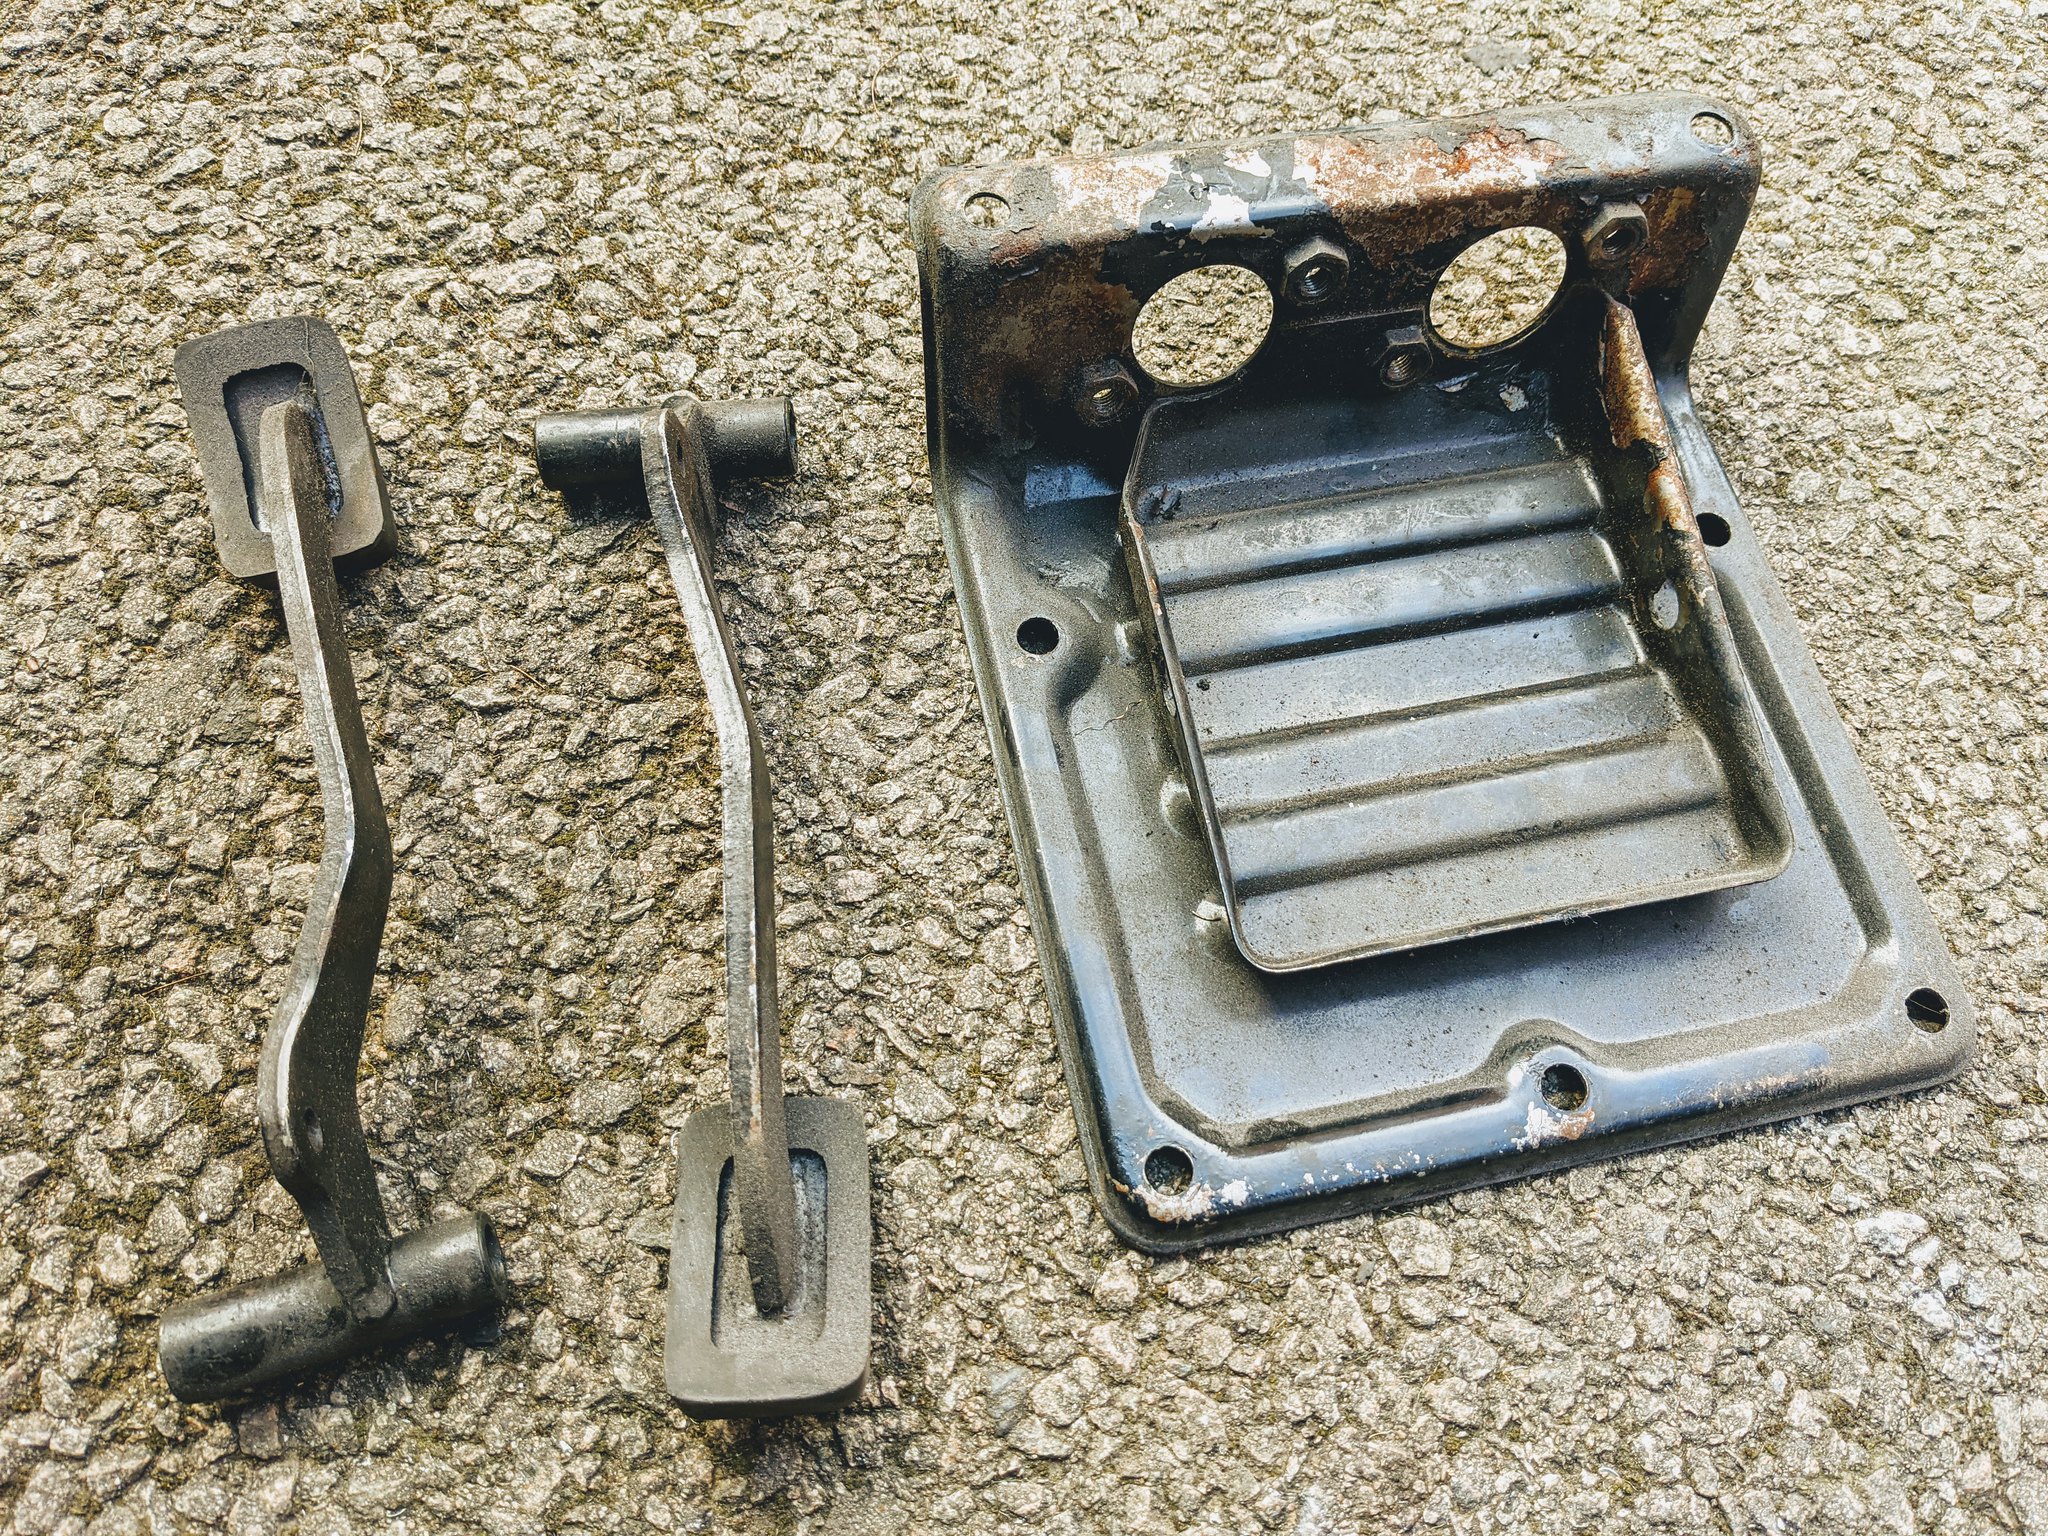
So here's how I got on. The old pedal box was looking rather sorry for itself:
 IMG_20200831_121023 by Godfrey Hatton, on Flickr
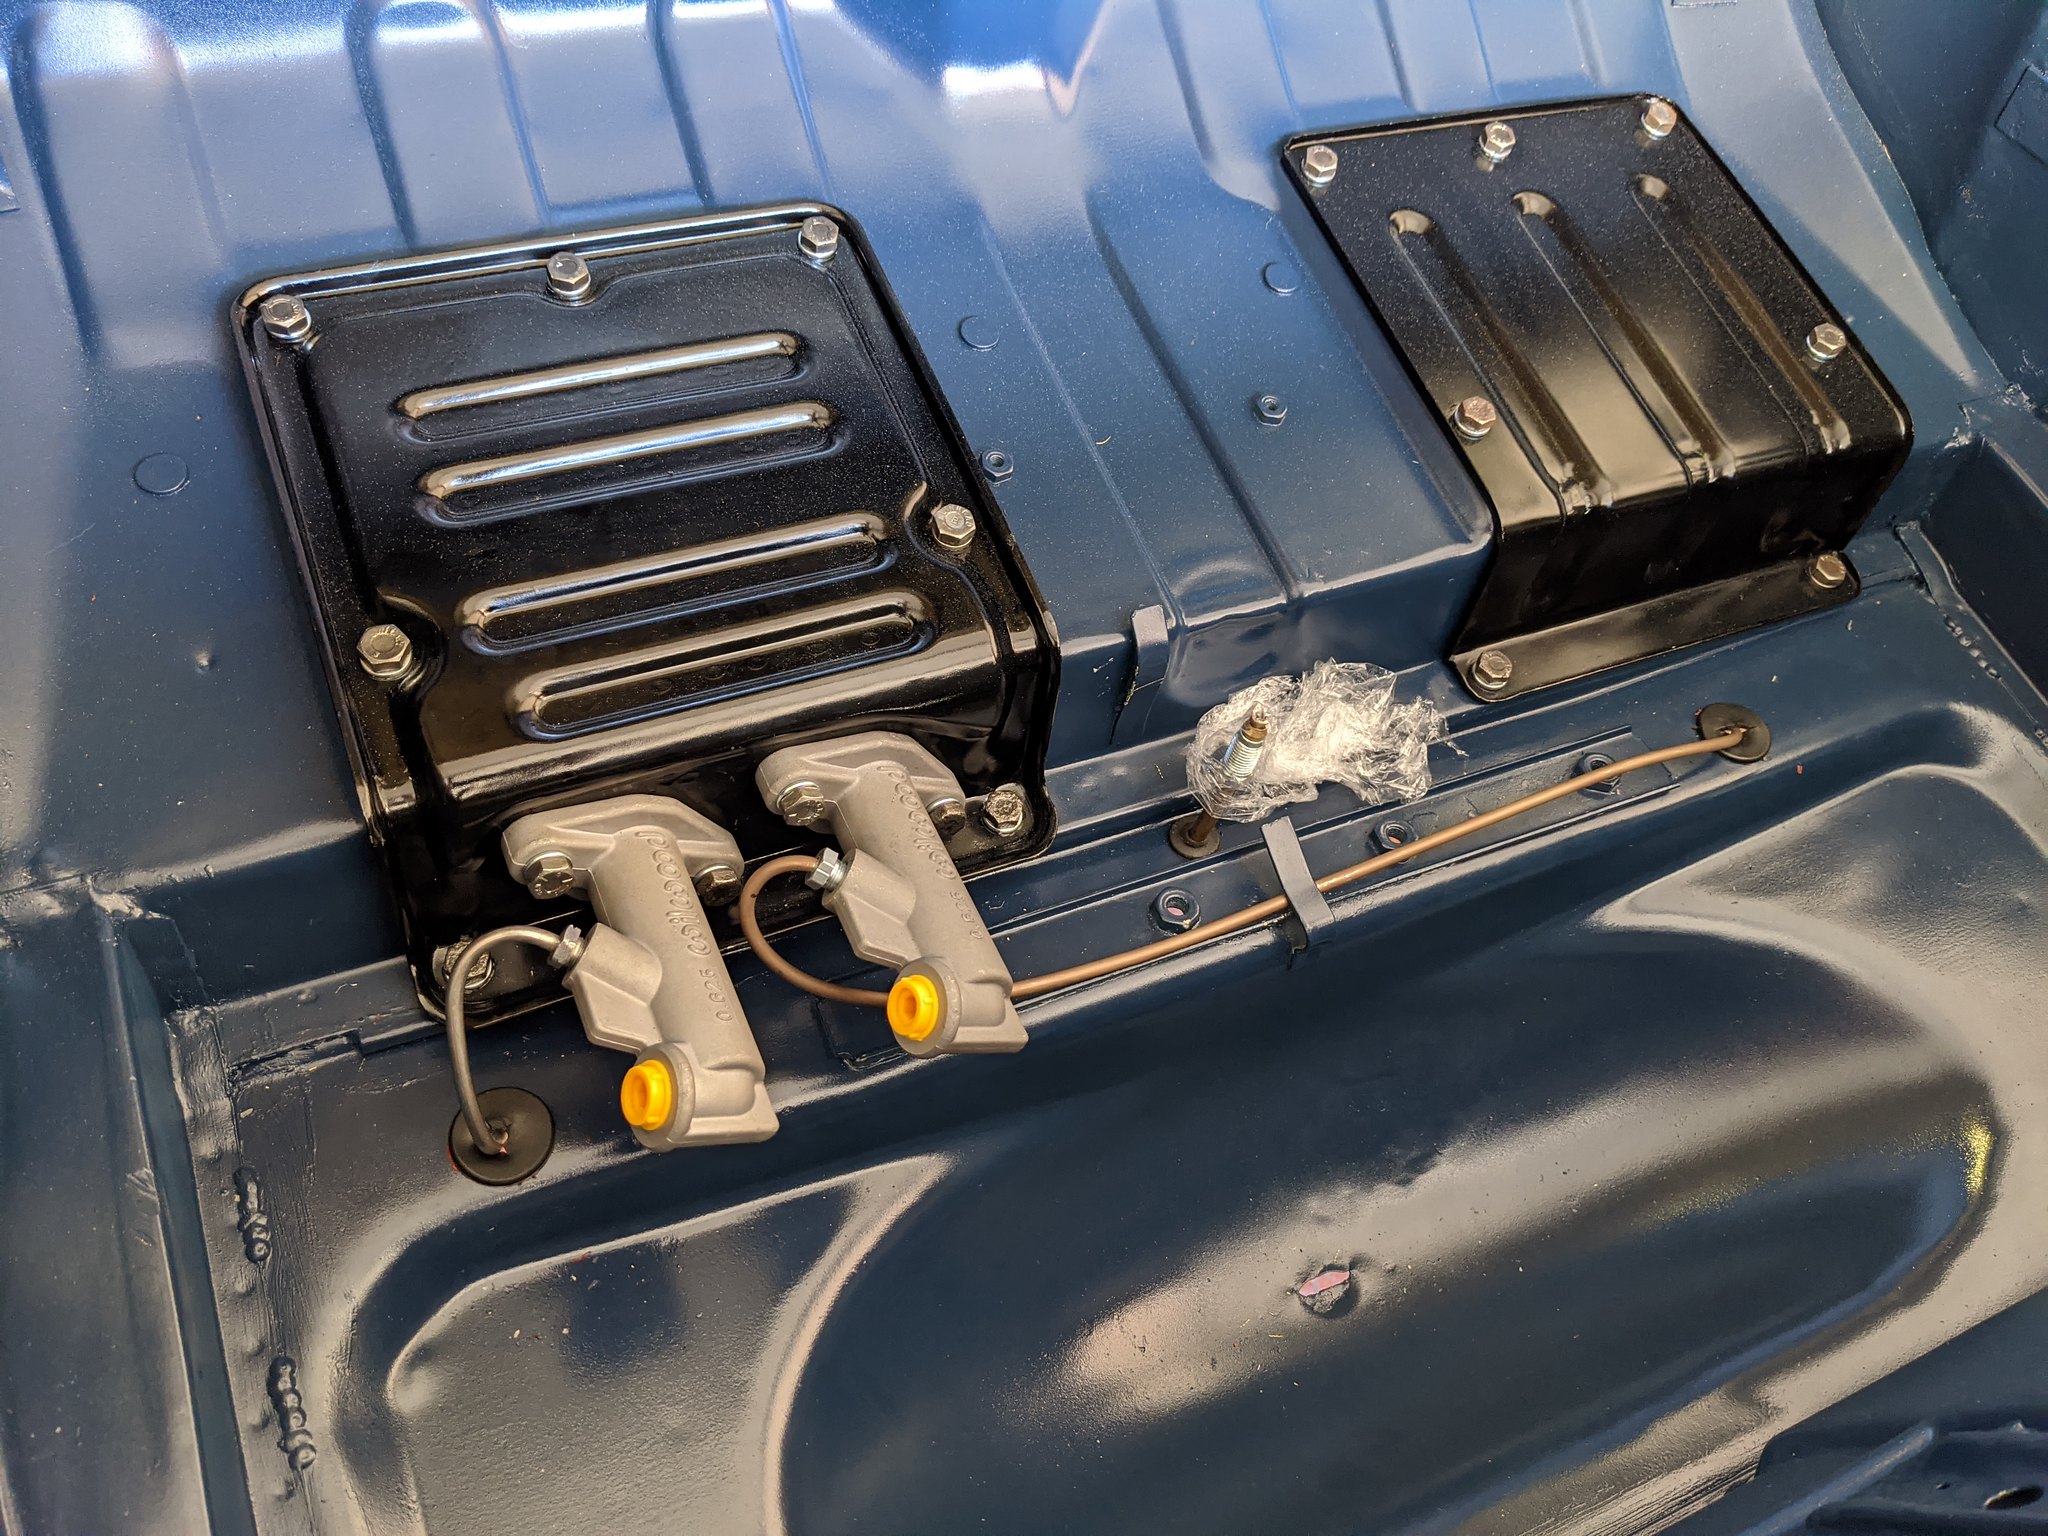
The usual process of stripping it back to bare metal before etch priming and finishing in glass black, along with fitting brand new master cylinders has got it looking proper again What's people's thoughts on renewing the pedal rubbers? I like the thought of keeping a bit of wear on the car, after all it's still a 50yr old car! Or should I get everything up to the same standard?
 IMG_20200901_202424 by Godfrey Hatton, on Flickr
 IMG_20200901_203834 by Godfrey Hatton, on Flickr
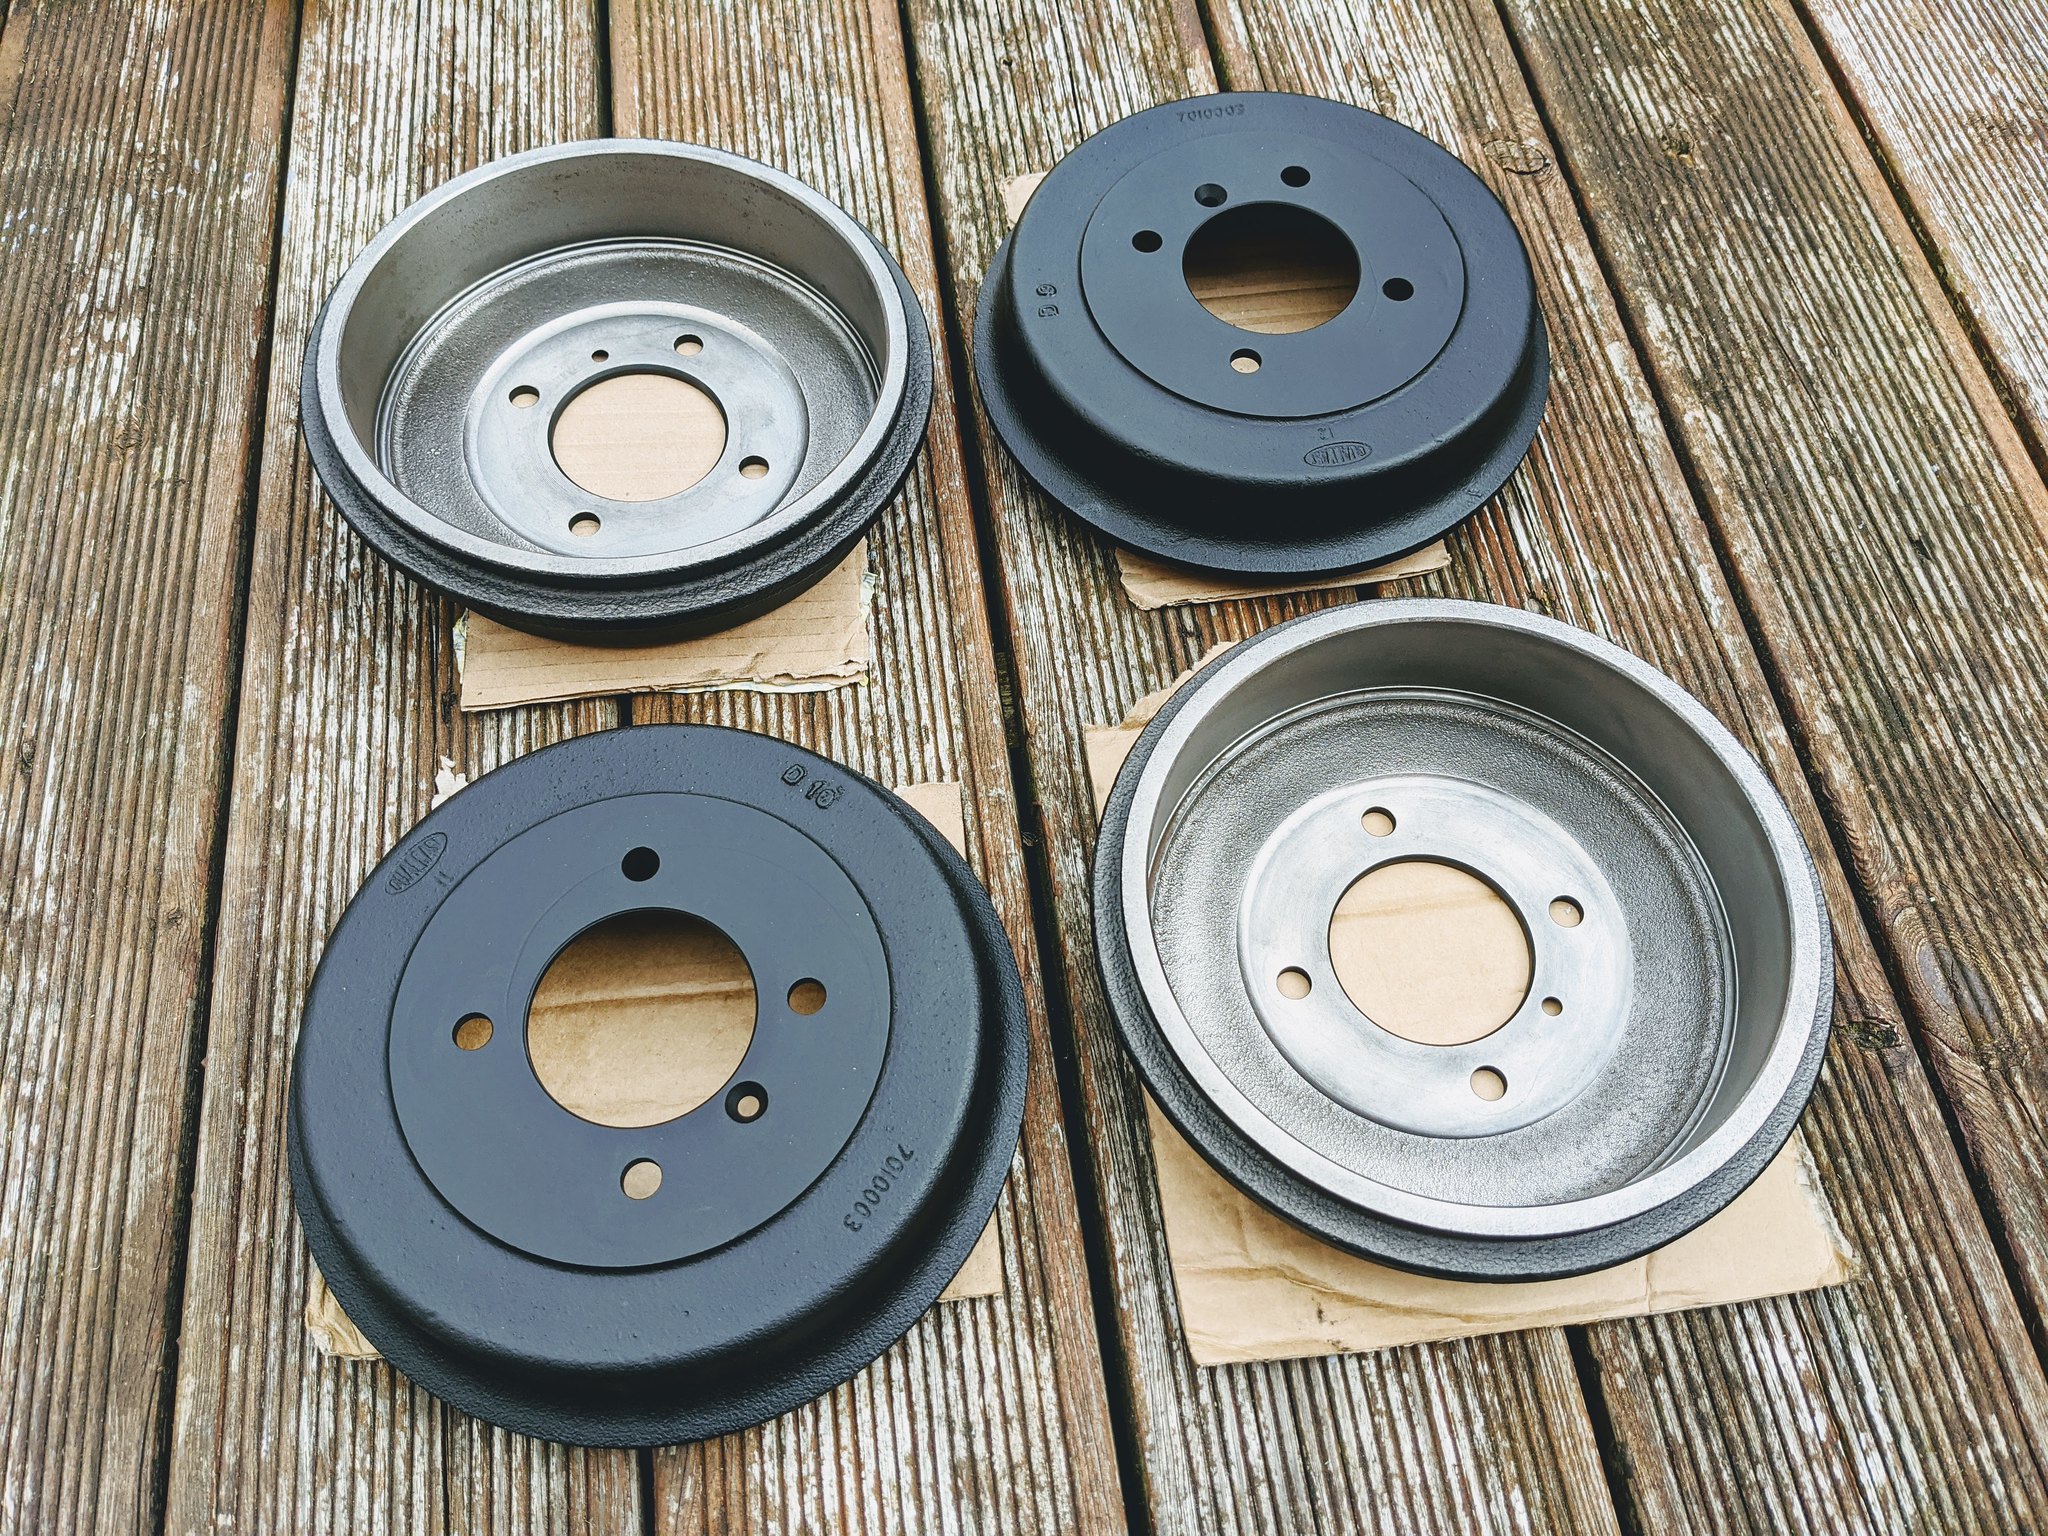
Another little job which I'm most pleased with are the drums. Following advice from Dave Lane on his own thread, I sent my drums away for machining to ensure they are true. The chap I used said 3 really weren't that bad but the 4th was quite poor, so I should have lovely smooth brakes now. With them back I then cleaned them up and painted the outside with VHT paint to keep them looking smart:
 IMG_20200831_180303 by Godfrey Hatton, on Flickr
Slowly but surely lots of little boxes are getting ticked! Hoping to spend some proper time on it this weekend to try and get somewhere with the rest of the suspension, I'll keep you all posted!
Pog
So here's how I got on. The old pedal box was looking rather sorry for itself:
IMG_20200831_121023 by Godfrey Hatton, on FlickrThe usual process of stripping it back to bare metal before etch priming and finishing in glass black, along with fitting brand new master cylinders has got it looking proper again
IMG_20200901_202424 by Godfrey Hatton, on FlickrIMG_20200901_203834 by Godfrey Hatton, on FlickrAnother little job which I'm most pleased with are the drums. Following advice from Dave Lane on his own thread, I sent my drums away for machining to ensure they are true. The chap I used said 3 really weren't that bad but the 4th was quite poor, so I should have lovely smooth brakes now. With them back I then cleaned them up and painted the outside with VHT paint to keep them looking smart:
IMG_20200831_180303 by Godfrey Hatton, on FlickrSlowly but surely lots of little boxes are getting ticked! Hoping to spend some proper time on it this weekend to try and get somewhere with the rest of the suspension, I'll keep you all posted!
Pog
Young Imp Members Registrar
-
Pog
- Posts: 142
- Joined: Sat Aug 24, 2013 4:55 pm
- Club Member: Yes
- Car Model: 1969 Super 'Betty'
- Location: Northampton, UK
- Has thanked: 10 times
- Been thanked: 37 times
Re: EHK 744G - 1969 Super
Hi all,
Finally completed the plumbing to to the front master cylinders - although my word was it a palaver! Both the small brake pipe from junction to cylinder and the clutch pipe to the adapter were too short in the supplied kits from Bob @ spares! He double checked the measurements I took of each and confirmed that something wasn't quite right, so I couldn't go any further until replacements were sent, which Bob was all too happy to do. A few days later they arrive - the clutch line was now a perfect fit, but when it came to the small brake pipe, I have a feeling the replacement came as pure copper, where everything else supplied has been copper/nickel. As when I bent this replacement it was way more malleable than the last one and I ended up flattening the bend rather than a nice uniform one. I tried carefully bending it back but it split! I really couldn't be bothered waiting for yet another replacement to be sent out. And then I remembered, I still have the original and there's nothing really wrong with it, I was only renewing all the lines so I could switch to silicone fluid. So I made sure to rinse it out thoroughly with brake cleaner to remove all remnants of old brake fluid, it was still in excellent condition and has cleaned up nicely, plus it was already bent to the correct shape so was an obvious easy refit, bonus!
 PXL_20200919_101733213 by Godfrey Hatton, on Flickr
 PXL_20200919_111421903 by Godfrey Hatton, on Flickr
I'm really happy with how the lines have turned out - I tried really hard to get them looking nice and neat!
And now I can finally crack on with the steering rack/front suspension - so watch this space
Pog
Finally completed the plumbing to to the front master cylinders - although my word was it a palaver! Both the small brake pipe from junction to cylinder and the clutch pipe to the adapter were too short in the supplied kits from Bob @ spares! He double checked the measurements I took of each and confirmed that something wasn't quite right, so I couldn't go any further until replacements were sent, which Bob was all too happy to do. A few days later they arrive - the clutch line was now a perfect fit, but when it came to the small brake pipe, I have a feeling the replacement came as pure copper, where everything else supplied has been copper/nickel. As when I bent this replacement it was way more malleable than the last one and I ended up flattening the bend rather than a nice uniform one. I tried carefully bending it back but it split!
PXL_20200919_101733213 by Godfrey Hatton, on FlickrPXL_20200919_111421903 by Godfrey Hatton, on FlickrI'm really happy with how the lines have turned out - I tried really hard to get them looking nice and neat!
And now I can finally crack on with the steering rack/front suspension - so watch this space
Pog
Young Imp Members Registrar
-
617sqn
- Posts: 1146
- Joined: Fri Dec 05, 2003 11:17 pm
- Club Member: Yes
- Car Model: Hillman Imp 1972
- Location: Sussex, England.
Re: EHK 744G - 1969 Super
Excellent progress there. Looking very professional  .
.
Andy G
 .
. Andy G
Member No. 7500, and Stan's best mate.
-
The Nun
- Posts: 2928
- Joined: Tue Jan 23, 2007 7:02 pm
- Club Member: Yes
- Car Model: Imp
- Location: South
- Has thanked: 76 times
- Been thanked: 104 times
Re: EHK 744G - 1969 Super
If your original pedal rubbers are still decent leave them, I bought some replacements, just because like you I thought I ought to, which were supposed to be new repros but the rubber was too hard or they had gone off, by the next day they had split in situe so I put the old original ones back on which were still supple and still going strong.
Peter Nunn...ey im member 00033
-
Pog
- Posts: 142
- Joined: Sat Aug 24, 2013 4:55 pm
- Club Member: Yes
- Car Model: 1969 Super 'Betty'
- Location: Northampton, UK
- Has thanked: 10 times
- Been thanked: 37 times
Re: EHK 744G - 1969 Super
Thanks for the tip Nun. I've ordered a pair from Bob and they're brand new and squidgy rubber - so I've changed them over with a squirt of silicone spray to help ease them on. Much better.
I then cleaned and gave the accelerator pedal assy a coat of paint so the complete pedal box assy is now shiny and new!
 PXL_20200927_154344321 by Godfrey Hatton, on Flickr
Pog
I then cleaned and gave the accelerator pedal assy a coat of paint so the complete pedal box assy is now shiny and new!
PXL_20200927_154344321 by Godfrey Hatton, on Flickr Pog
Young Imp Members Registrar
-
Grahame59

- Posts: 328
- Joined: Sat Aug 14, 2004 12:42 pm
- Club Member: Yes
- Car Model: Hillman Imp Super
- Location: Billingshurst, West Sussex
- Has thanked: 22 times
- Been thanked: 47 times
- Contact:
Re: EHK 744G - 1969 Super
Proof that it's best to buy tried and tested parts from Bob/Imp Club (and Club approved suppliers such as Malcolm) rather than trust to luck with unknown pattern parts from eBay, etc. I've never had any problems with parts bought from the club.
Grahame Pearson
Member No. 23
Editor, Impressions
1967 Imp Super
(0-60 like a Porsche, only slower)
Member No. 23
Editor, Impressions
1967 Imp Super
(0-60 like a Porsche, only slower)
-
The Nun
- Posts: 2928
- Joined: Tue Jan 23, 2007 7:02 pm
- Club Member: Yes
- Car Model: Imp
- Location: South
- Has thanked: 76 times
- Been thanked: 104 times
Re: EHK 744G - 1969 Super
My split the next day ones were from Bob, he blamed a bad batch. 

Peter Nunn...ey im member 00033
-
Grahame59
- Posts: 328
- Joined: Sat Aug 14, 2004 12:42 pm
- Club Member: Yes
- Car Model: Hillman Imp Super
- Location: Billingshurst, West Sussex
- Has thanked: 22 times
- Been thanked: 47 times
- Contact:
Re: EHK 744G - 1969 Super
Ah
Grahame Pearson
Member No. 23
Editor, Impressions
1967 Imp Super
(0-60 like a Porsche, only slower)
Member No. 23
Editor, Impressions
1967 Imp Super
(0-60 like a Porsche, only slower)
-
Pog
- Posts: 142
- Joined: Sat Aug 24, 2013 4:55 pm
- Club Member: Yes
- Car Model: 1969 Super 'Betty'
- Location: Northampton, UK
- Has thanked: 10 times
- Been thanked: 37 times
Re: EHK 744G - 1969 Super
Hi all,
Made some more good progress on the Imp today - the steering rack assy is now in place along with the top shock mounts.
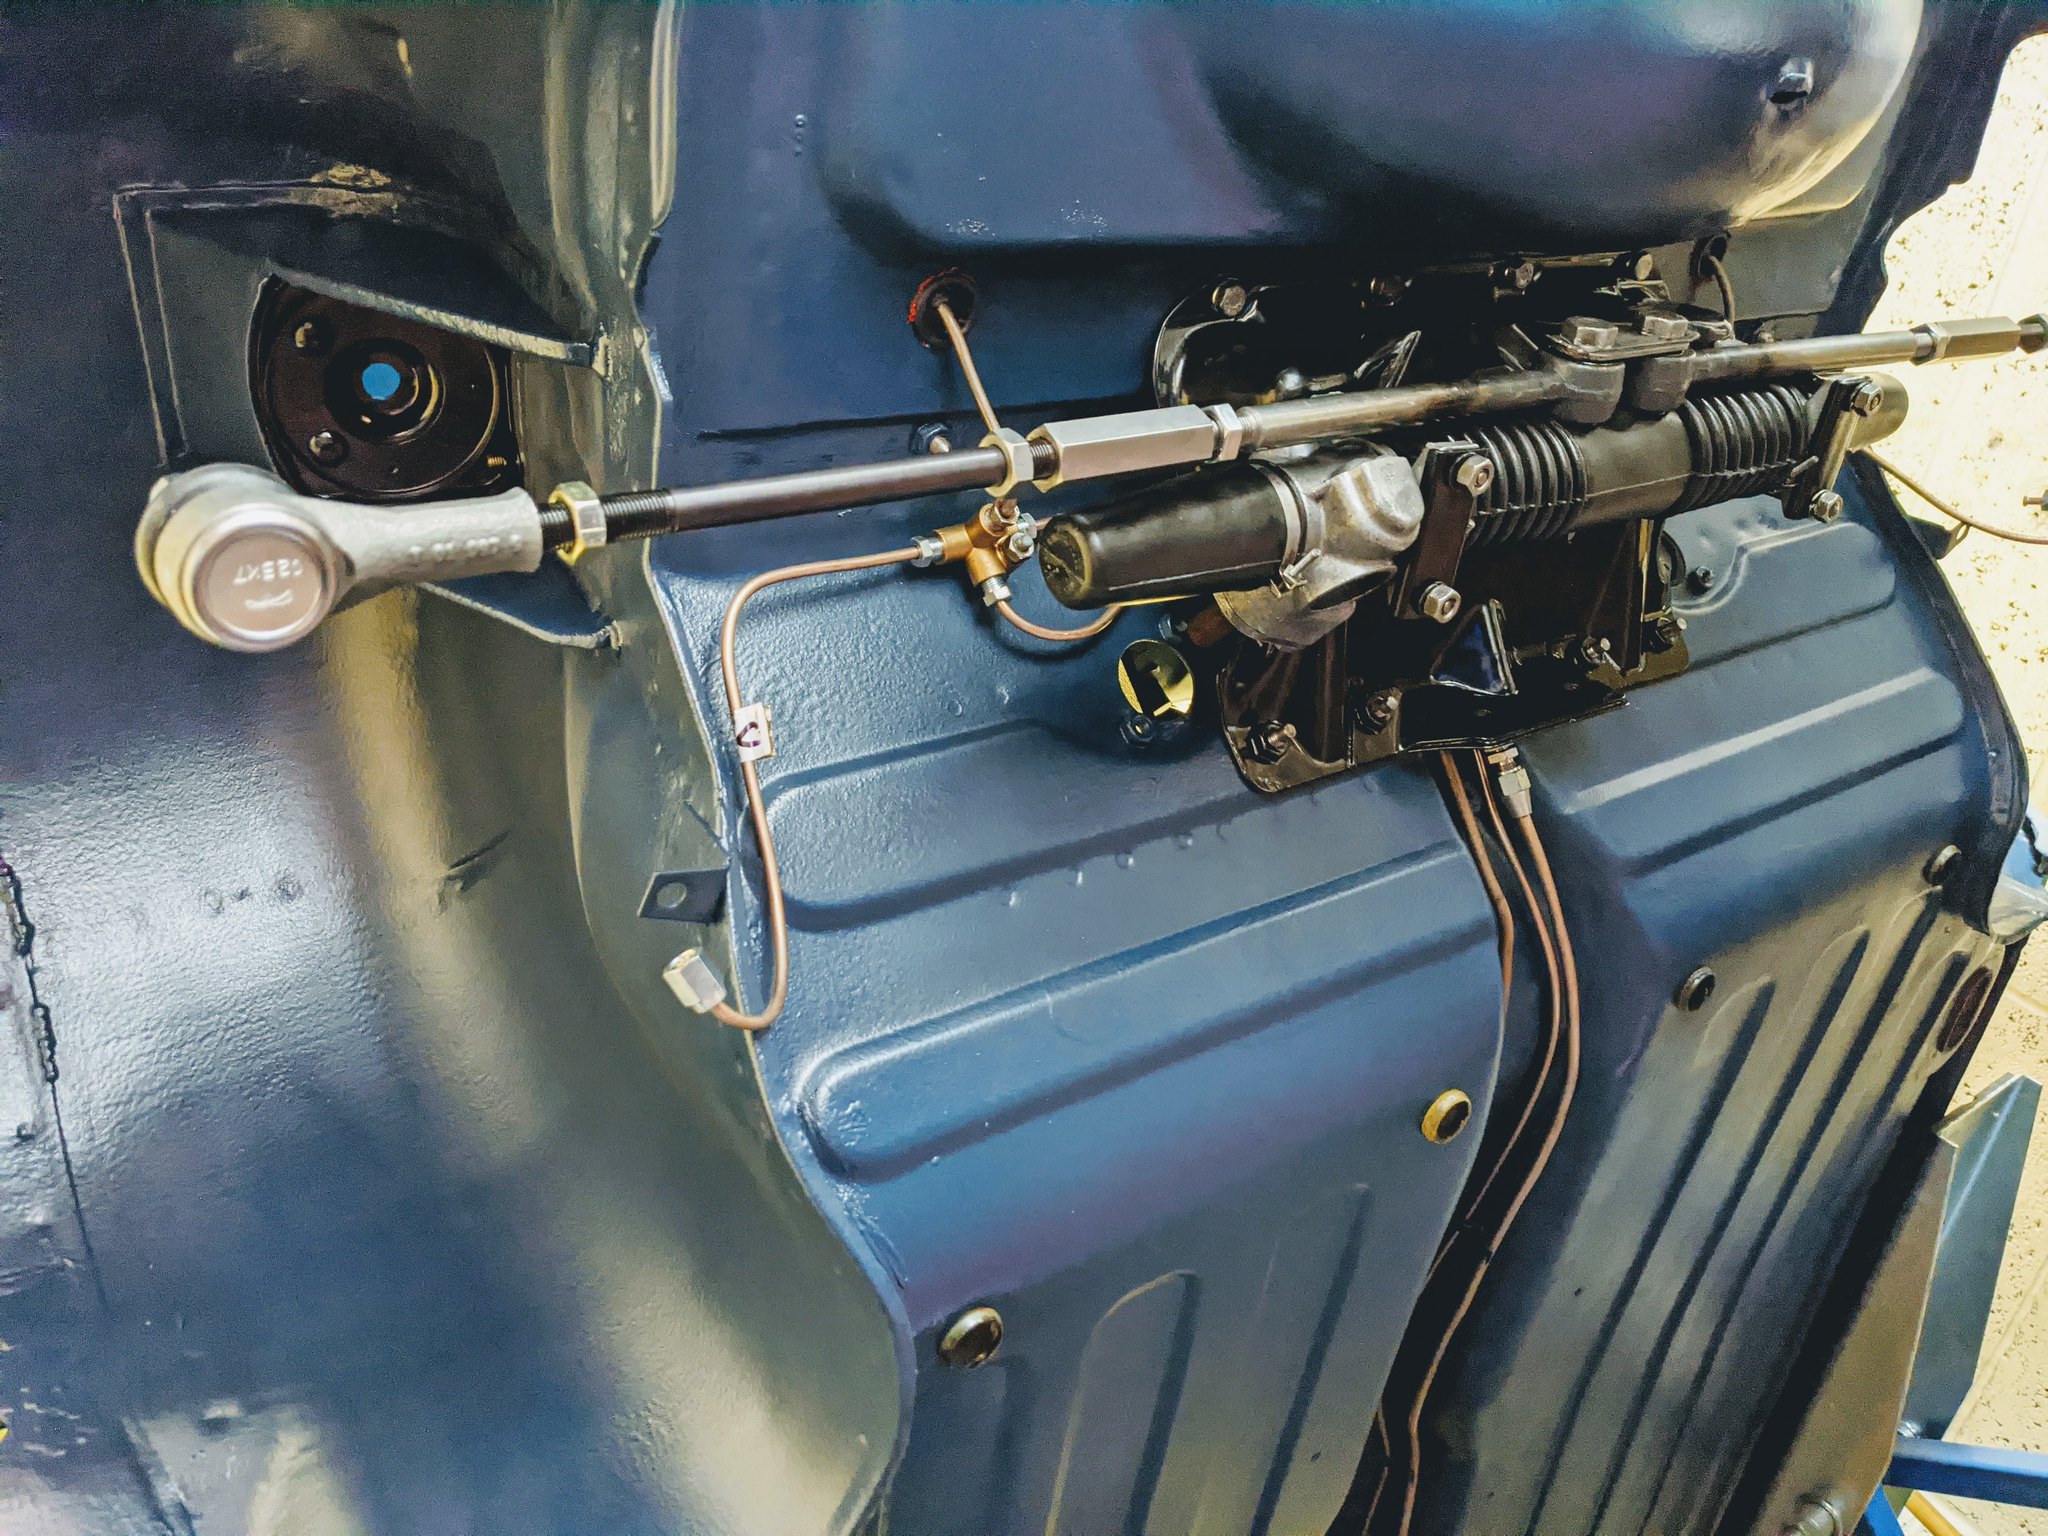 PXL_20201003_124350407 by Godfrey Hatton, on Flickr
It was at this point, getting ready to bolt on the inner steering column, that I realised I was missing the captive nuts for the steering column bracket. Odd, I thought, as I swear I didn’t remove anything during the tear down, but I had no idea they weren’t fixed to the shell. Dread suddenly overcame me, the captive nut plate had obviously fallen into the shell while the car was on its side, forever to rattle in the voids!
I wanted to see if there was anything I could do about it, so I ordered one of these: https://www.amazon.co.uk/Inspection-Dep ... B01NBFTAHE and let me tell you, best gadget I ever bought! With it, I found the missing plate!
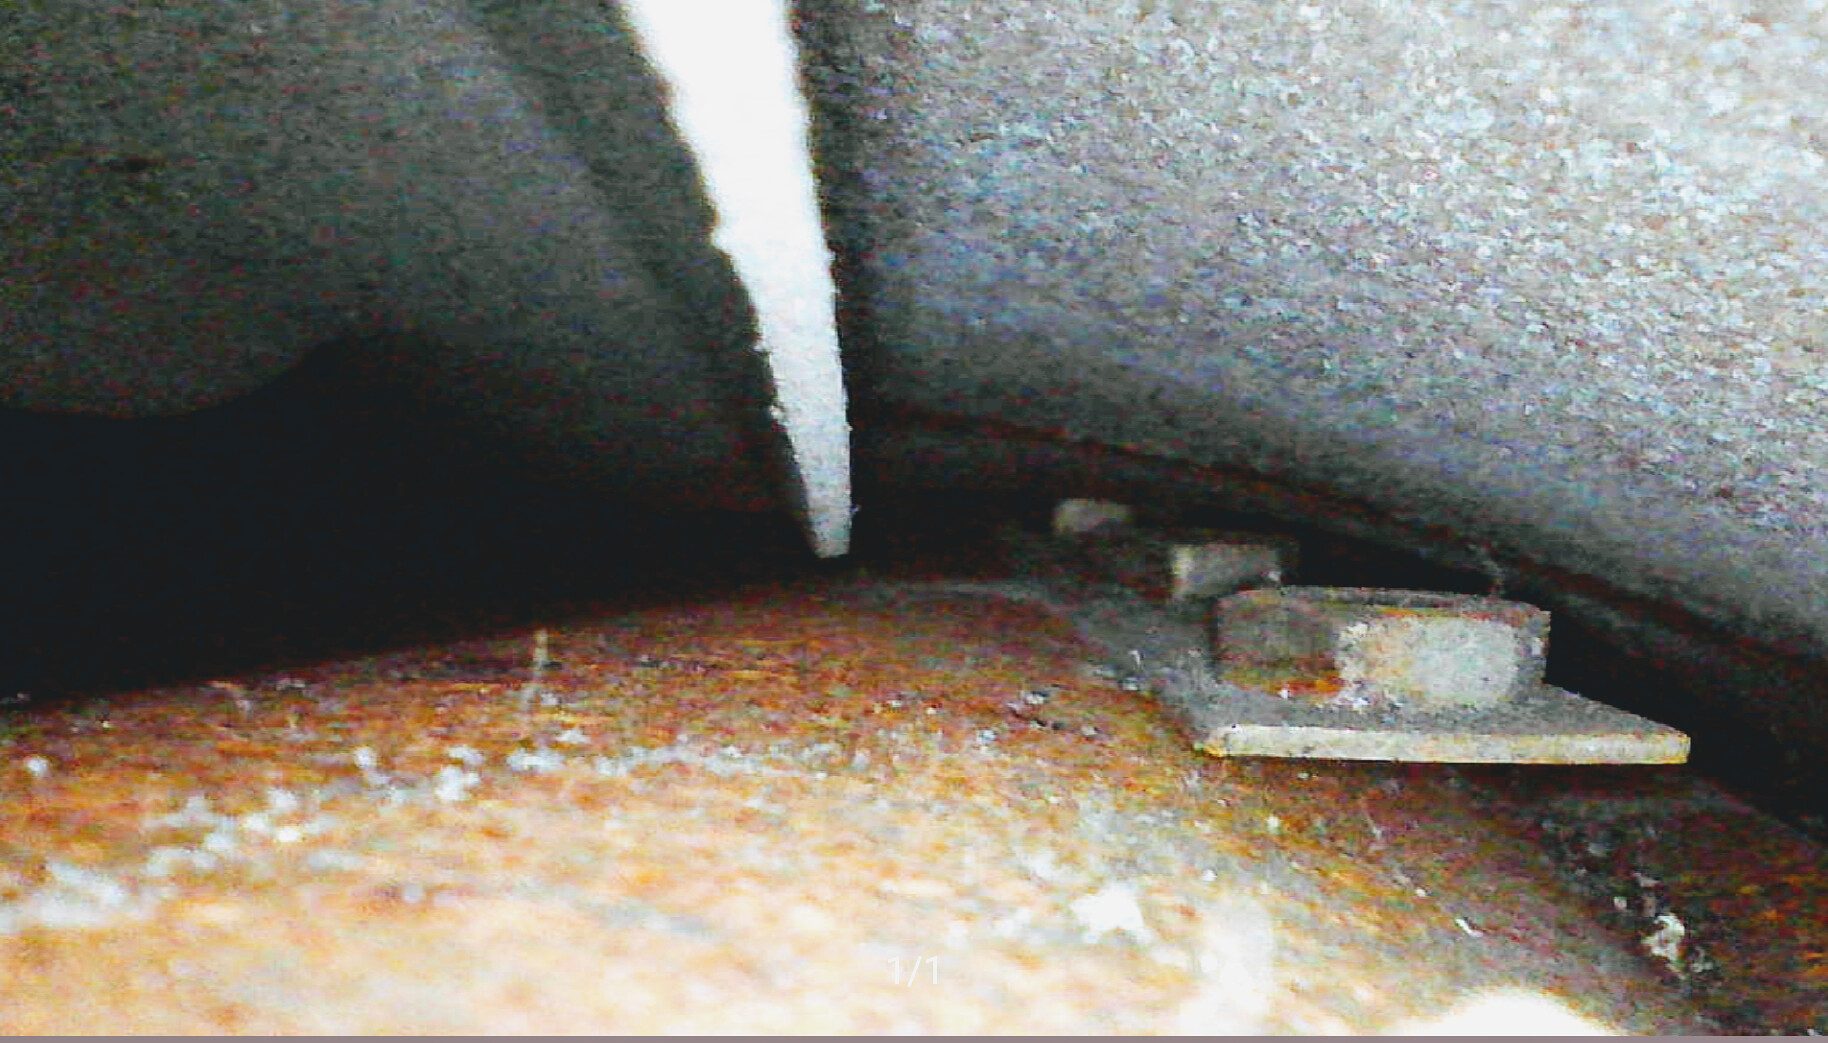 Screenshot_20201003-152731 by Godfrey Hatton, on Flickr
I fashioned a hook with some wire and after many, many attempts, managed to fish it out!
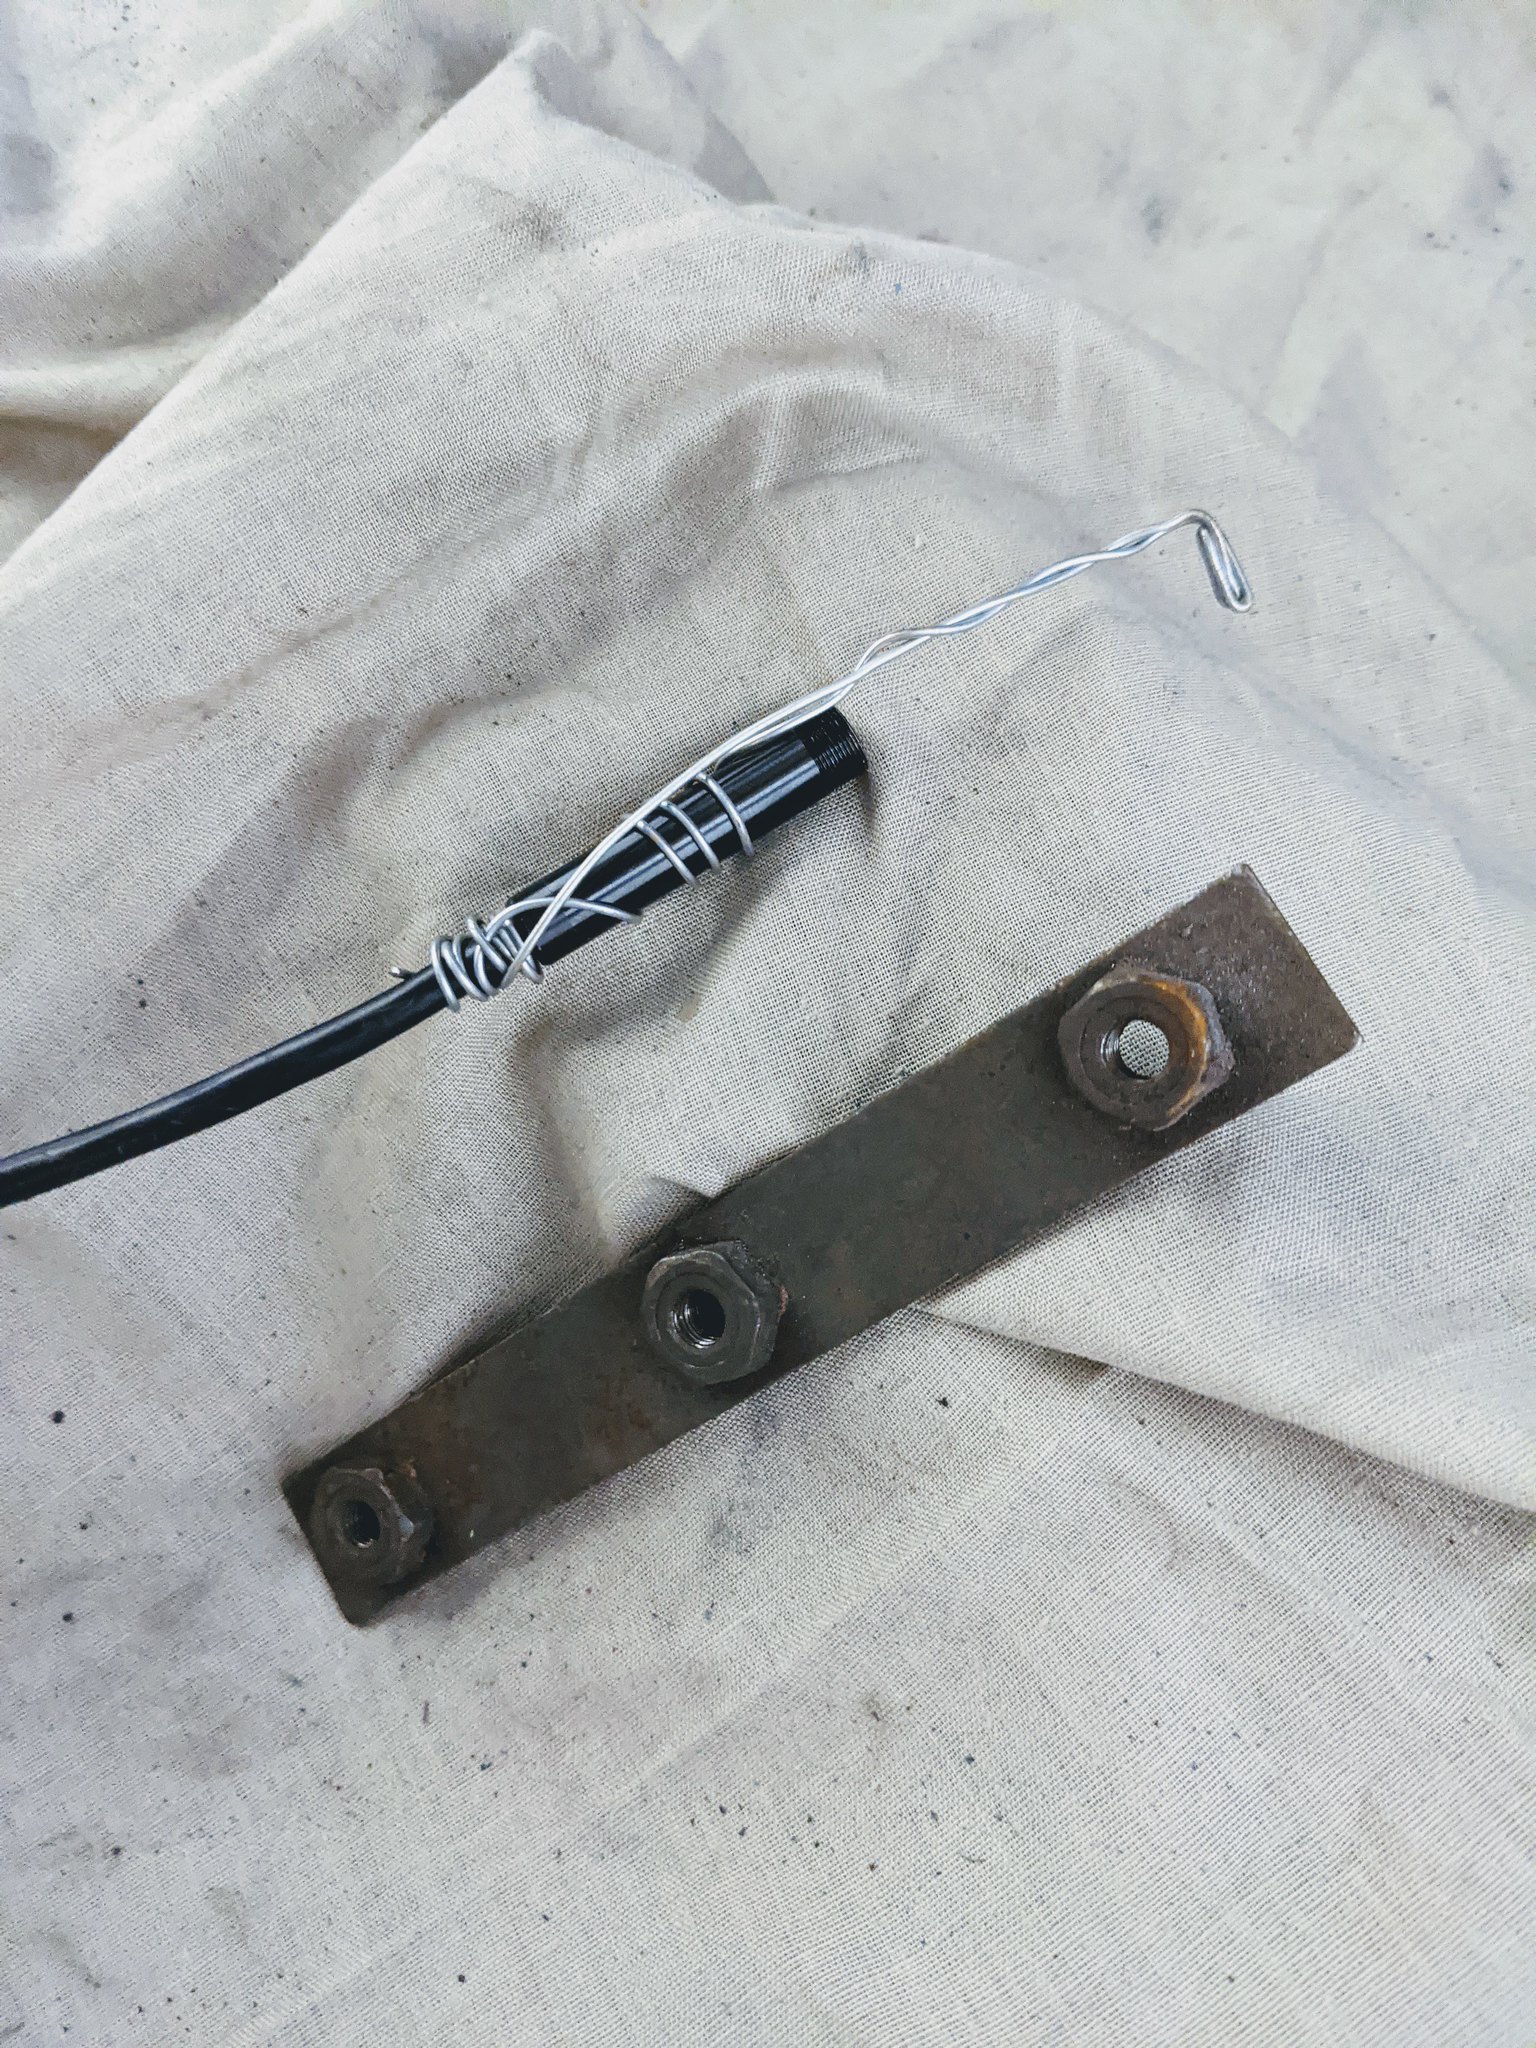 PXL_20201003_135537054 by Godfrey Hatton, on Flickr
Absolutely over the moon, I thought I’d have to put up with an unfixable rattle.
Next step will be the rest of the front suspension. Shouldn’t be too long before the car is back on its wheels, so watch this space!
Pog
Made some more good progress on the Imp today - the steering rack assy is now in place along with the top shock mounts.
PXL_20201003_124350407 by Godfrey Hatton, on FlickrIt was at this point, getting ready to bolt on the inner steering column, that I realised I was missing the captive nuts for the steering column bracket. Odd, I thought, as I swear I didn’t remove anything during the tear down, but I had no idea they weren’t fixed to the shell. Dread suddenly overcame me, the captive nut plate had obviously fallen into the shell while the car was on its side, forever to rattle in the voids!
I wanted to see if there was anything I could do about it, so I ordered one of these: https://www.amazon.co.uk/Inspection-Dep ... B01NBFTAHE and let me tell you, best gadget I ever bought! With it, I found the missing plate!
Screenshot_20201003-152731 by Godfrey Hatton, on FlickrI fashioned a hook with some wire and after many, many attempts, managed to fish it out!
PXL_20201003_135537054 by Godfrey Hatton, on FlickrAbsolutely over the moon, I thought I’d have to put up with an unfixable rattle.
Next step will be the rest of the front suspension. Shouldn’t be too long before the car is back on its wheels, so watch this space!
Pog
Young Imp Members Registrar
-
Grahame59
- Posts: 328
- Joined: Sat Aug 14, 2004 12:42 pm
- Club Member: Yes
- Car Model: Hillman Imp Super
- Location: Billingshurst, West Sussex
- Has thanked: 22 times
- Been thanked: 47 times
- Contact:
Re: EHK 744G - 1969 Super
Endoscope looks great. Once you'd spotted it I wonder if a magnet (either attached to the endoscope or one of these nifty telescopic ones) might have enabled you to retrieve it quicker though?
Grahame Pearson
Member No. 23
Editor, Impressions
1967 Imp Super
(0-60 like a Porsche, only slower)
Member No. 23
Editor, Impressions
1967 Imp Super
(0-60 like a Porsche, only slower)
-
The Nun
- Posts: 2928
- Joined: Tue Jan 23, 2007 7:02 pm
- Club Member: Yes
- Car Model: Imp
- Location: South
- Has thanked: 76 times
- Been thanked: 104 times
Re: EHK 744G - 1969 Super
It's a what we're they thinking of design feature, they obviously thought no one would ever get to the stage where the column bracket needed to be removed?
Peter Nunn...ey im member 00033
-
Pog
- Posts: 142
- Joined: Sat Aug 24, 2013 4:55 pm
- Club Member: Yes
- Car Model: 1969 Super 'Betty'
- Location: Northampton, UK
- Has thanked: 10 times
- Been thanked: 37 times
Re: EHK 744G - 1969 Super
Oh believe me I tried, but it was really wedged in there! I already had one of those bendy magnets and it wasn’t strong enough. Even once I’d hooked it and tried tugging, it took a few gentle taps with a rubber mallet underneath the scuttle to cause enough vibration for it to pull free. With how wedged it was, it may never had caused a problem if I was unable to retrieve it, but you never know, it only takes one jolt over a speed bump and it could have loosened itself and started to cause a racket, so well chuffed I managed to get it out!
Pog
Young Imp Members Registrar
-
Pog
- Posts: 142
- Joined: Sat Aug 24, 2013 4:55 pm
- Club Member: Yes
- Car Model: 1969 Super 'Betty'
- Location: Northampton, UK
- Has thanked: 10 times
- Been thanked: 37 times
Re: EHK 744G - 1969 Super - gone fishing!
Hi all,
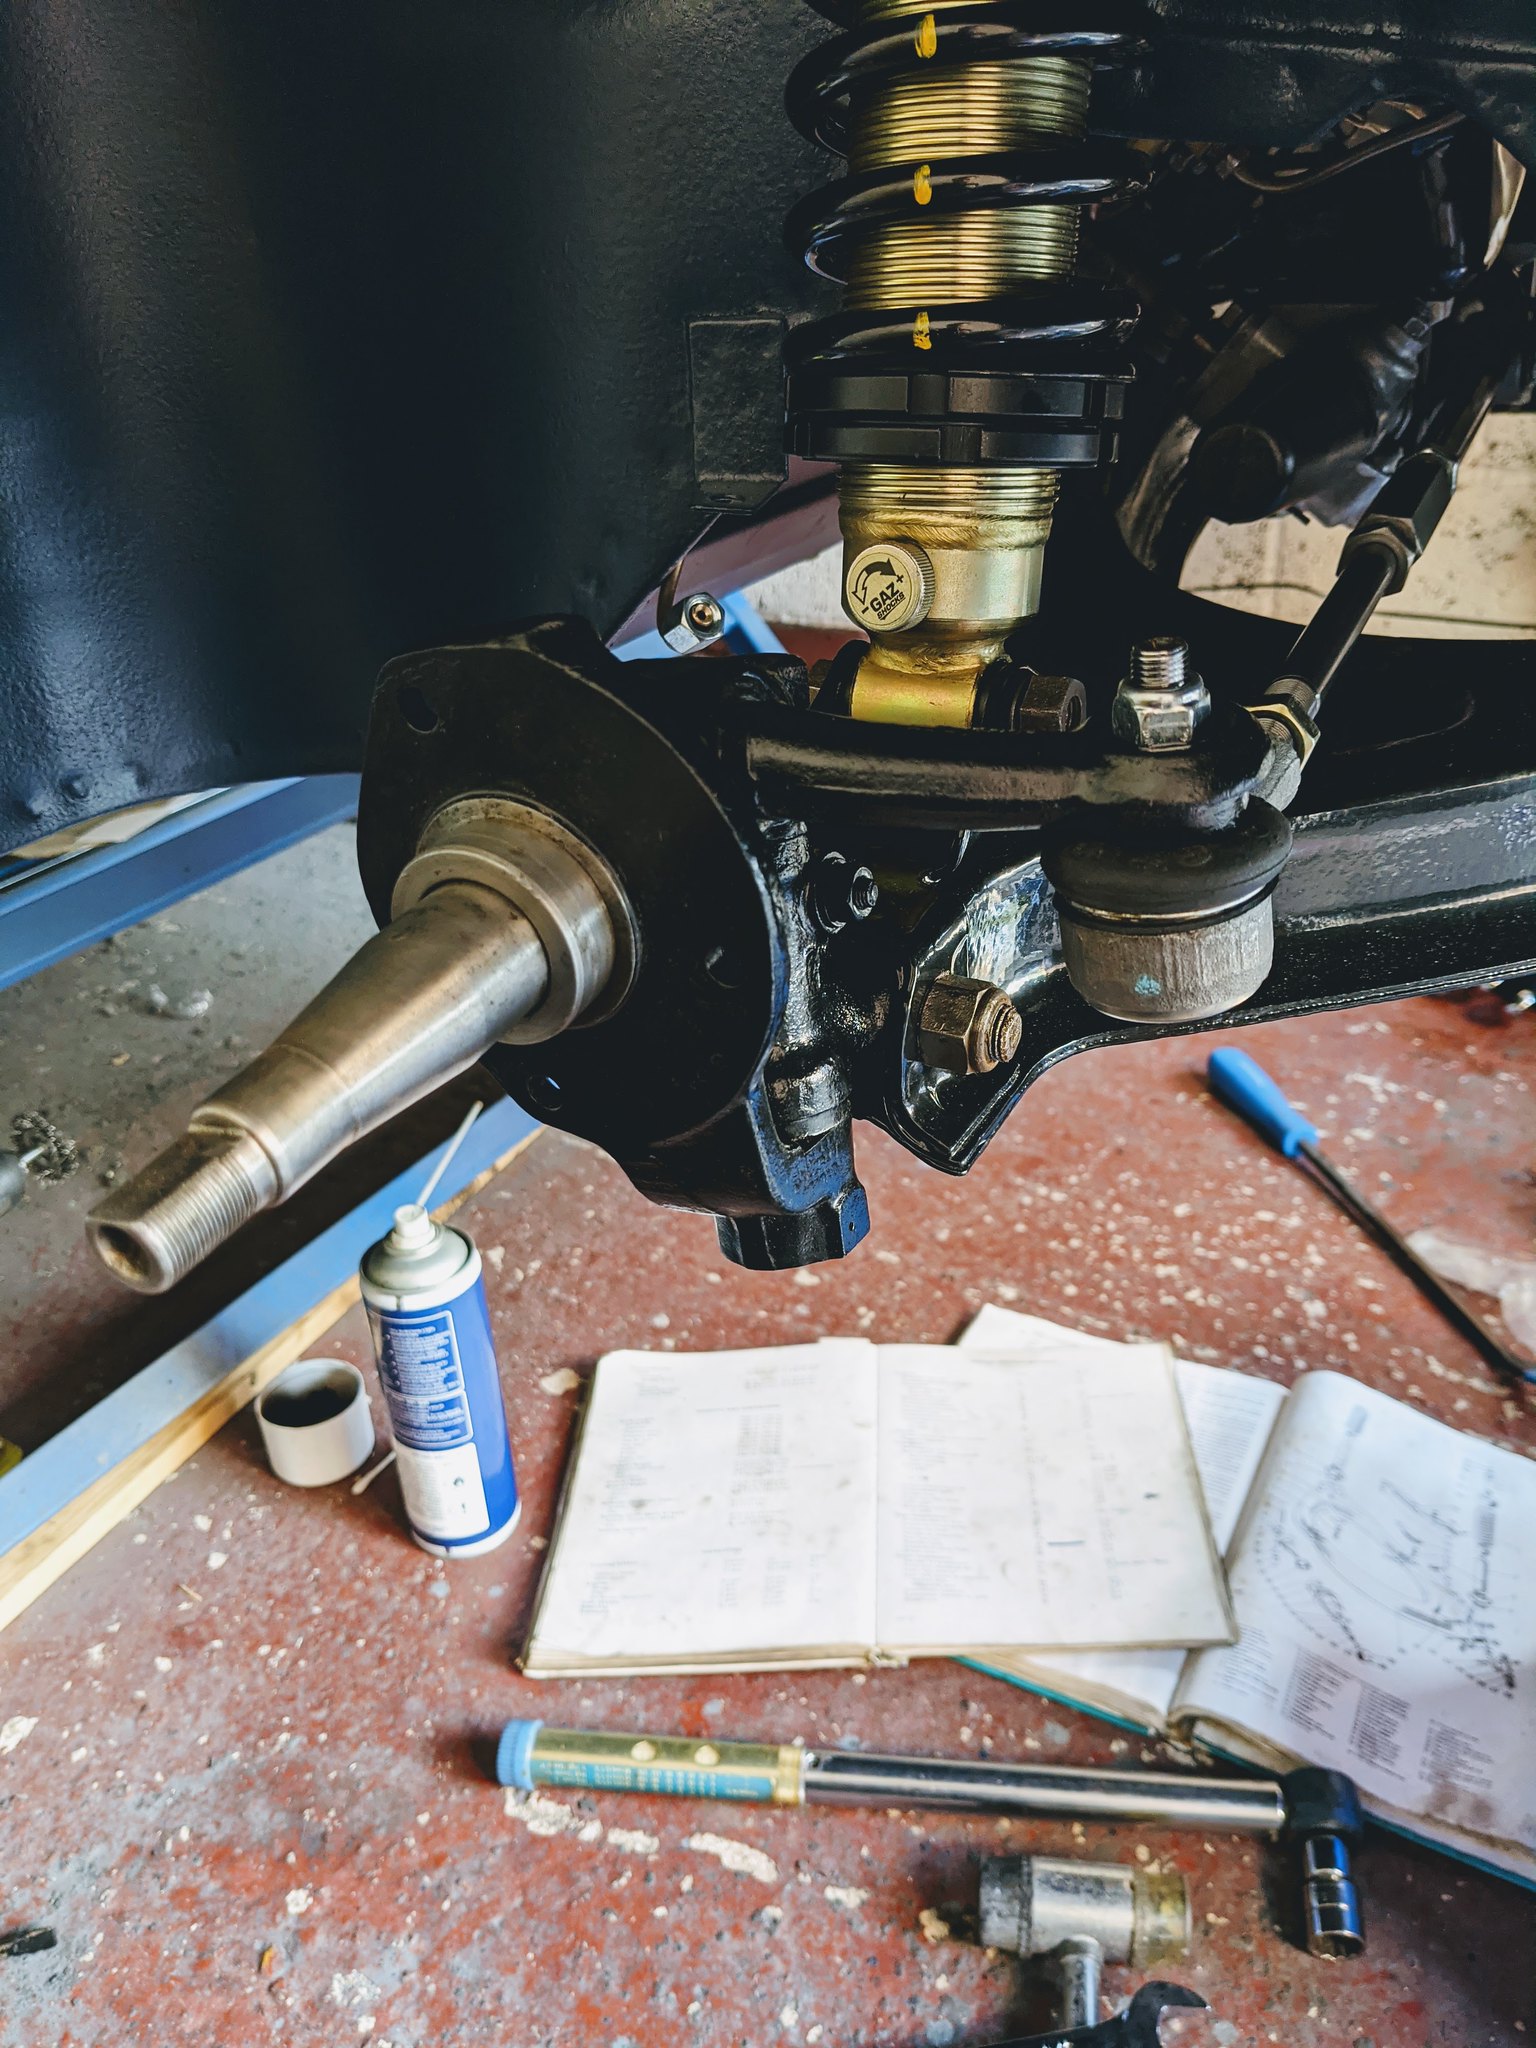
Made huge progress on the car over the weekend Front suspension is almost done!
I soon found out I couldn't get the wishbone bolts on with the steering rack already in place, so that had to come back off first. And then it was a battle getting the wishbones to line up all by myself - but I managed it after a lot of perseverance! With the wishbones on, the steering rack was a lot easier to fit actually, as you can rest it on the wishbones while you fiddle about with the plates/nuts etc.
 original_2afd00bf-f0b0-4bf4-b8f5-ffda2e044910_PXL_20201011_152407748 by Godfrey Hatton, on Flickr
I finally got to fit those lovely, shiny and new front shocks too - they're the shorter damper version to suit the monte springs - hopefully they feel as good on the road as they look! Nothings tightened yet, I've been advised to wait until the weight of the car is back on the ground before doing so.
 original_d3b9e058-92bc-422e-9cef-92761851d4ee_PXL_20201011_152435482 by Godfrey Hatton, on Flickr
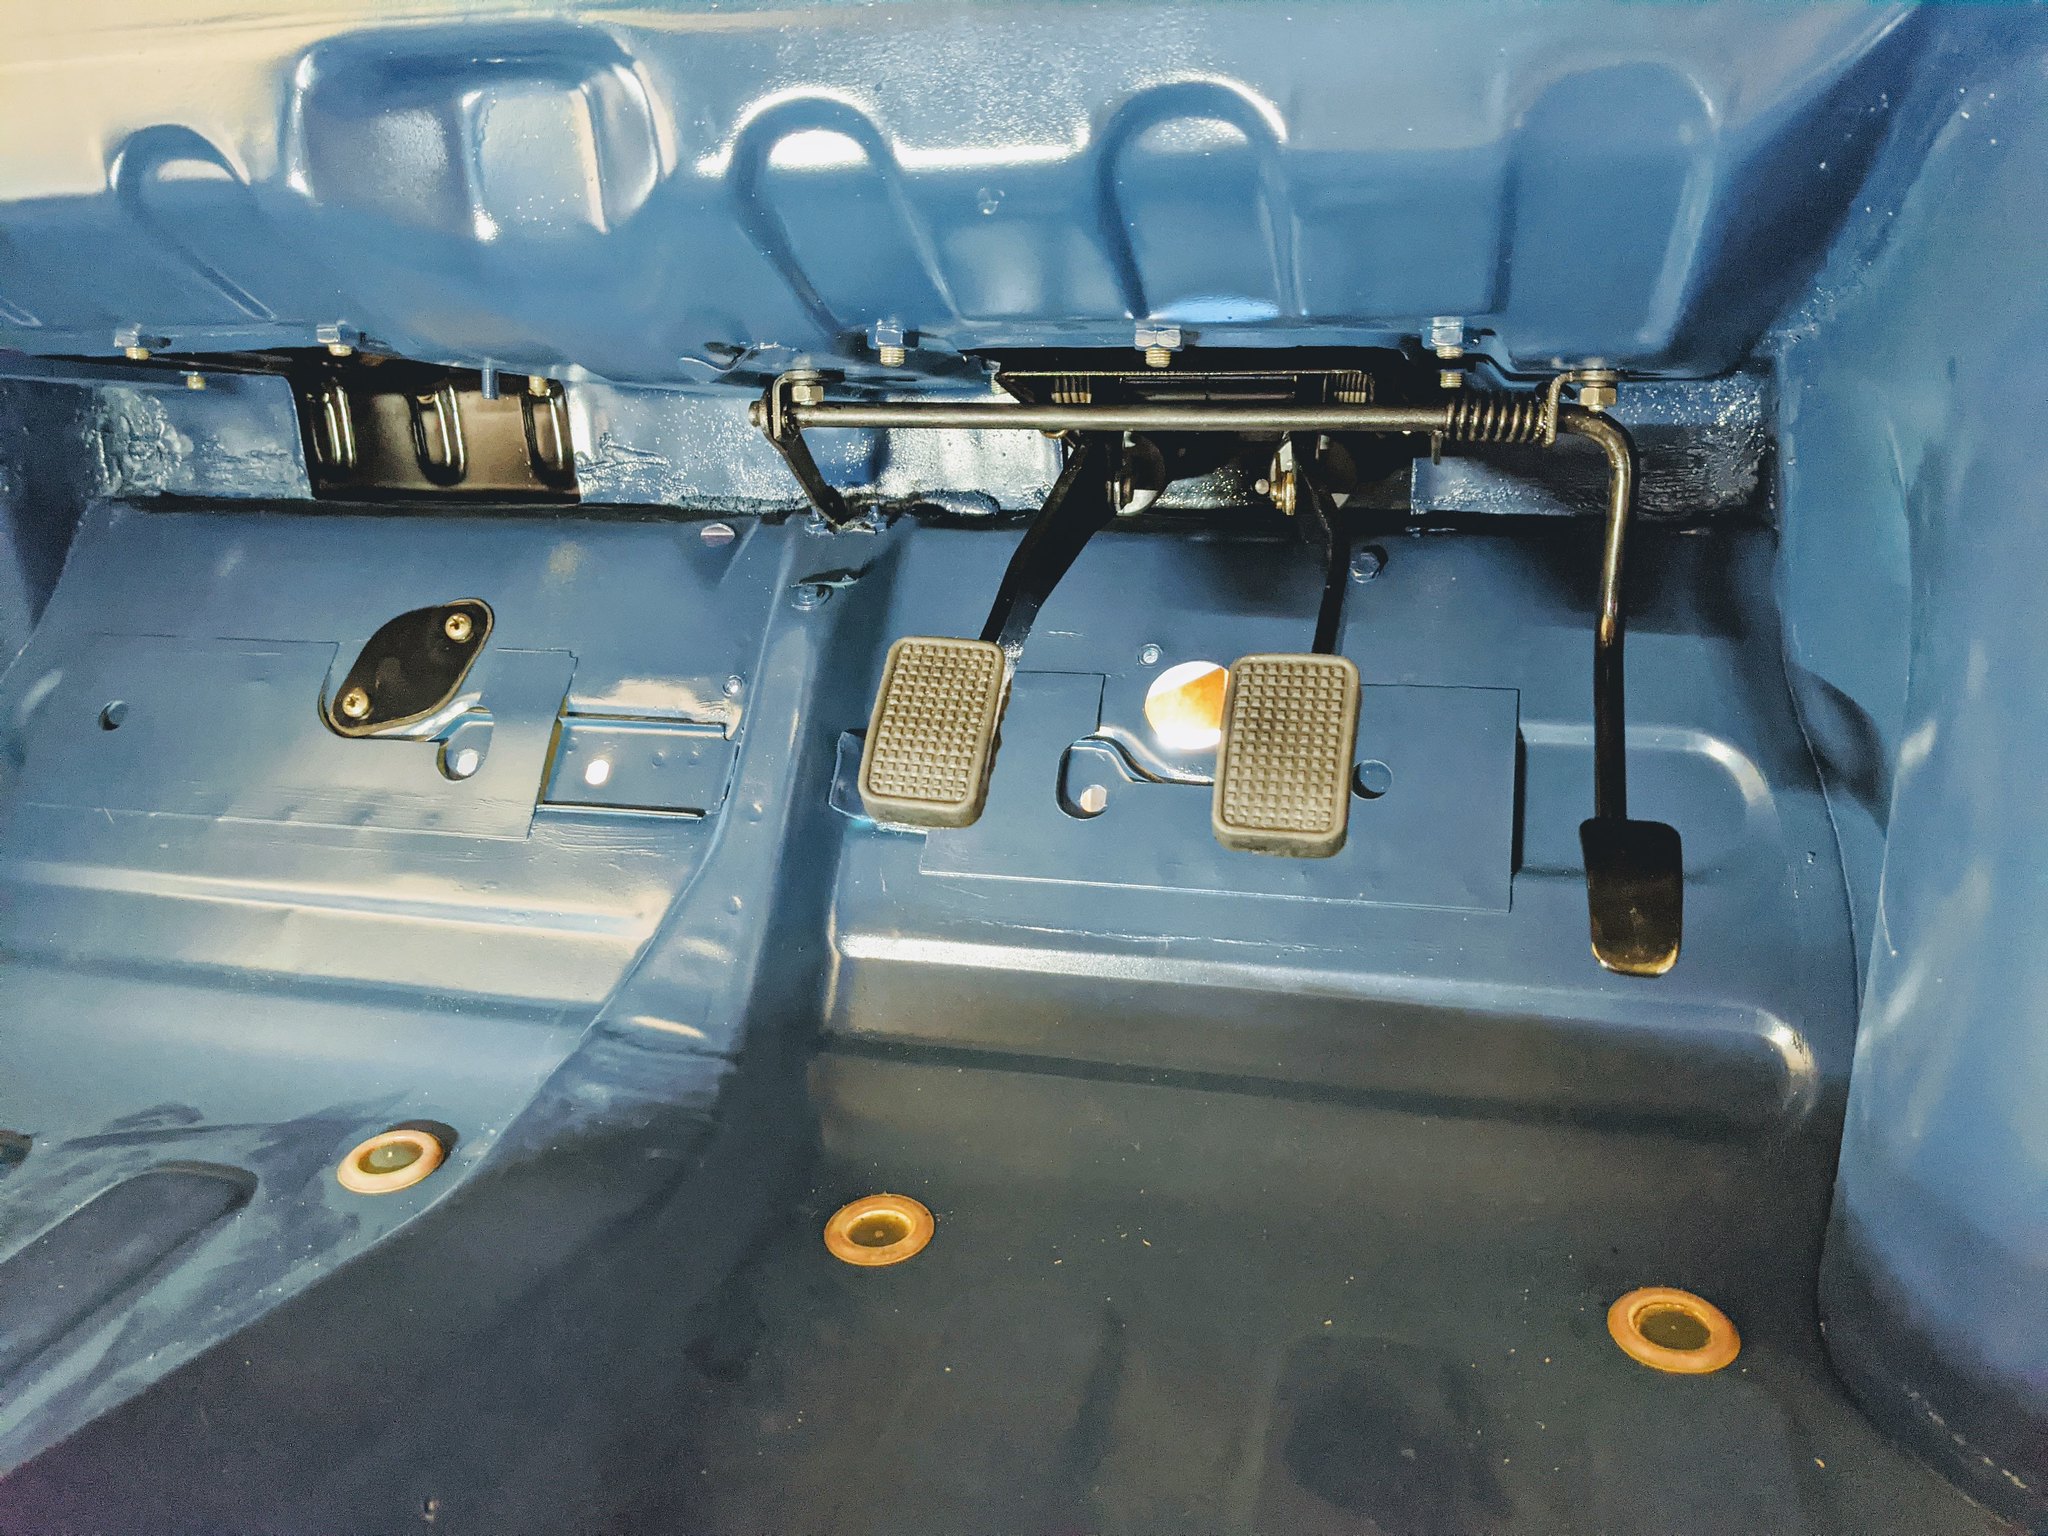
With the suspension assembly almost done, I moved on to the steering column. Using the retrieved captive nut plate the column bracket could go on, after I gave it a fresh coat of paint. The outer column also got a refresh, with paint and a new upgraded top bush (the old one literally fell apart just looking at it haha). Everything bolted together, the steering feels lovely and smooth; no tight spots or notchiness which is promising. With the steering wheel loosely in place, dare I say it, it's starting to look like a car again!
 original_07e536a5-c3cb-4a13-8c36-cfb39f04db7e_PXL_20201011_152335800 by Godfrey Hatton, on Flickr
Stub axles, hubs, wheel bearings and drum brakes are next, so I'll keep you all posted!
Pog
Made huge progress on the car over the weekend
I soon found out I couldn't get the wishbone bolts on with the steering rack already in place, so that had to come back off first. And then it was a battle getting the wishbones to line up all by myself - but I managed it after a lot of perseverance! With the wishbones on, the steering rack was a lot easier to fit actually, as you can rest it on the wishbones while you fiddle about with the plates/nuts etc.
original_2afd00bf-f0b0-4bf4-b8f5-ffda2e044910_PXL_20201011_152407748 by Godfrey Hatton, on Flickr I finally got to fit those lovely, shiny and new front shocks too - they're the shorter damper version to suit the monte springs - hopefully they feel as good on the road as they look! Nothings tightened yet, I've been advised to wait until the weight of the car is back on the ground before doing so.
original_d3b9e058-92bc-422e-9cef-92761851d4ee_PXL_20201011_152435482 by Godfrey Hatton, on Flickr With the suspension assembly almost done, I moved on to the steering column. Using the retrieved captive nut plate the column bracket could go on, after I gave it a fresh coat of paint. The outer column also got a refresh, with paint and a new upgraded top bush (the old one literally fell apart just looking at it haha). Everything bolted together, the steering feels lovely and smooth; no tight spots or notchiness which is promising. With the steering wheel loosely in place, dare I say it, it's starting to look like a car again!
original_07e536a5-c3cb-4a13-8c36-cfb39f04db7e_PXL_20201011_152335800 by Godfrey Hatton, on FlickrStub axles, hubs, wheel bearings and drum brakes are next, so I'll keep you all posted!
Pog
Young Imp Members Registrar
-
colimp66

- Posts: 702
- Joined: Wed Dec 17, 2008 8:17 pm
- Club Member: Yes
- Car Model: 1970 Hillman Imp Deluxe.. "The Pest"
- Location: Dunbar, East Lothian, Scotland
- Has thanked: 60 times
- Been thanked: 53 times
Re: EHK 744G - 1969 Super - suspension almost done!
Pog,
as Scott says that is looking really good, well done. Great feeling fitting new stuff back onto the car.
Cheers
Col.
as Scott says that is looking really good, well done. Great feeling fitting new stuff back onto the car.
Cheers
Col.
-
Bobbycham

- Posts: 321
- Joined: Fri Nov 18, 2011 8:56 pm
- Club Member: Yes
- Car Model: Singer Chamois
- Location: Devizes
- Has thanked: 22 times
- Been thanked: 19 times
Re: EHK 744G - 1969 Super - suspension almost done!
LOOKING GOOOOOOD!!!!!!!!!!!!
Bob
Bob
I am the most responsible person around, if anything goes wrong ,"l am responsible"
-
Pog
- Posts: 142
- Joined: Sat Aug 24, 2013 4:55 pm
- Club Member: Yes
- Car Model: 1969 Super 'Betty'
- Location: Northampton, UK
- Has thanked: 10 times
- Been thanked: 37 times
Re: EHK 744G - 1969 Super - suspension almost done!
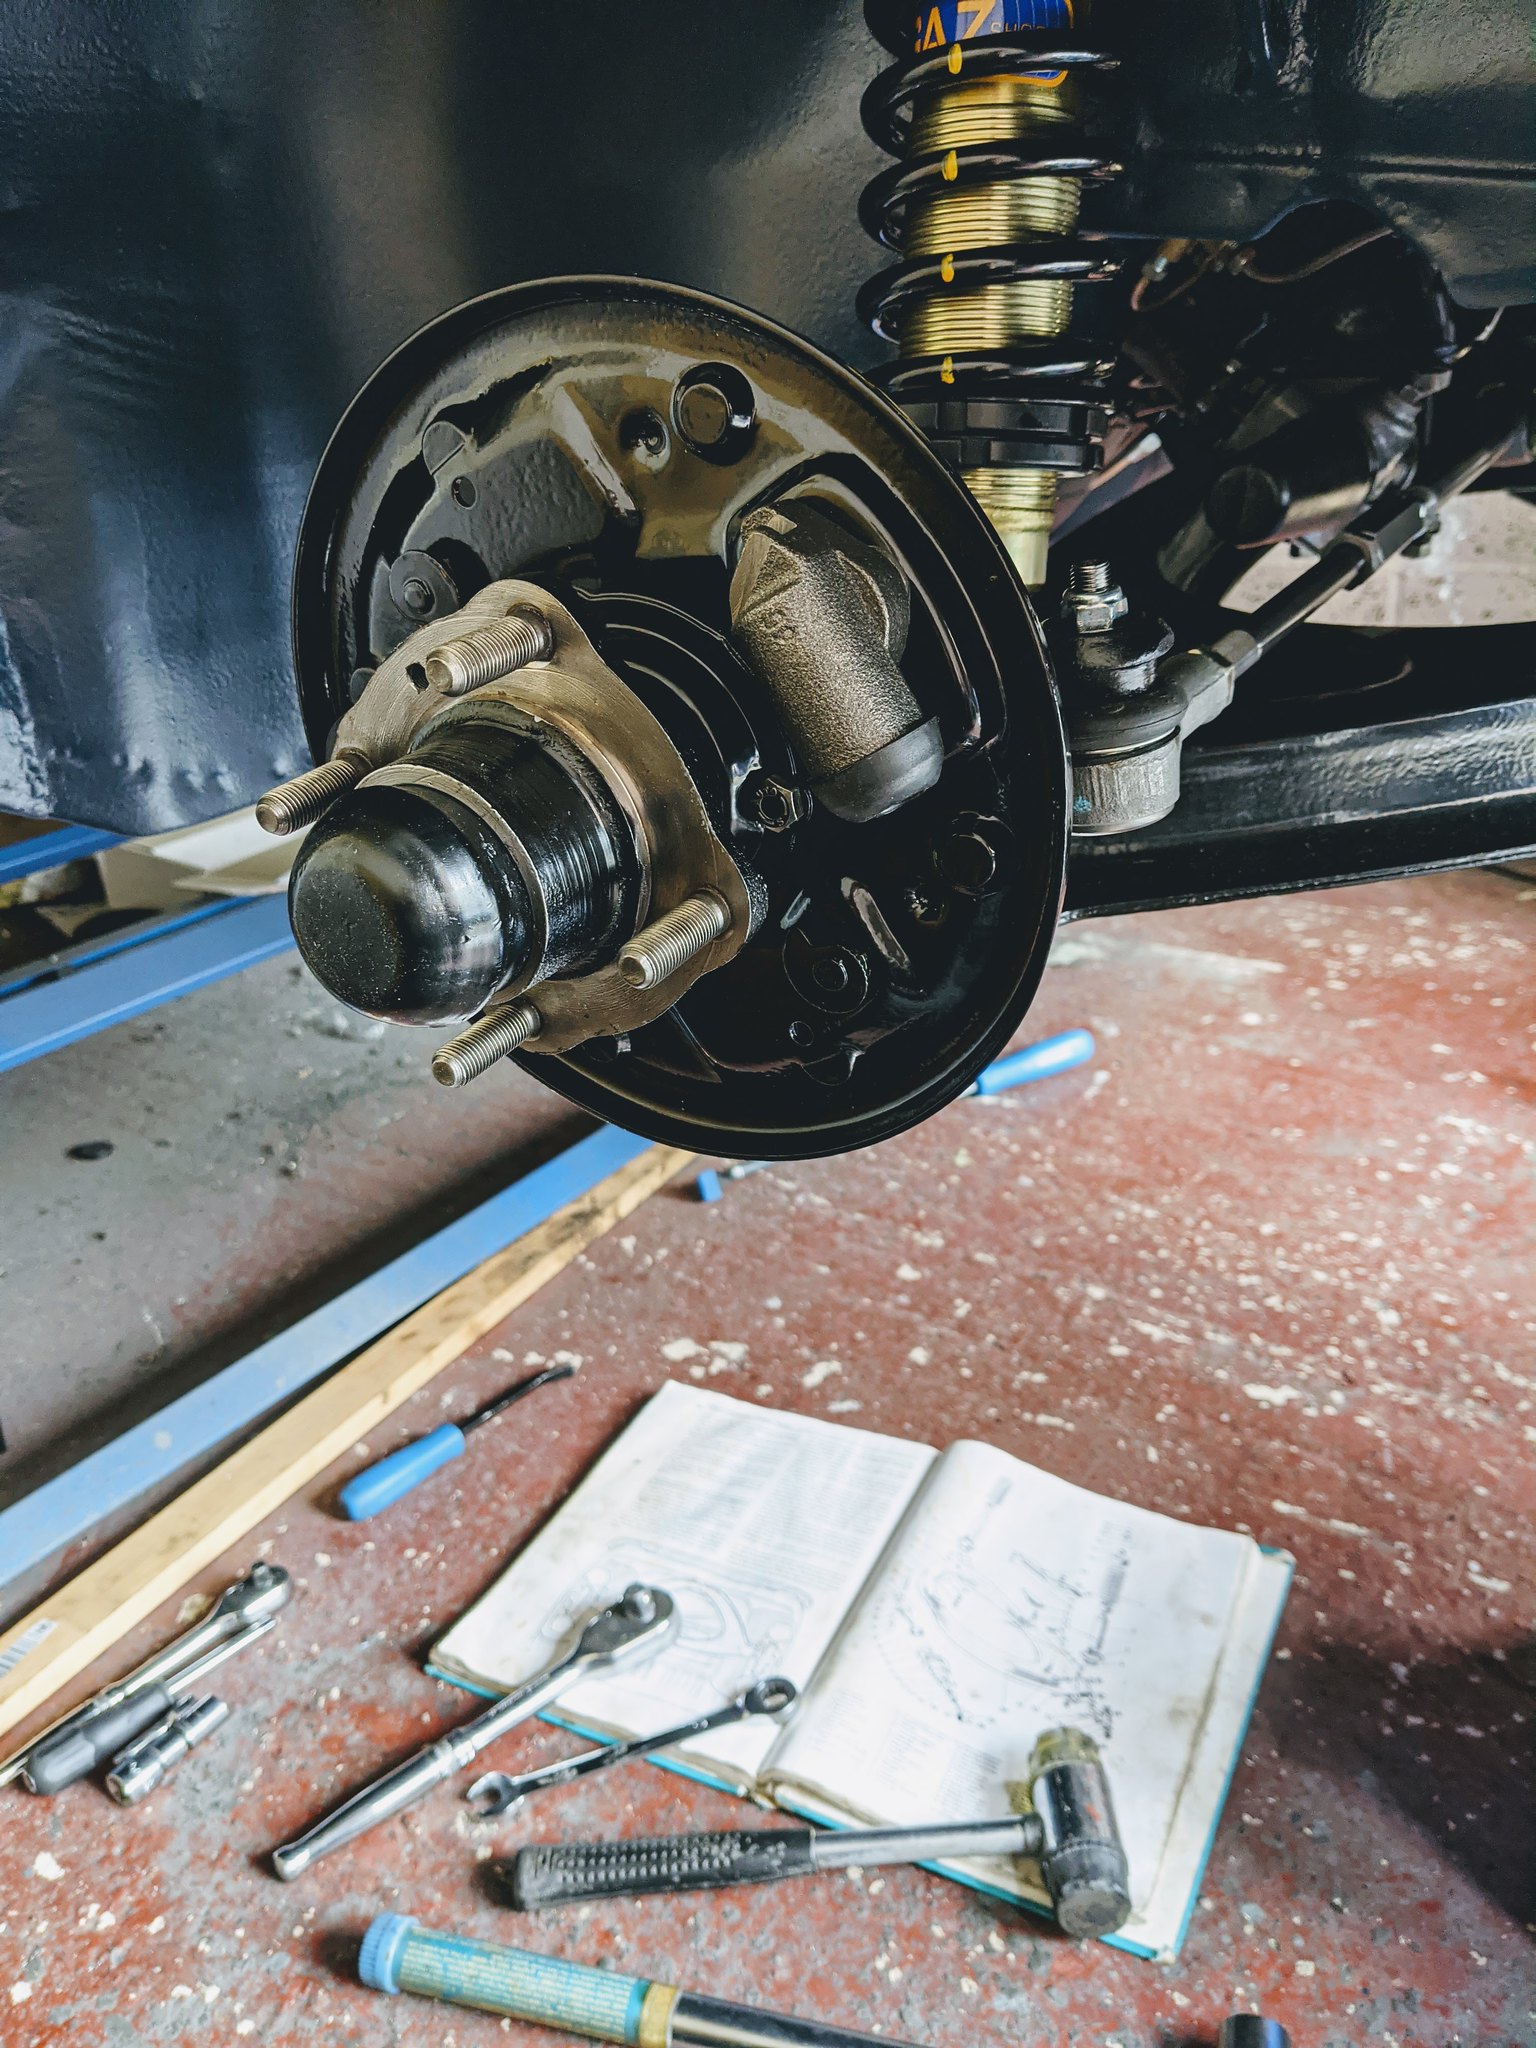
Thanks all. Made more good progress on the Imp this weekend:
Continuing with the front suspension - the stub axles were bolted on. The verticle bolt wouldn't fit past the lower damper bolt, so that had to come back out to fit, luckily everything was only done up finger tight.
 original_3fd830d0-d43d-4e5a-99aa-2834e79090de_PXL_20201017_084943933 by Godfrey Hatton, on Flickr
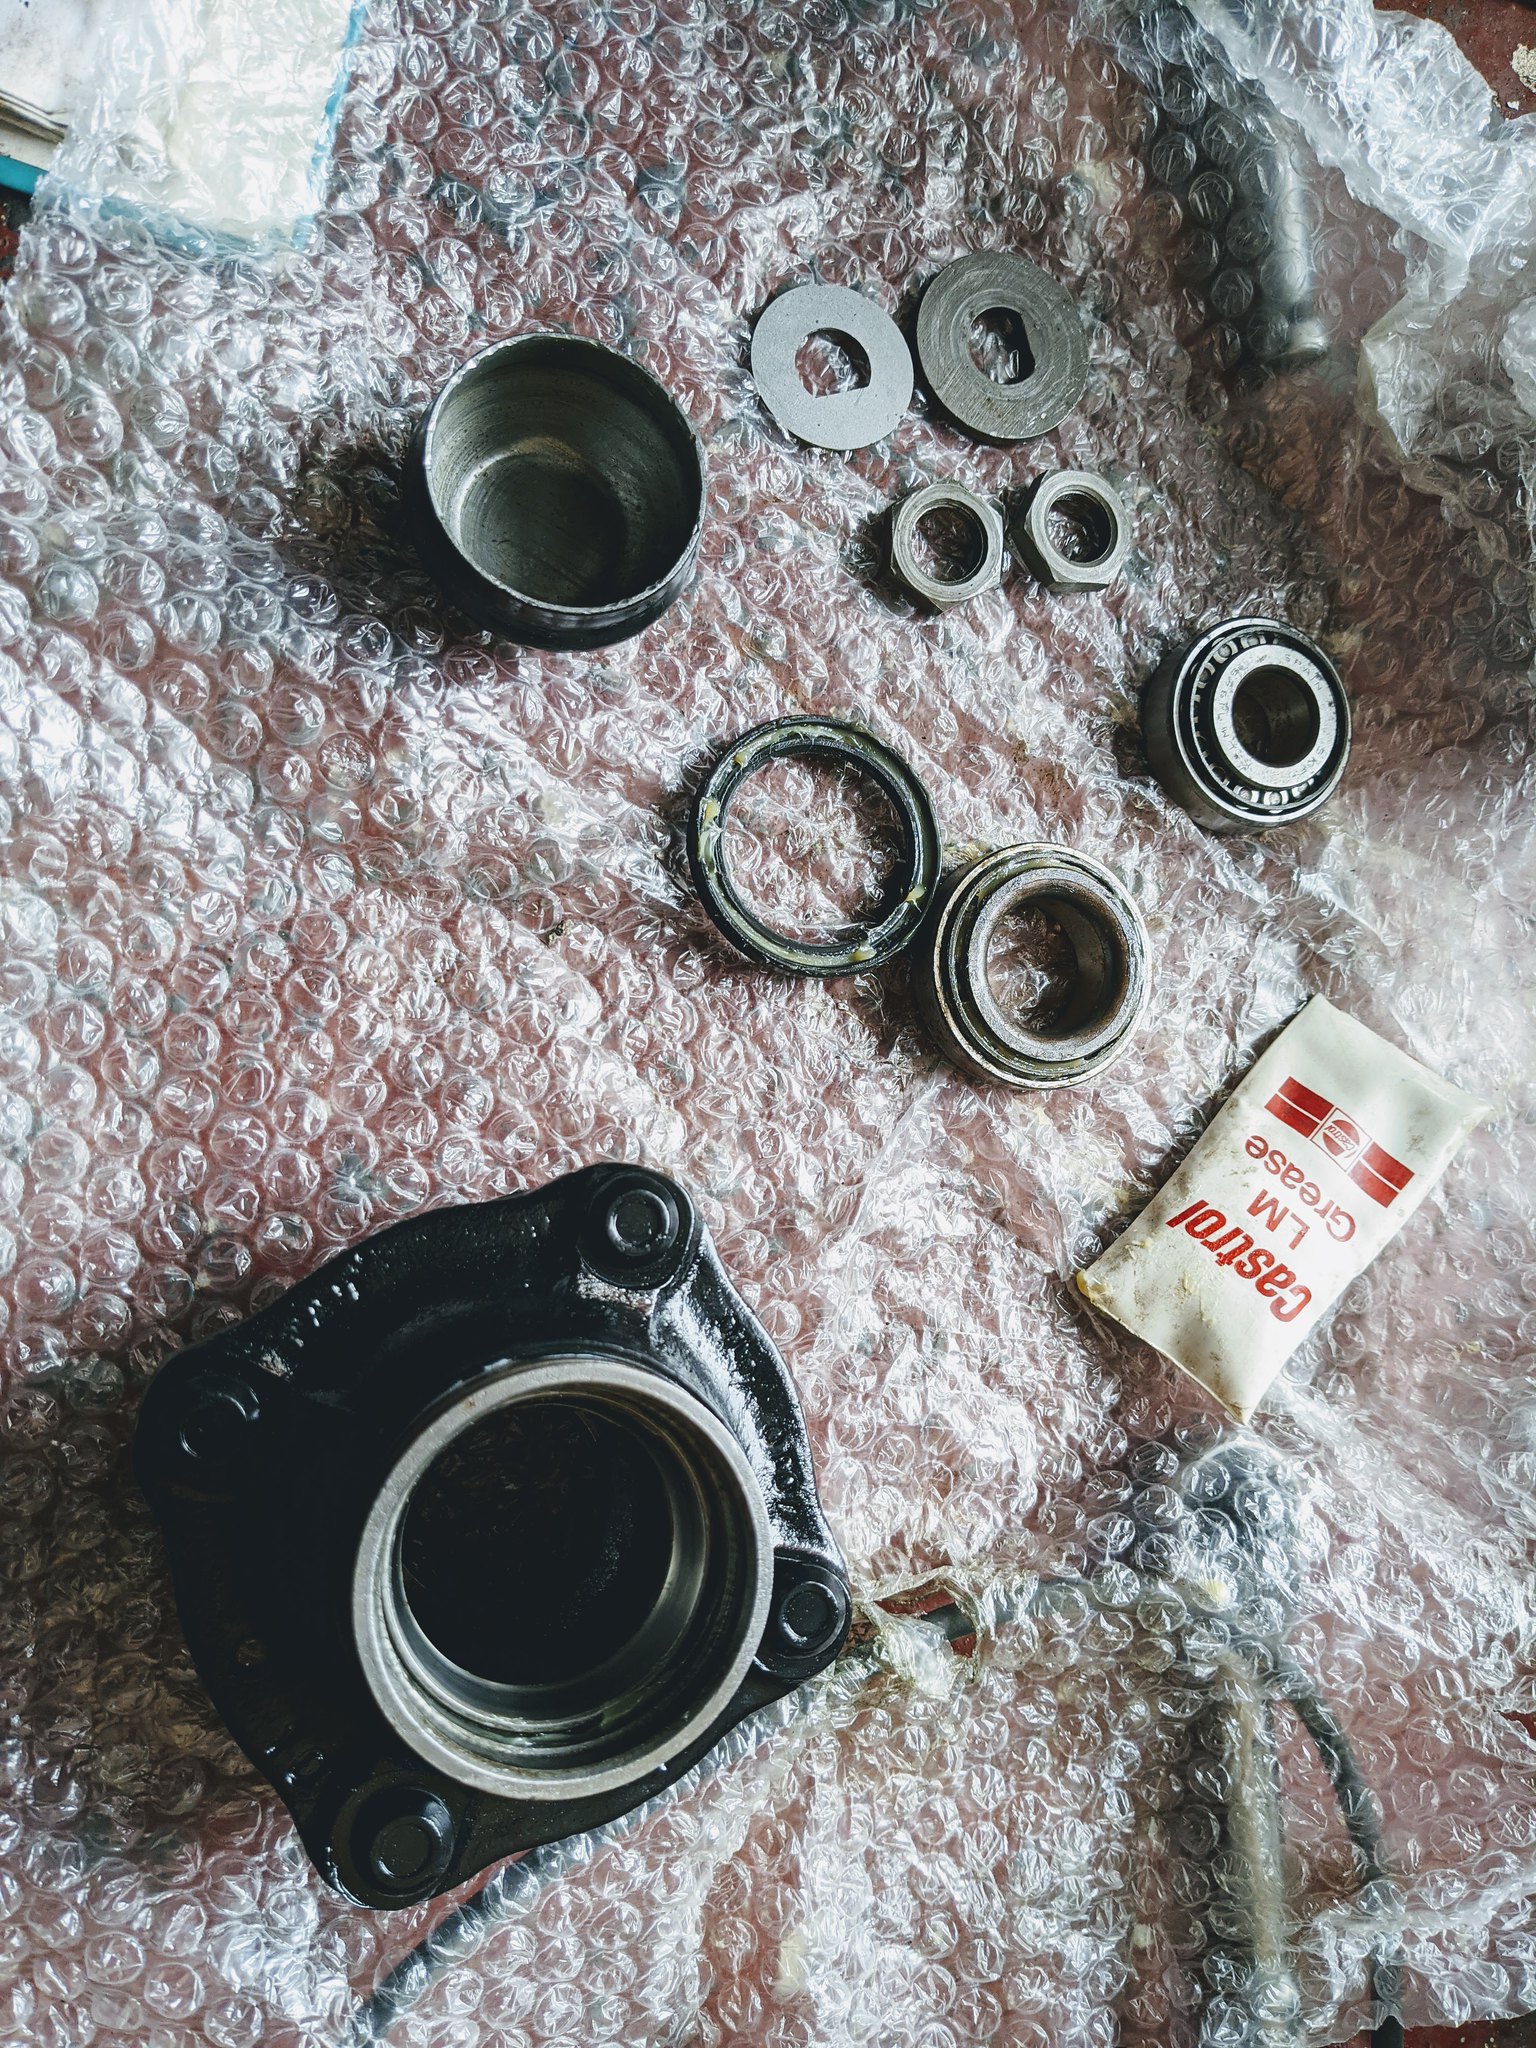
Next came the hub assemblies. New wheel bearings kits from Bob were fitted, carefully packing them with grease. Then the brake backing plates could be fitted and the hubs mounted on the stub axles. Making sure not to overtighten the adjustment nut and bending back the tab washers over the locking nut, they were finished with the hub caps. They spun nice and smooth and there wasn't any free play in them so I must have done something right!
 original_4c3664de-1310-482e-8b63-102251f5e8ce_PXL_20201017_095704163 by Godfrey Hatton, on Flickr
 original_4e0fd878-e42e-4d4e-9f7b-4f55efd9cca8_PXL_20201017_133324898 by Godfrey Hatton, on Flickr
Hubs sorted, the brakes were next. Blimey, those springs are tough aren't they! But that 'ping' you hear when the brake shoe finally locates in the cylinder, very reassuring!
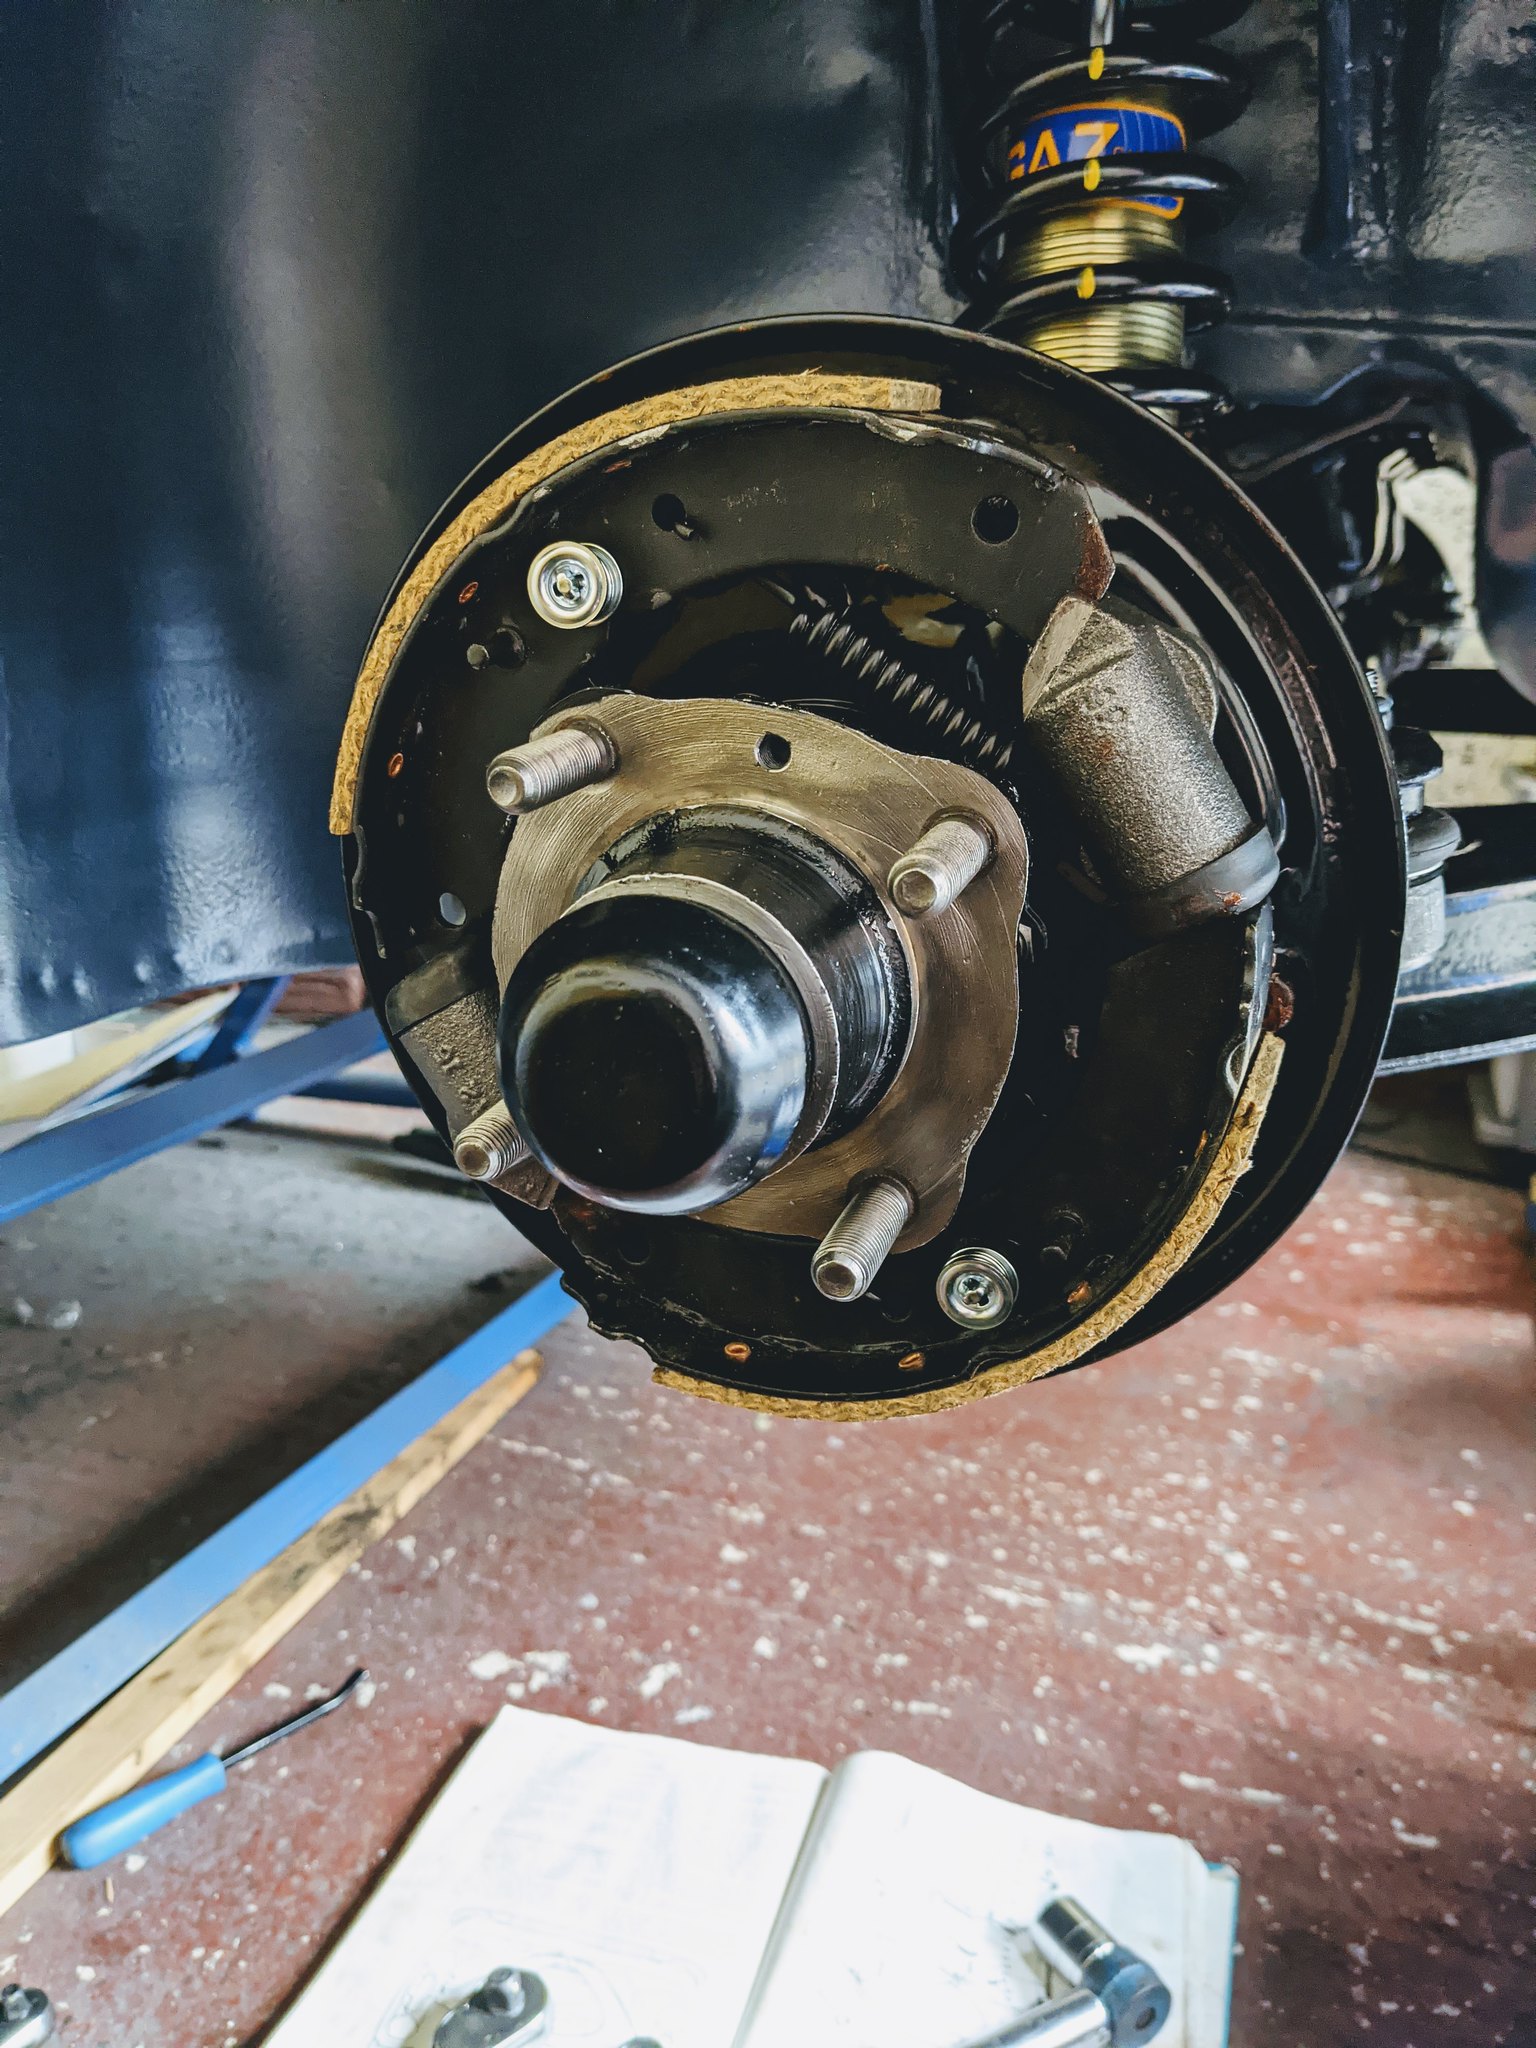 PXL_20201017_152103584 by Godfrey Hatton, on Flickr
Brakes sorted, the machined and refurbished drums could go on. Am I right in thinking that any high spots on the shoes will quickly go during their bedding in? Even with the adjusters backed all the way off, the drums still catch slightly as they spin. Which is a bit annoying considering I had them machined to try and prevent exactly that!
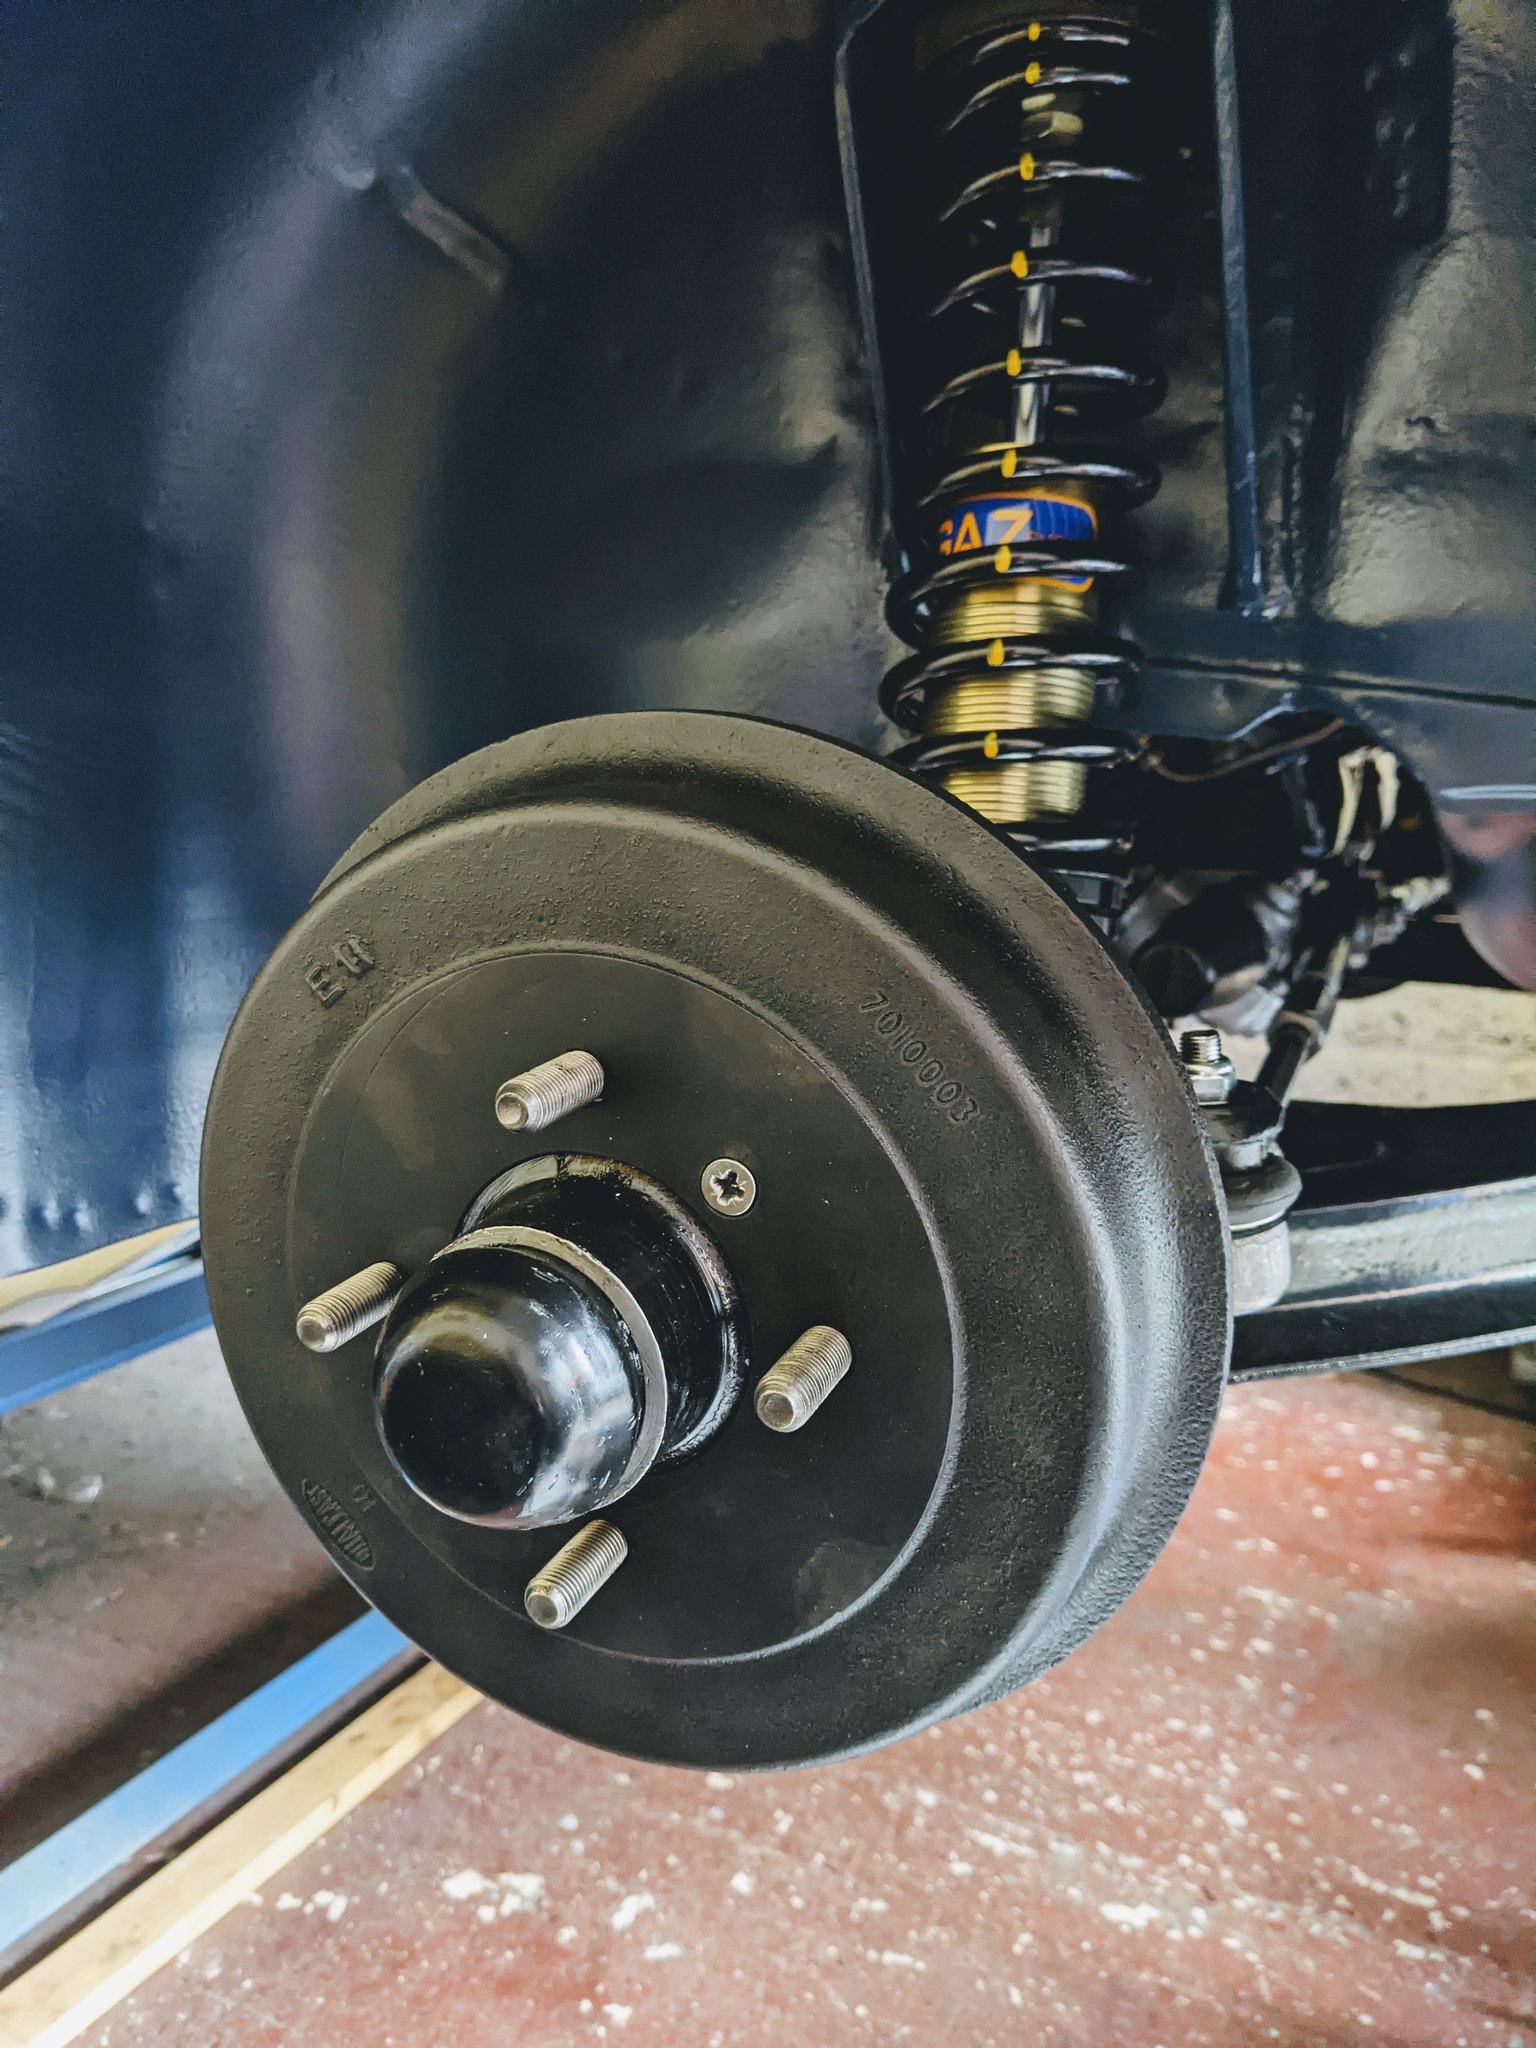 PXL_20201017_154330606 by Godfrey Hatton, on Flickr
Everything I've shown I've done to both sides. I still need to connect the brake pipe between the two cylinders and also the flexible brake hoses (there is a long and short hose, which goes on the front?), but that's practically the entire front assembly complete!
I'll keep you all posted, but I'm rather pleased with this latest update!
Pog
Continuing with the front suspension - the stub axles were bolted on. The verticle bolt wouldn't fit past the lower damper bolt, so that had to come back out to fit, luckily everything was only done up finger tight.
original_3fd830d0-d43d-4e5a-99aa-2834e79090de_PXL_20201017_084943933 by Godfrey Hatton, on FlickrNext came the hub assemblies. New wheel bearings kits from Bob were fitted, carefully packing them with grease. Then the brake backing plates could be fitted and the hubs mounted on the stub axles. Making sure not to overtighten the adjustment nut and bending back the tab washers over the locking nut, they were finished with the hub caps. They spun nice and smooth and there wasn't any free play in them so I must have done something right!
original_4c3664de-1310-482e-8b63-102251f5e8ce_PXL_20201017_095704163 by Godfrey Hatton, on Flickroriginal_4e0fd878-e42e-4d4e-9f7b-4f55efd9cca8_PXL_20201017_133324898 by Godfrey Hatton, on FlickrHubs sorted, the brakes were next. Blimey, those springs are tough aren't they! But that 'ping' you hear when the brake shoe finally locates in the cylinder, very reassuring!
PXL_20201017_152103584 by Godfrey Hatton, on FlickrBrakes sorted, the machined and refurbished drums could go on. Am I right in thinking that any high spots on the shoes will quickly go during their bedding in? Even with the adjusters backed all the way off, the drums still catch slightly as they spin. Which is a bit annoying considering I had them machined to try and prevent exactly that!
PXL_20201017_154330606 by Godfrey Hatton, on FlickrEverything I've shown I've done to both sides. I still need to connect the brake pipe between the two cylinders and also the flexible brake hoses (there is a long and short hose, which goes on the front?), but that's practically the entire front assembly complete!
I'll keep you all posted, but I'm rather pleased with this latest update!
Pog
Young Imp Members Registrar
-
The Nun
- Posts: 2928
- Joined: Tue Jan 23, 2007 7:02 pm
- Club Member: Yes
- Car Model: Imp
- Location: South
- Has thanked: 76 times
- Been thanked: 104 times
Re: EHK 744G - 1969 Super - front brakes sorted!
Theres a special Girling tool for fitting the brake shoes, makes it so simple and saves many a grazed knuckle too, only a few quid, well worth having in your tool box
You do not have the required permissions to view the files attached to this post.
Peter Nunn...ey im member 00033
-
Teddie2003
- Posts: 120
- Joined: Sun Feb 20, 2005 10:06 am
- Club Member: Yes
- Car Model: Clan Crusader & Davrian Mk6
- Location: Gosport, Hants
- Been thanked: 3 times
Re: EHK 744G - 1969 Super - front brakes sorted!
Is that an old model tool or can you still get it now?
-
phatbob
- Posts: 77
- Joined: Mon Apr 26, 2004 12:55 pm
- Club Member: Yes
- Car Model: Hillman Super Imp.
- Location: Warrington, England
- Has thanked: 38 times
- Been thanked: 22 times
Re: EHK 744G - 1969 Super - front brakes sorted!
Let me Google that for you.
https://www.mgocspares.co.uk/cgi-bin/sh ... 8361W_2dT4
Yours for a tenner. HTH.
Bob.
Astronomy is looking up!
-
Pog
- Posts: 142
- Joined: Sat Aug 24, 2013 4:55 pm
- Club Member: Yes
- Car Model: 1969 Super 'Betty'
- Location: Northampton, UK
- Has thanked: 10 times
- Been thanked: 37 times
Re: EHK 744G - 1969 Super - front brakes complete
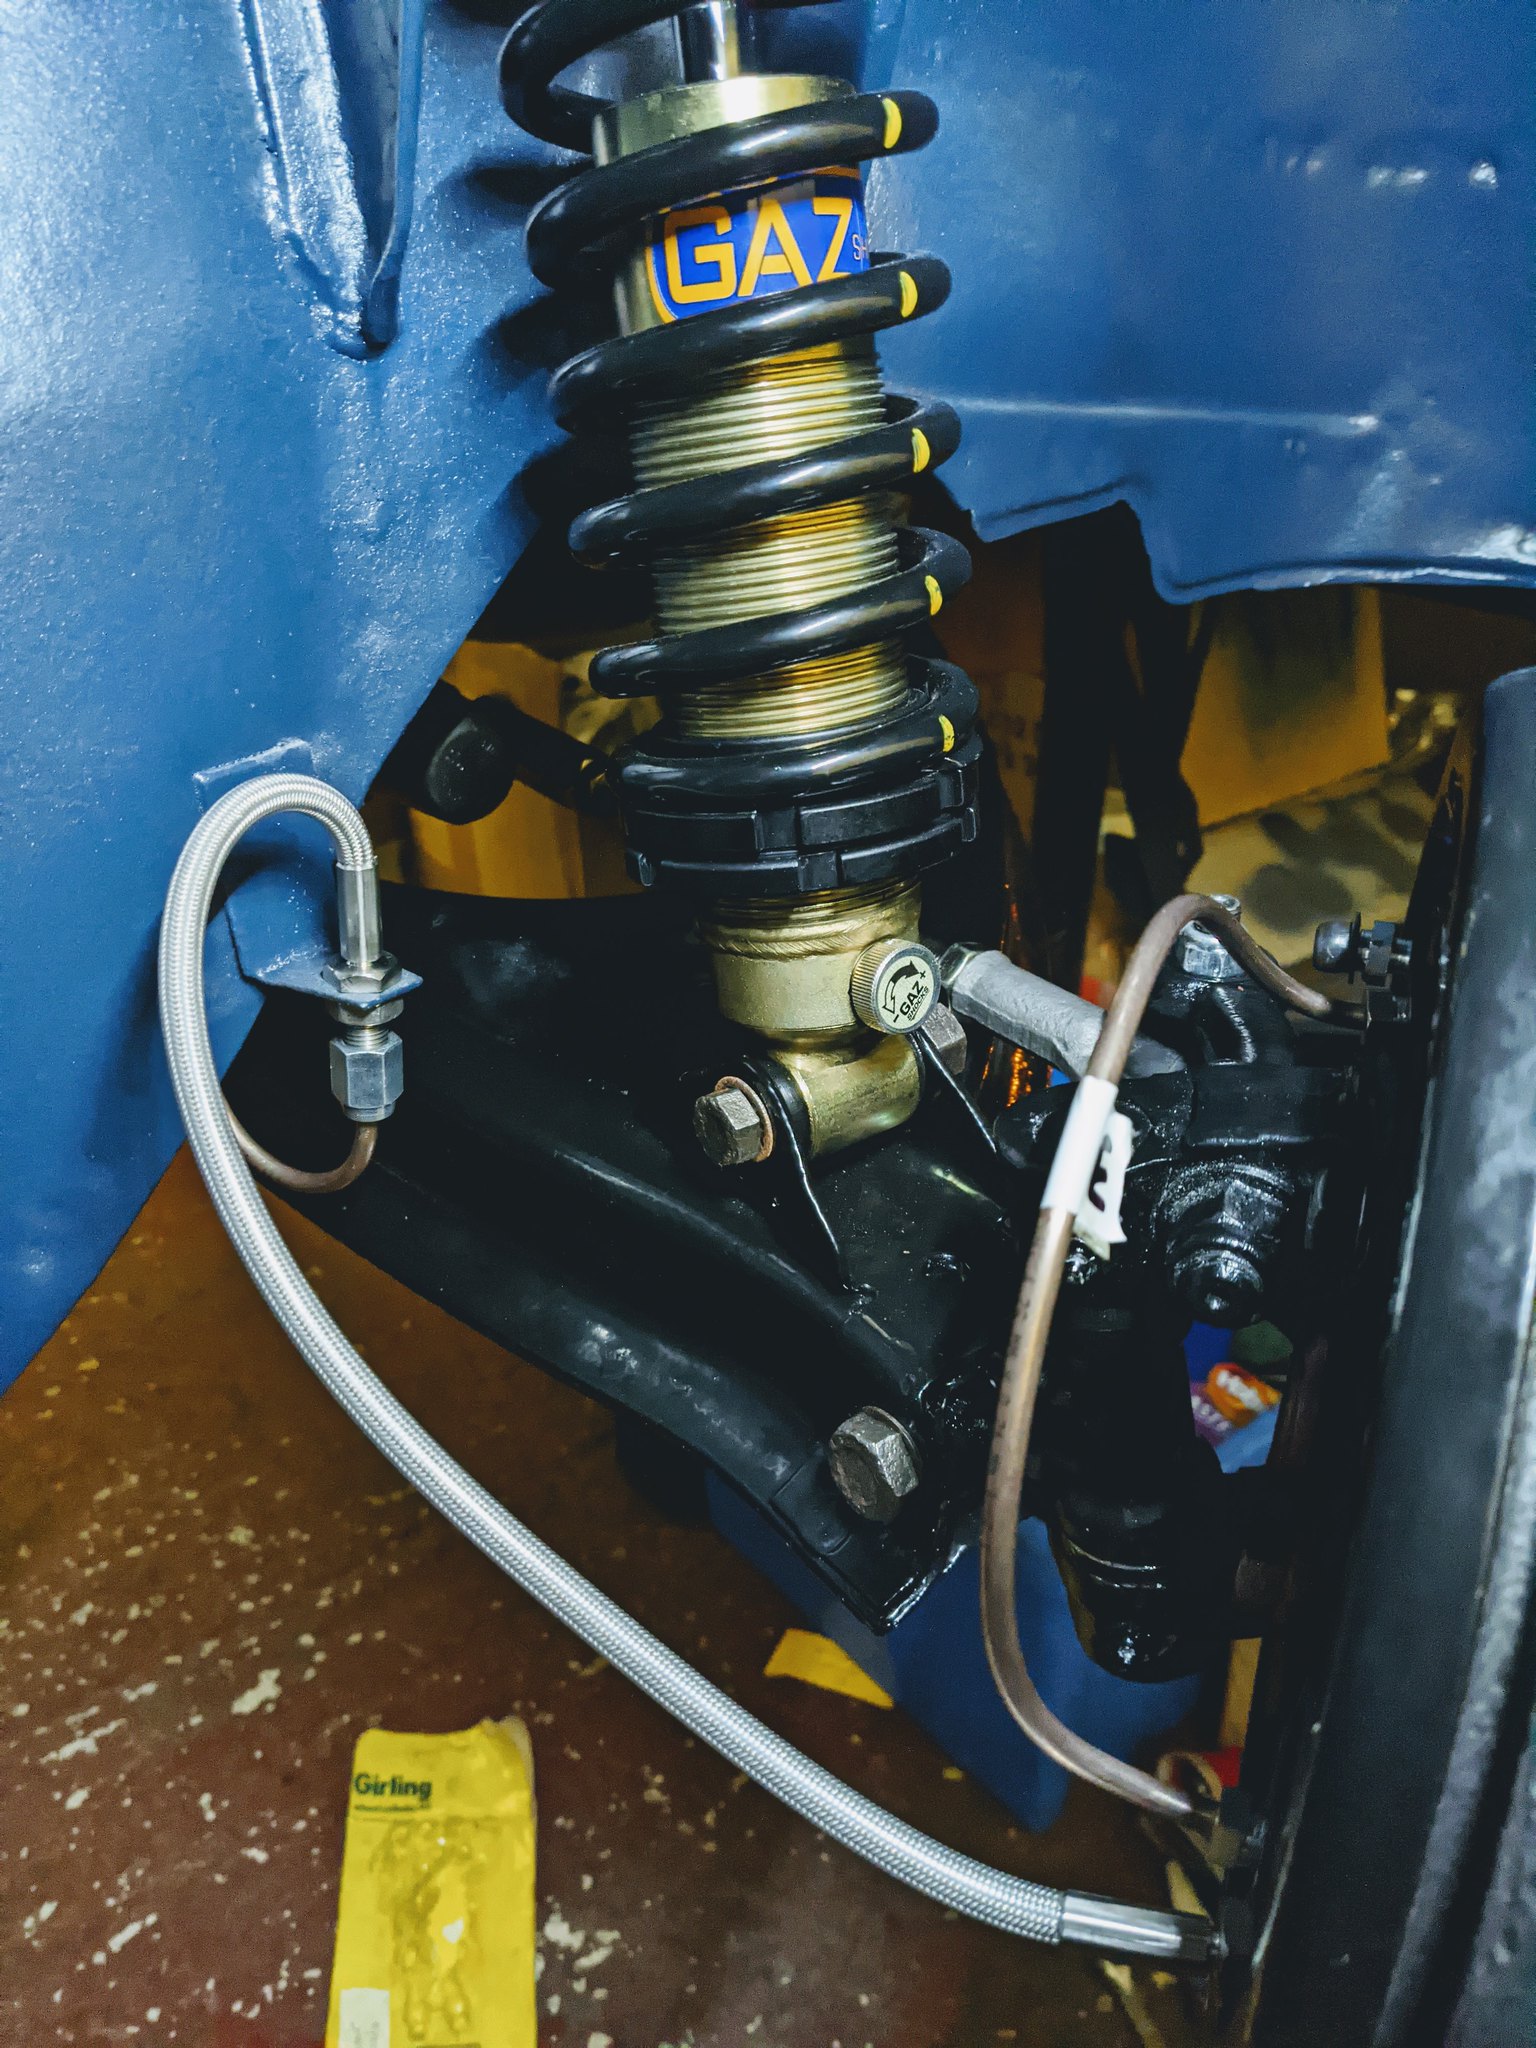
Good to know Nun. Only spent a little while in the garage today, but completed the front brakes by fitting the twin cylinder brake pipe and connecting the flexible brake hose on each side. As with everything else I’ve done, looking to improve on standard, I’ve opted for braided hoses.
 original_53d5ae09-da35-4fc3-96e2-3f45e69fcd9b_PXL_20201025_174257741 by Godfrey Hatton, on Flickr
 original_4b08bbe6-2712-4961-aef3-a6ff7a8c447d_PXL_20201025_172620380 by Godfrey Hatton, on Flickr
Now I can move to the rear. Is anyone able to show me how the rear brake lines and flexible hose is routed through the rear trailing arm? I’d greatly appreciate it!
Pog
original_53d5ae09-da35-4fc3-96e2-3f45e69fcd9b_PXL_20201025_174257741 by Godfrey Hatton, on Flickroriginal_4b08bbe6-2712-4961-aef3-a6ff7a8c447d_PXL_20201025_172620380 by Godfrey Hatton, on FlickrNow I can move to the rear. Is anyone able to show me how the rear brake lines and flexible hose is routed through the rear trailing arm? I’d greatly appreciate it!
Pog
Young Imp Members Registrar
-
Pog
- Posts: 142
- Joined: Sat Aug 24, 2013 4:55 pm
- Club Member: Yes
- Car Model: 1969 Super 'Betty'
- Location: Northampton, UK
- Has thanked: 10 times
- Been thanked: 37 times
Re: EHK 744G - 1969 Super - front brakes complete
Hi all,
This one's a fun update - a proper milestone achievement I think you'll agree, but I'll get to that...
Rear brake lines and braided flexible hoses are now in (just the final fixed lines to the drums to do):
 PXL_20201026_111308584.MP by Godfrey Hatton, on Flickr
But that allowed me to continue with the rear hubs. Some of you on Facebook saw I was really struggling with the rear wheel bearings. New ones were sourced from Bob, but no matter how I tried, they wouldn't seem to fit into the rear trailing arm. Even popping them in the freezer and heating up the housing with a hair dryer and they still wouldn't drift into place, they were just creating a ridge in the housing as if the bearing was too big.
 original_904a5c24-bfe4-4c55-b216-7ee0c954a9cd_PXL_20201101_113222979 by Godfrey Hatton, on Flickr
The only way I could see getting around it was to take some fine grit sandpaper and carefully rub the inside of the housing to smooth out the ridge. Sure enough, after some finessing, the bearing could then be squeezed in far enough to allow sufficient thread from the driveshaft to poke through and get the nut on the end, allowing me to pull both bearings into place by tightening the nut. Let's just say I'm not looking forward to having the do that job again! I hope they last a fair while.
With the driveshafts in, I bolted on the brakes I had already pre-built making that much simpler! I tightened down the whole hub assemblies to their specified torque with a new upgraded locking nut from Moose (thanks Mike!) with some high strength thread lock for good measure. I may not be building this car to race competitively, but I am keen to do the odd sprint day for fun, so don't want to take any chances.
 original_1d950ccc-39eb-4c26-8640-e6d68996e9f8_PXL_20201107_153417314 by Godfrey Hatton, on Flickr
With the rear hubs finally sorted, the drums could go on. And I simply couldn't resist, now there was nothing really stopping me from putting the wheels back on! So here you have it... the first time the car has been on its own wheels in 18 months!! Proper buzzing. They will sadly have to come back off and go back in the air at some point, not least to send the wheels off for refurbishment, but also to sort things like throttle/choke cable and gear lever/linkage assembly etc. But I just had to roll it out and see how it looked - I'd almost forgotten how small these cars are, I'd been so used to seeing the car at chest level!
What's a bit saddening is that the car, from the outside, looks absolutely no different to when I got it nearly 2 years ago! It was a rolling chassis then and it's only back to being a rolling chassis now. But it's quite the transformation underneath!
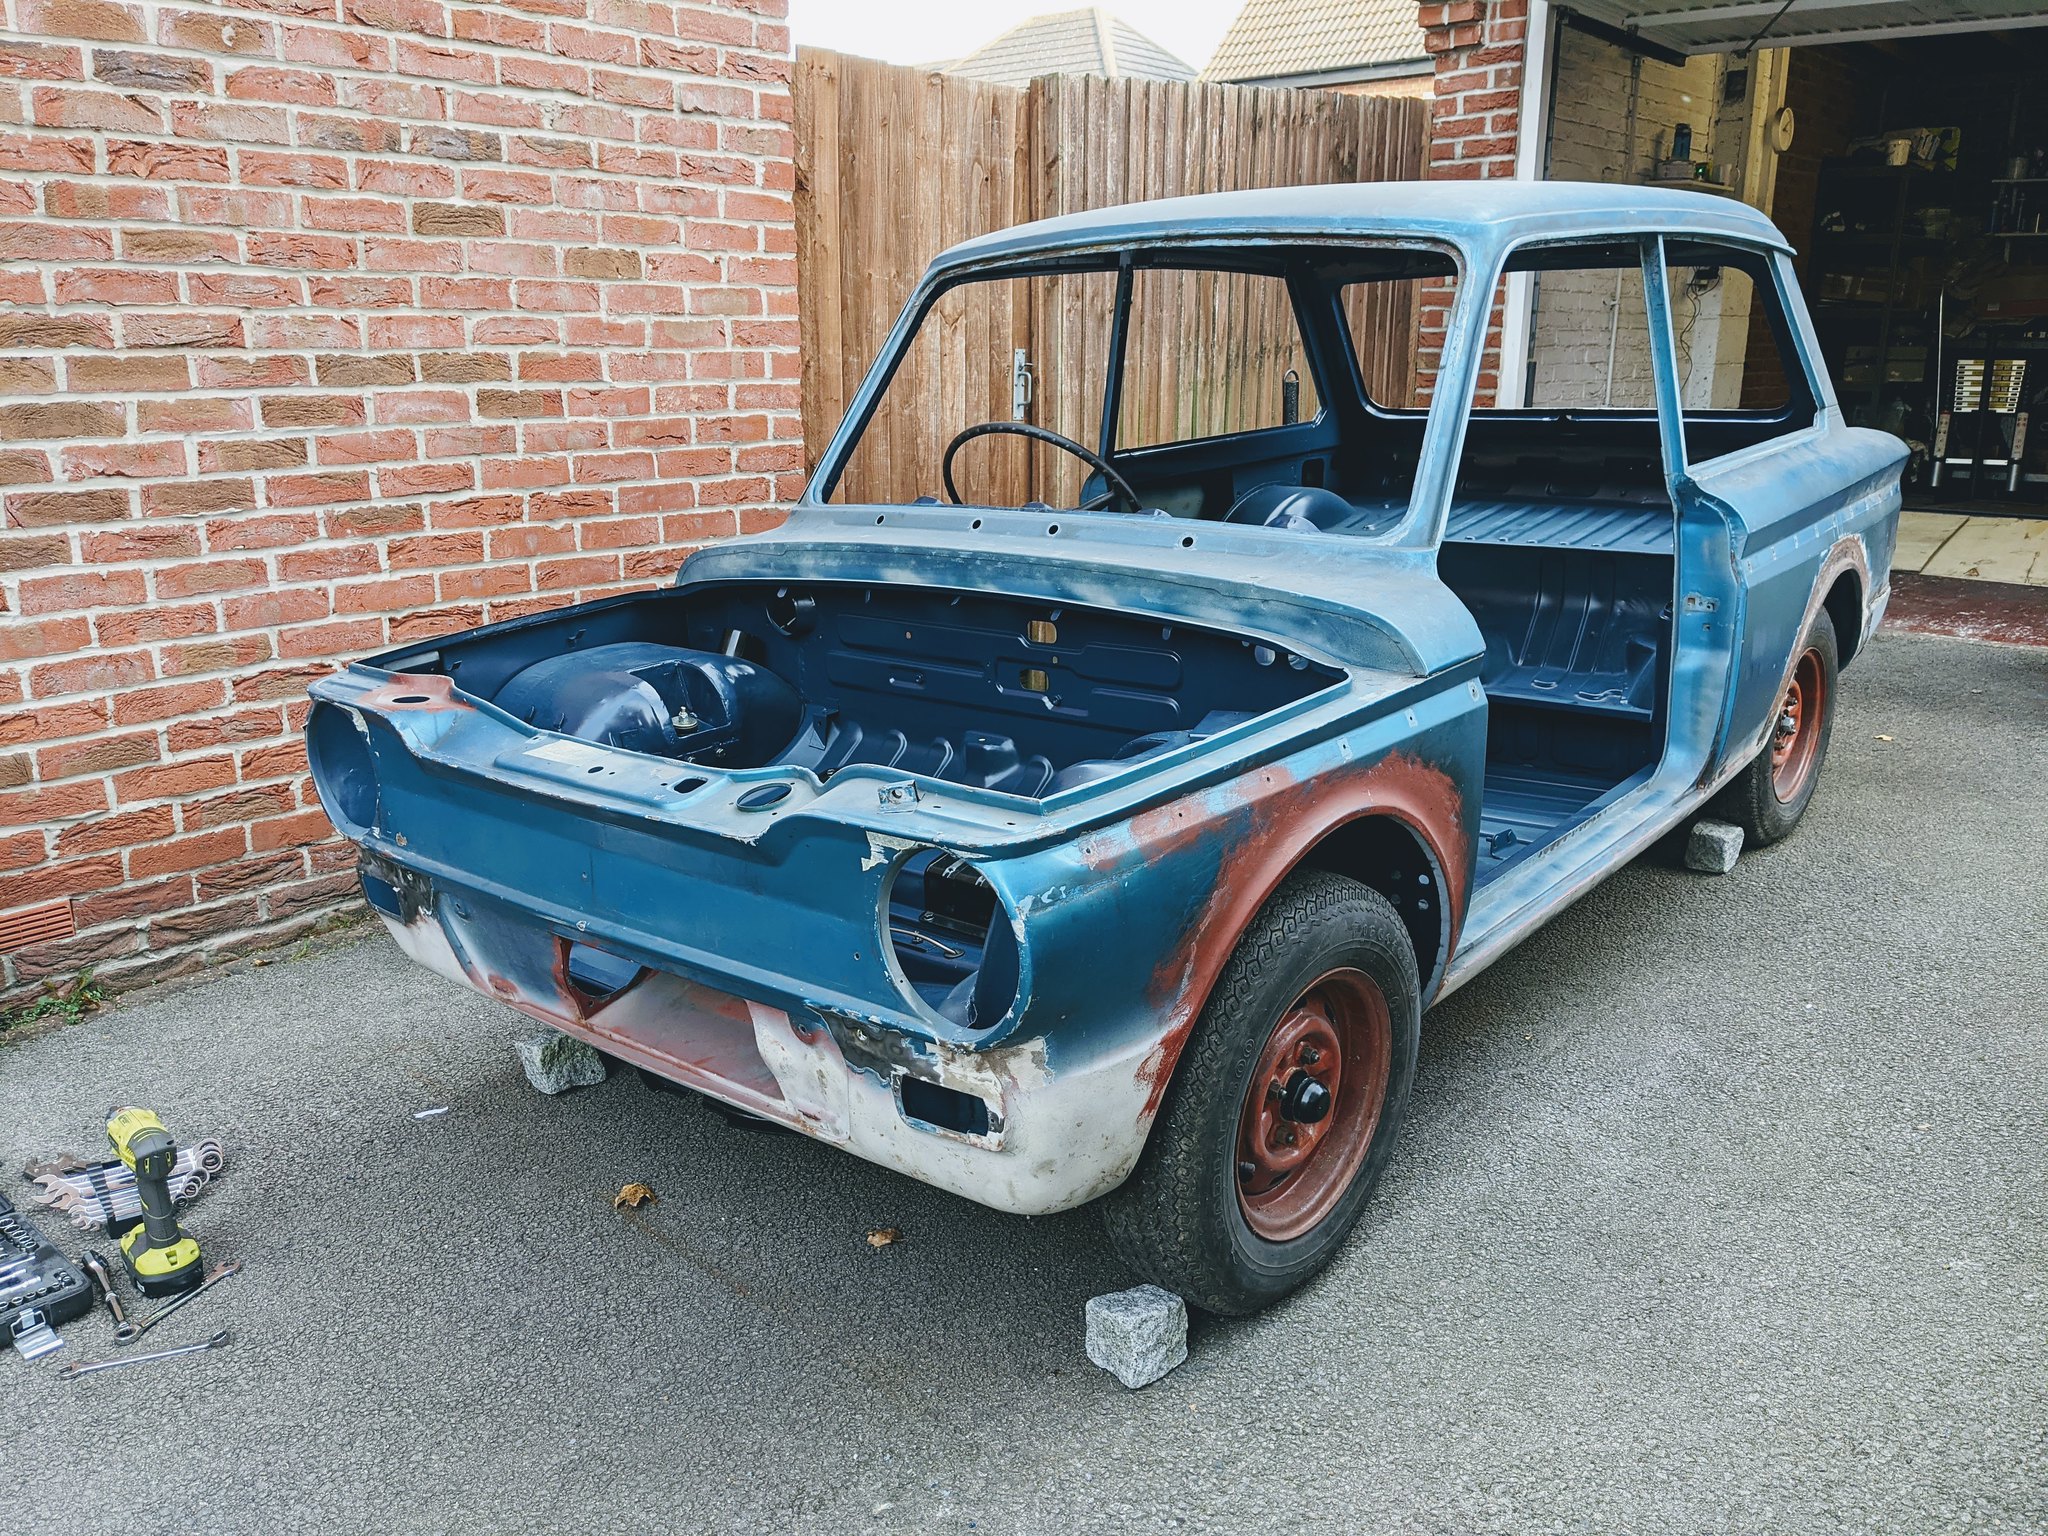 original_cd7154dd-4286-4a8f-b274-38af6961437e_PXL_20201107_151008805 by Godfrey Hatton, on Flickr
And so the project rolls into its next phase, I'll be sure to keep you all posted!
Pog
This one's a fun update - a proper milestone achievement I think you'll agree, but I'll get to that...
Rear brake lines and braided flexible hoses are now in (just the final fixed lines to the drums to do):
PXL_20201026_111308584.MP by Godfrey Hatton, on Flickr But that allowed me to continue with the rear hubs. Some of you on Facebook saw I was really struggling with the rear wheel bearings. New ones were sourced from Bob, but no matter how I tried, they wouldn't seem to fit into the rear trailing arm. Even popping them in the freezer and heating up the housing with a hair dryer and they still wouldn't drift into place, they were just creating a ridge in the housing as if the bearing was too big.
original_904a5c24-bfe4-4c55-b216-7ee0c954a9cd_PXL_20201101_113222979 by Godfrey Hatton, on FlickrThe only way I could see getting around it was to take some fine grit sandpaper and carefully rub the inside of the housing to smooth out the ridge. Sure enough, after some finessing, the bearing could then be squeezed in far enough to allow sufficient thread from the driveshaft to poke through and get the nut on the end, allowing me to pull both bearings into place by tightening the nut. Let's just say I'm not looking forward to having the do that job again! I hope they last a fair while.
With the driveshafts in, I bolted on the brakes I had already pre-built making that much simpler! I tightened down the whole hub assemblies to their specified torque with a new upgraded locking nut from Moose (thanks Mike!) with some high strength thread lock for good measure. I may not be building this car to race competitively, but I am keen to do the odd sprint day for fun, so don't want to take any chances.
original_1d950ccc-39eb-4c26-8640-e6d68996e9f8_PXL_20201107_153417314 by Godfrey Hatton, on FlickrWith the rear hubs finally sorted, the drums could go on. And I simply couldn't resist, now there was nothing really stopping me from putting the wheels back on! So here you have it... the first time the car has been on its own wheels in 18 months!! Proper buzzing. They will sadly have to come back off and go back in the air at some point, not least to send the wheels off for refurbishment, but also to sort things like throttle/choke cable and gear lever/linkage assembly etc. But I just had to roll it out and see how it looked - I'd almost forgotten how small these cars are, I'd been so used to seeing the car at chest level!
What's a bit saddening is that the car, from the outside, looks absolutely no different to when I got it nearly 2 years ago! It was a rolling chassis then and it's only back to being a rolling chassis now. But it's quite the transformation underneath!
original_cd7154dd-4286-4a8f-b274-38af6961437e_PXL_20201107_151008805 by Godfrey Hatton, on FlickrAnd so the project rolls into its next phase, I'll be sure to keep you all posted!
Pog
Young Imp Members Registrar
-
colimp66
- Posts: 702
- Joined: Wed Dec 17, 2008 8:17 pm
- Club Member: Yes
- Car Model: 1970 Hillman Imp Deluxe.. "The Pest"
- Location: Dunbar, East Lothian, Scotland
- Has thanked: 60 times
- Been thanked: 53 times
Re: EHK 744G - 1969 Super - BACK ON ITS WHEELS!
Brilliant having it back on its wheels Pog, well done. All the little bits of progress all add up although it may not look much different from the outside from 18 months ago. You know and we know what has all been done in those 18 months.
Keep it going and keep us all upto date to.
Cheers
Col.
Keep it going and keep us all upto date to.
Cheers
Col.
-
bazzateer
- Posts: 1269
- Joined: Sun Apr 02, 2006 12:27 pm
- Club Member: Yes
- Car Model: 68 Chamois Sport, 72 Imp Sport, 76 Datsun 260Z
- Location: Watford and very occasionally Fareham
- Has thanked: 68 times
- Been thanked: 88 times
Re: EHK 744G - 1969 Super - BACK ON ITS WHEELS!
Good work!
If I told you I was a pathological liar, would you believe me?
Barry Blackmore - Chiltern ACO, apparently.......................
Barry Blackmore - Chiltern ACO, apparently.......................
-
Pog
- Posts: 142
- Joined: Sat Aug 24, 2013 4:55 pm
- Club Member: Yes
- Car Model: 1969 Super 'Betty'
- Location: Northampton, UK
- Has thanked: 10 times
- Been thanked: 37 times
Re: EHK 744G - 1969 Super - BACK ON ITS WHEELS!
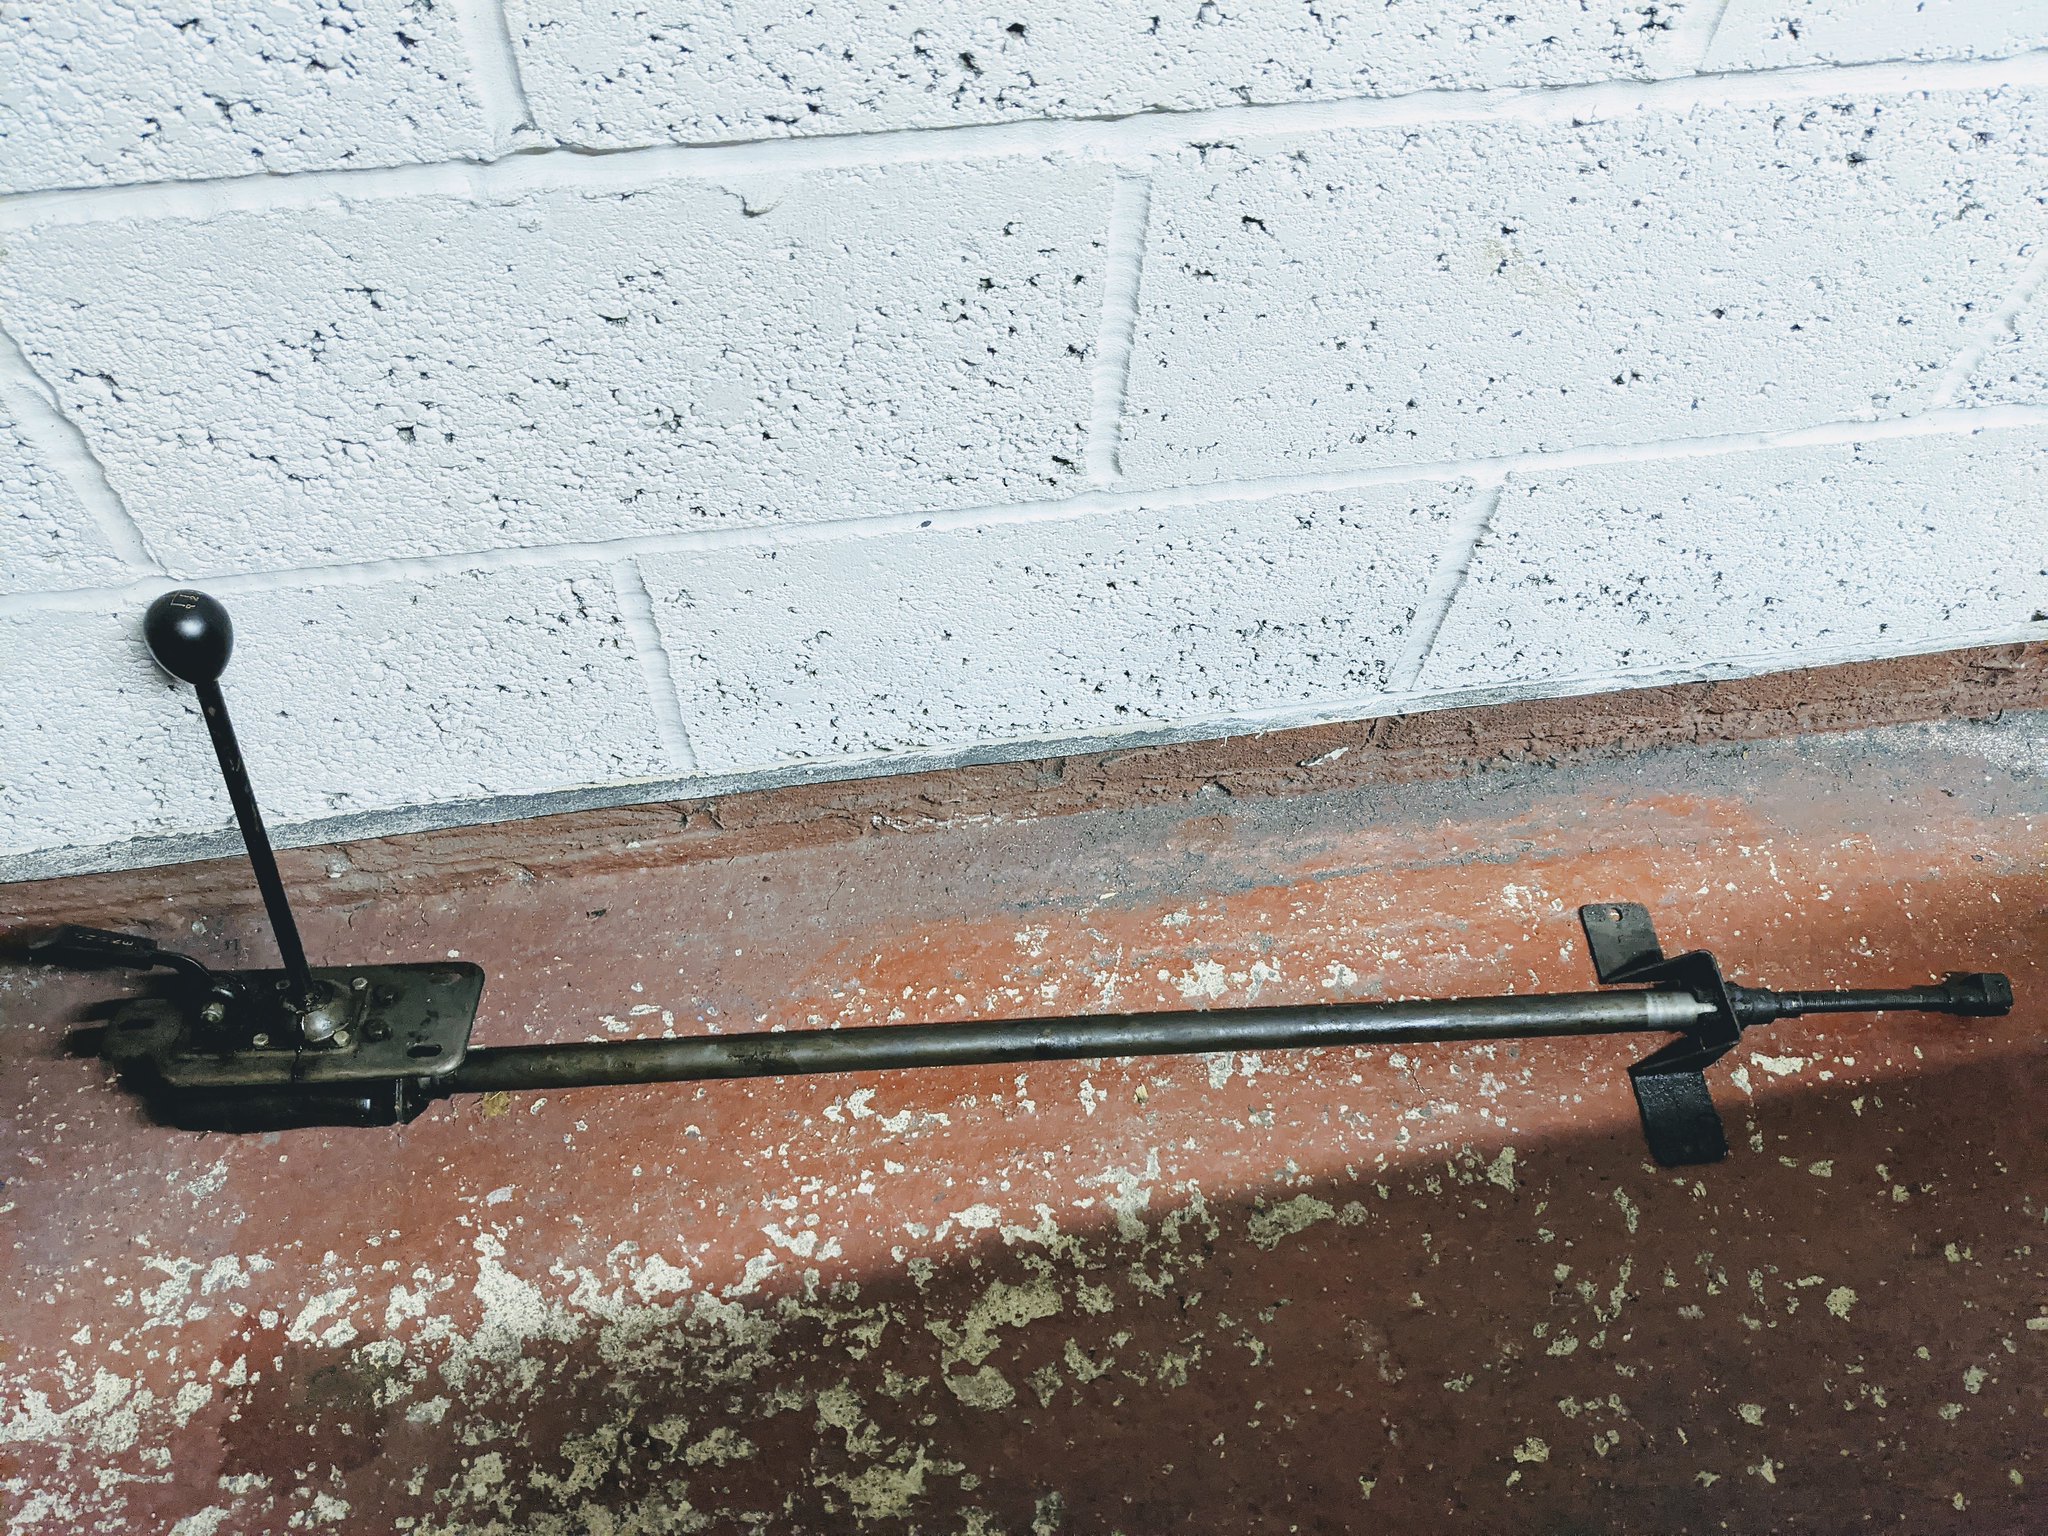
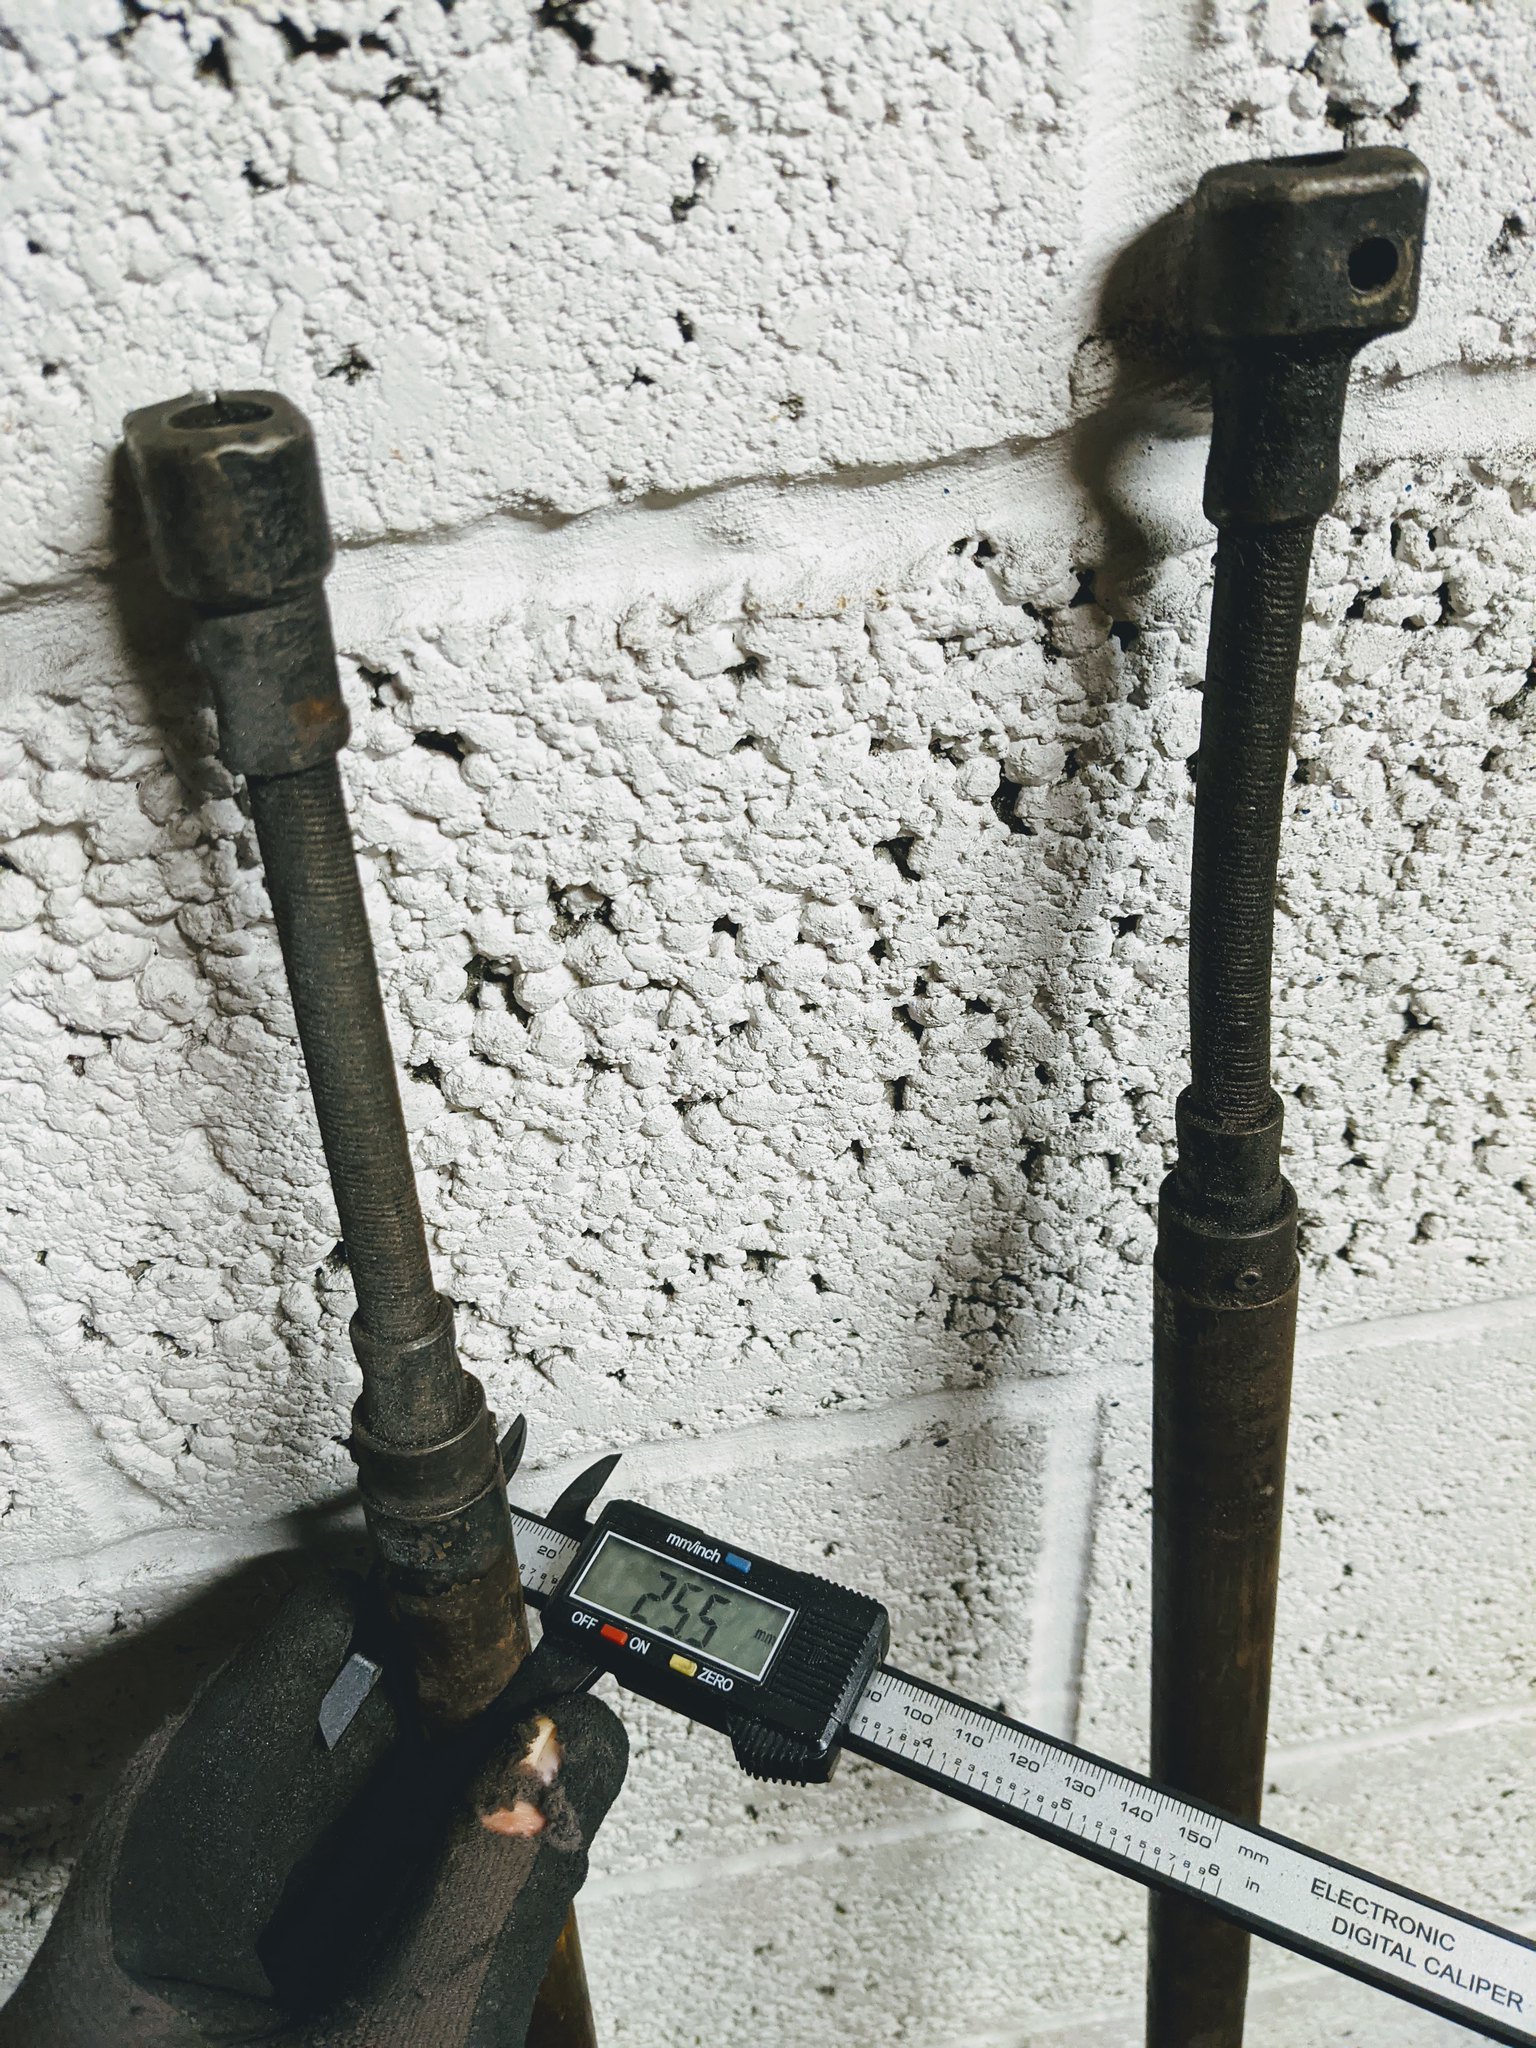
Cheers guys! Now, talk to me about gear linkages... I think my next job shall be rebuilding this one:
 PXL_20201109_191925810 by Godfrey Hatton, on Flickr
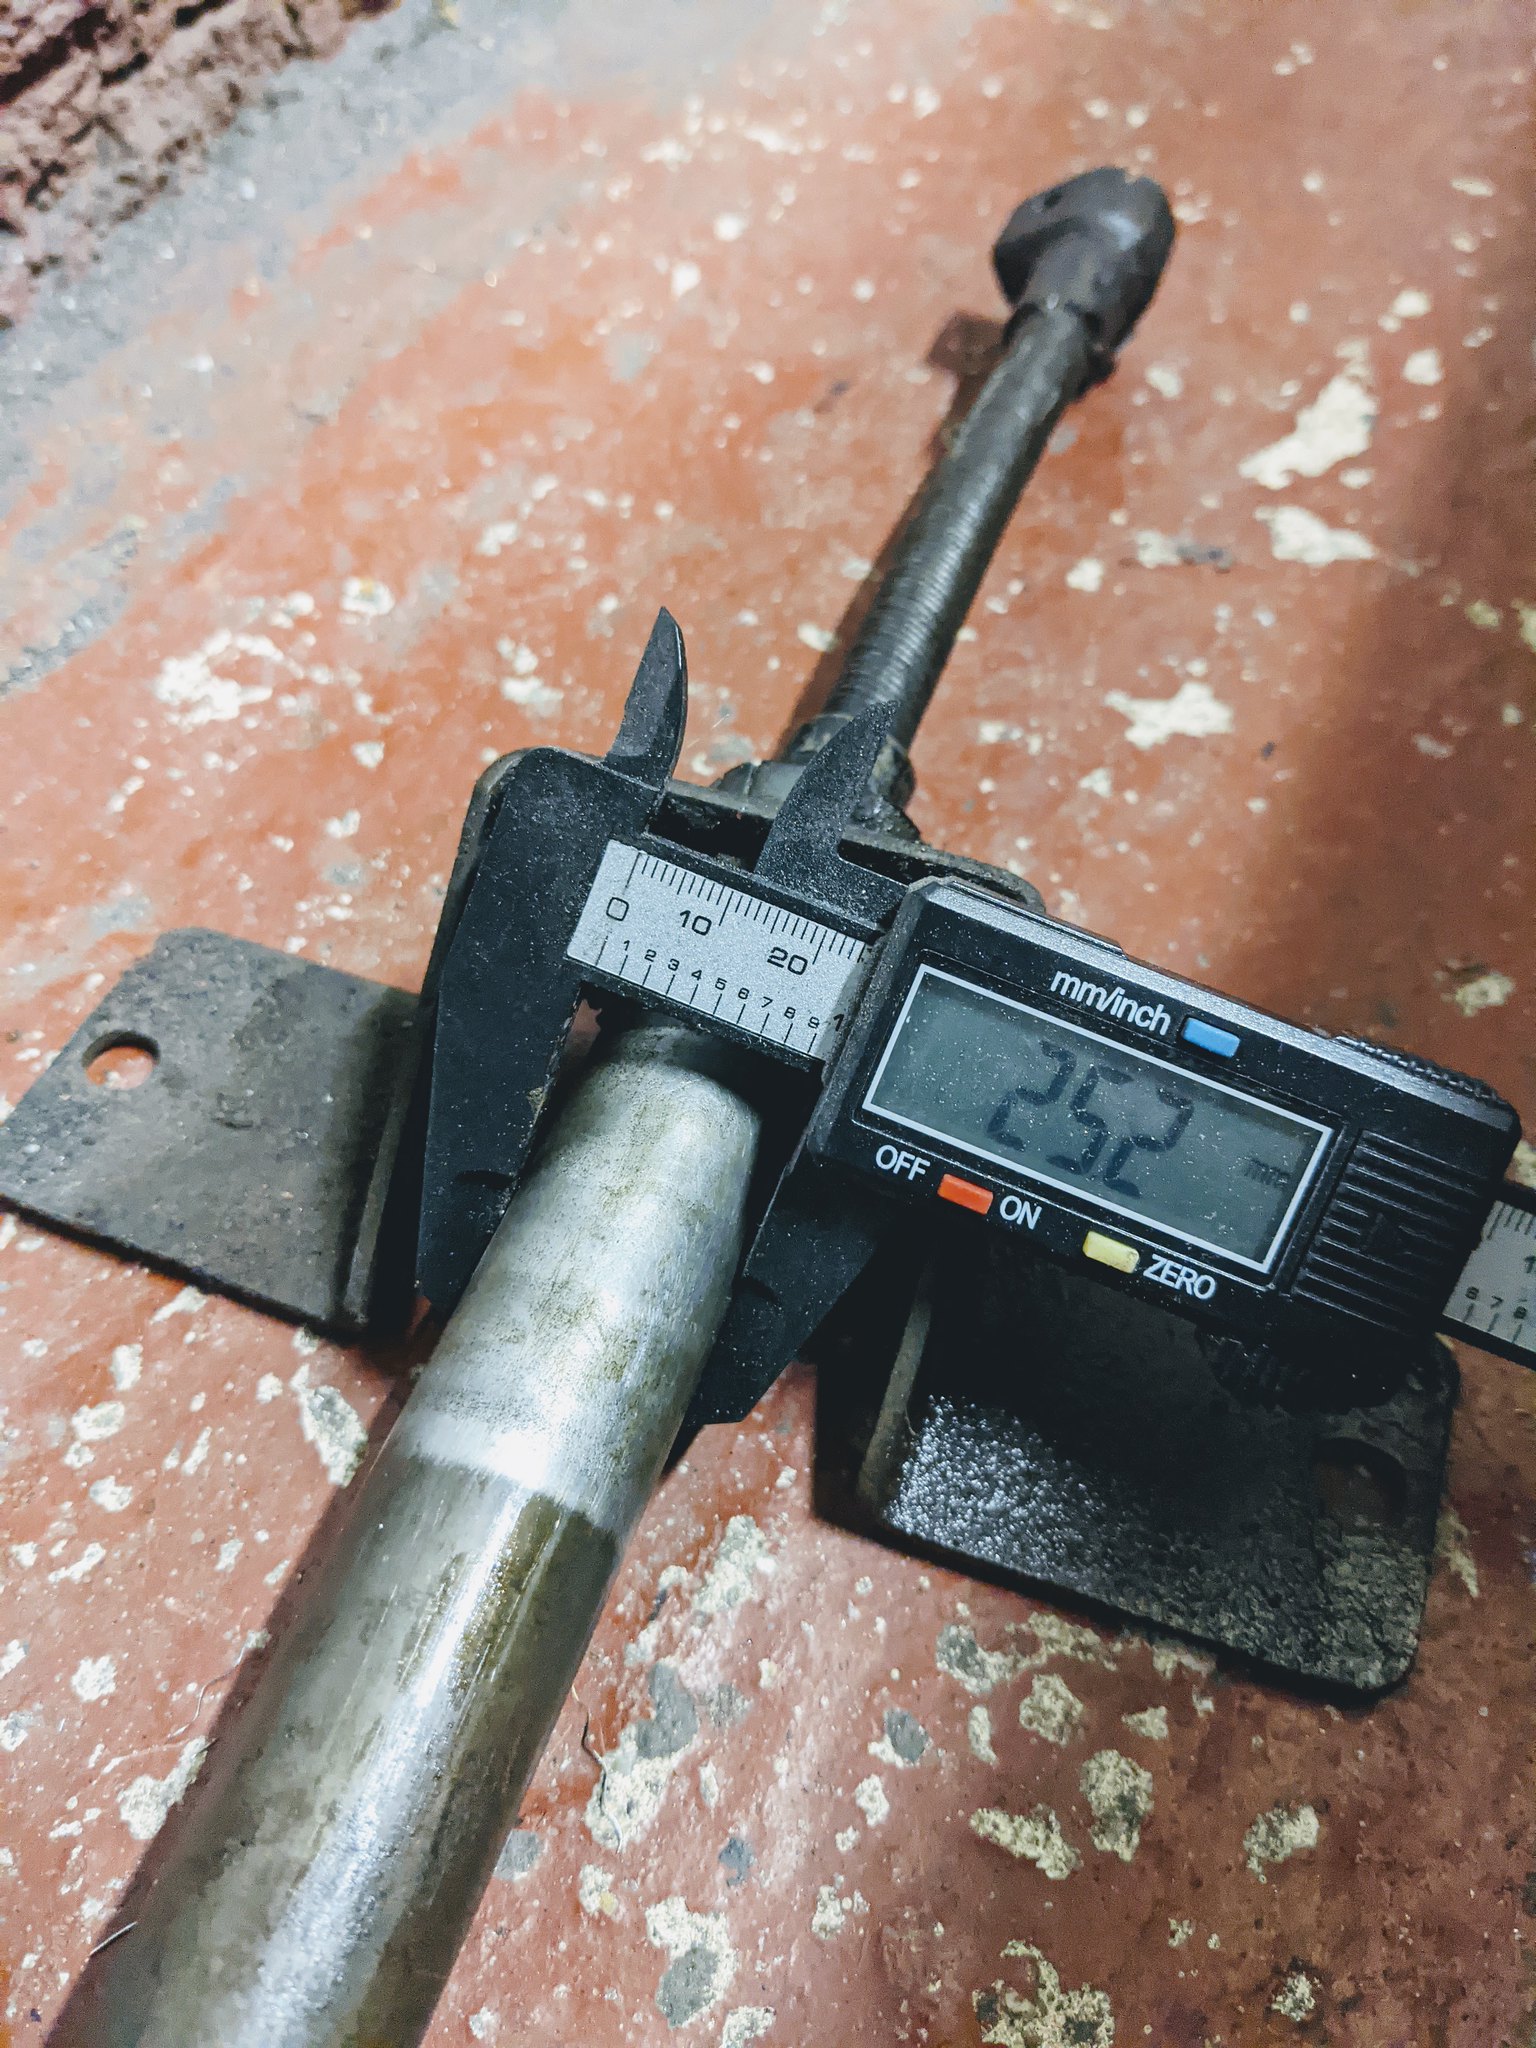
Here’s the entire gear linkage assy as pulled off the car. I’m aware the shaft wears where it passes through the rear bracket. The rest of the shaft’s diameter is 25.5mm, this one has quite a bit of play in it:
 PXL_20201109_191651457 by Godfrey Hatton, on Flickr
Luckily I have a couple other shafts that came with the spares with the car. The best of these appears to have no wear whatsoever, so that’ll get switched over. Do the plastic bearing brackets get replaced to or are these unobtainium? I’ll also be changing the flexi coupling for a reman item, how does it attach to the shaft?
 PXL_20201109_191853216 by Godfrey Hatton, on Flickr
The rubber dust cover has a tear in it, are replacements available or would a puncture patch be adequate?
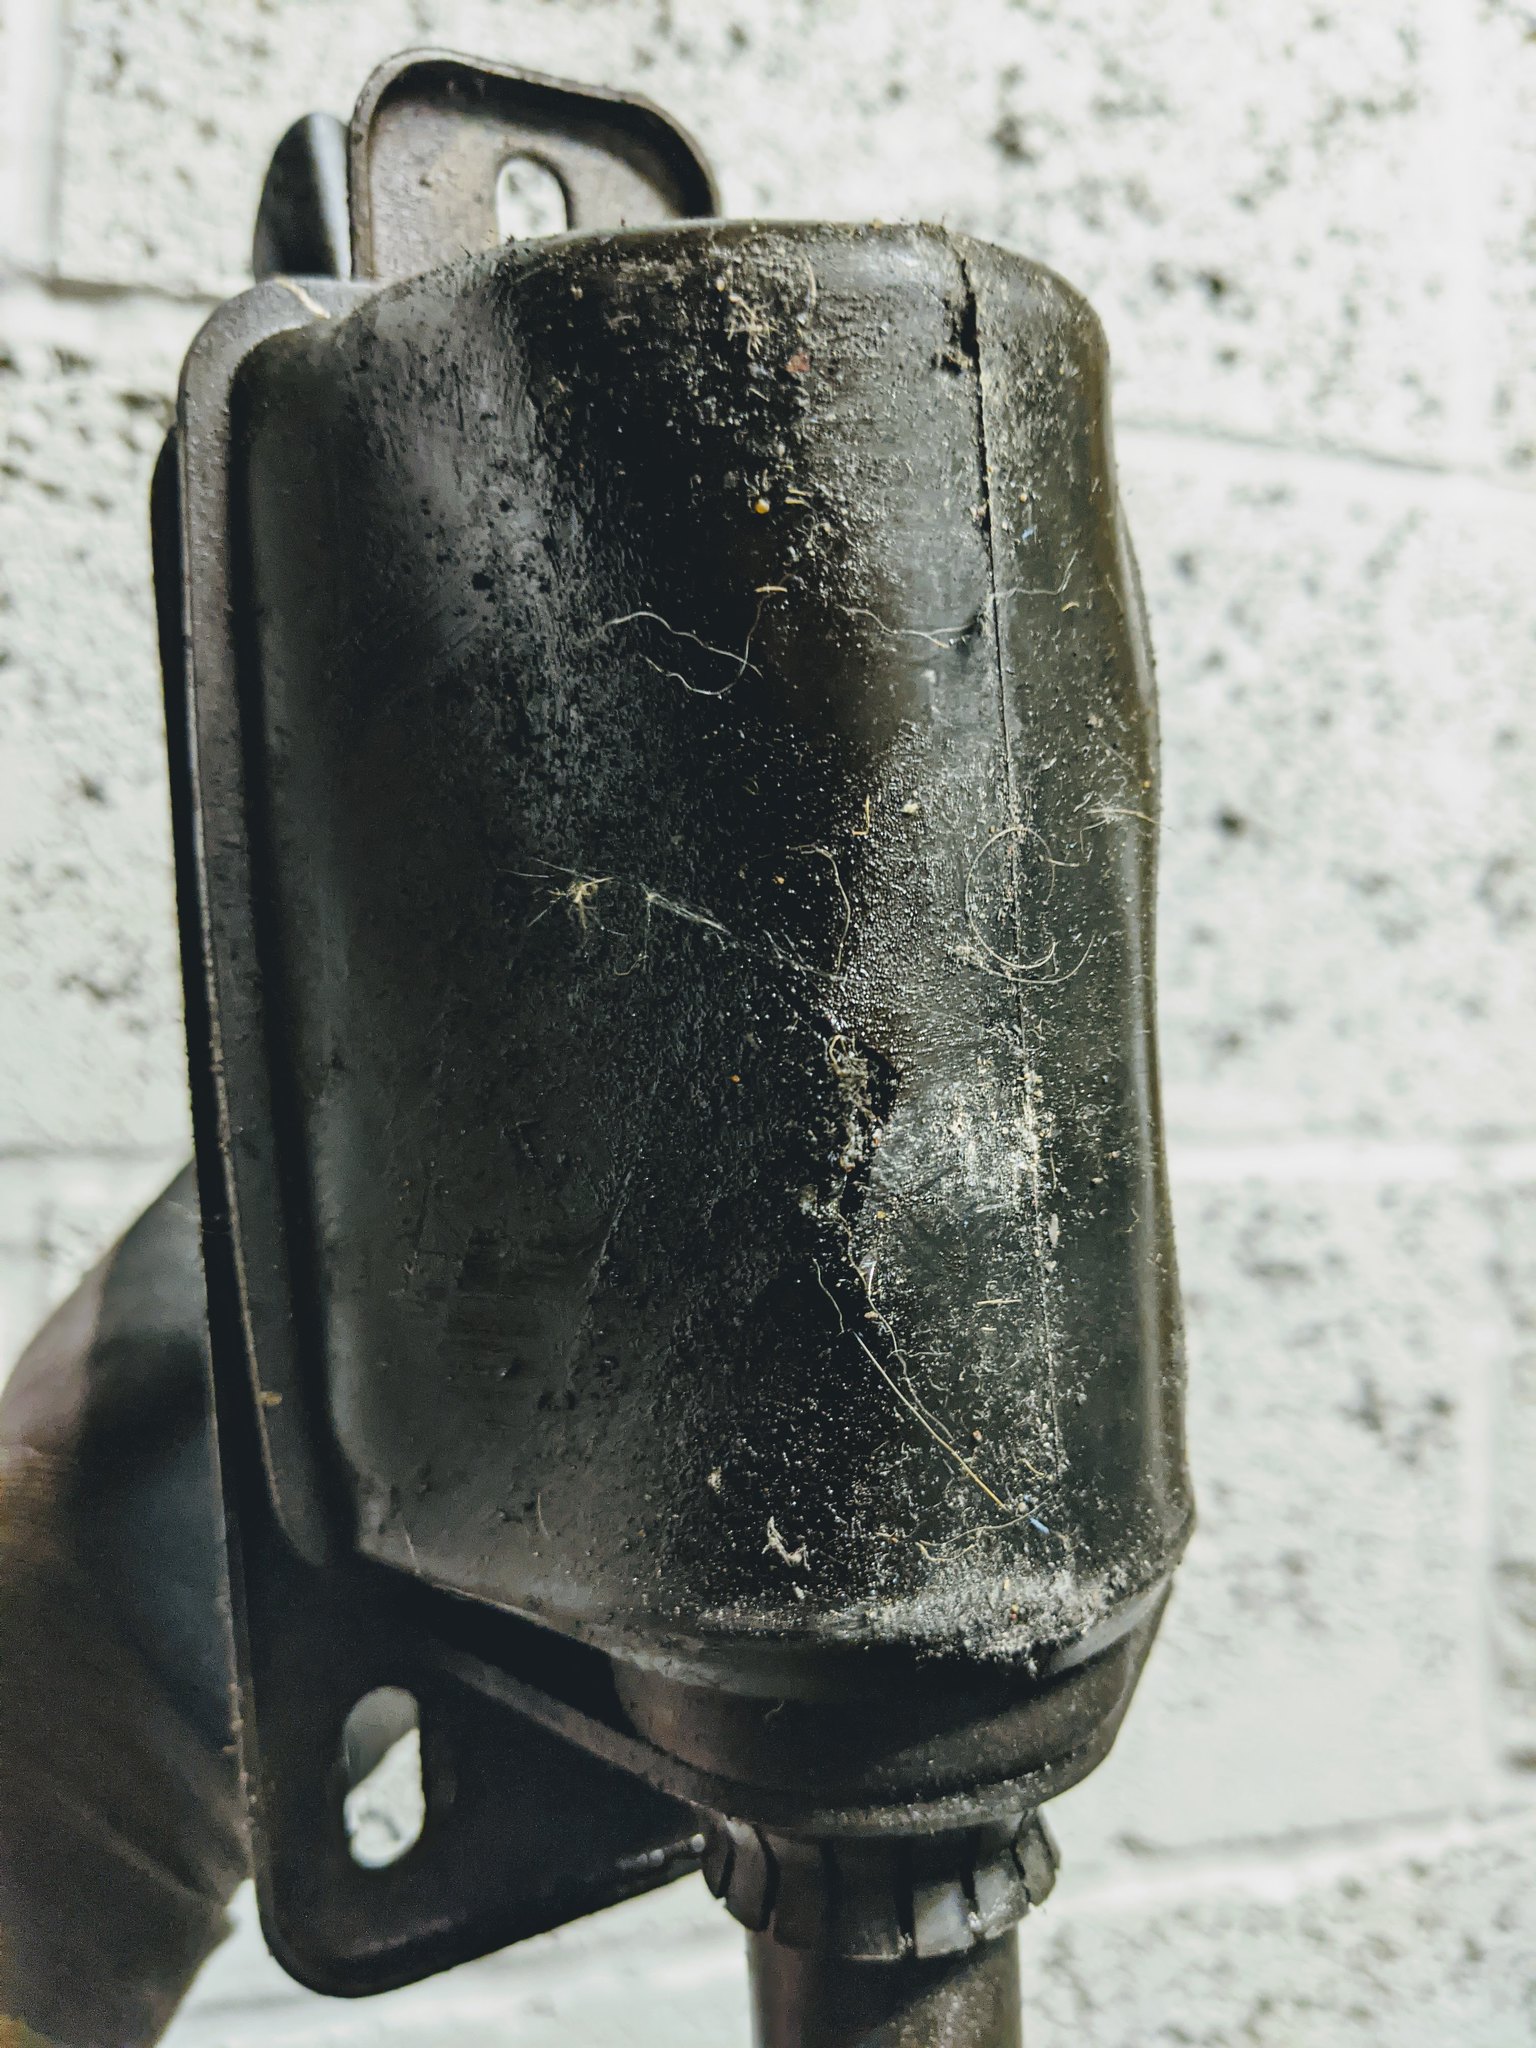 PXL_20201109_192016054 by Godfrey Hatton, on Flickr
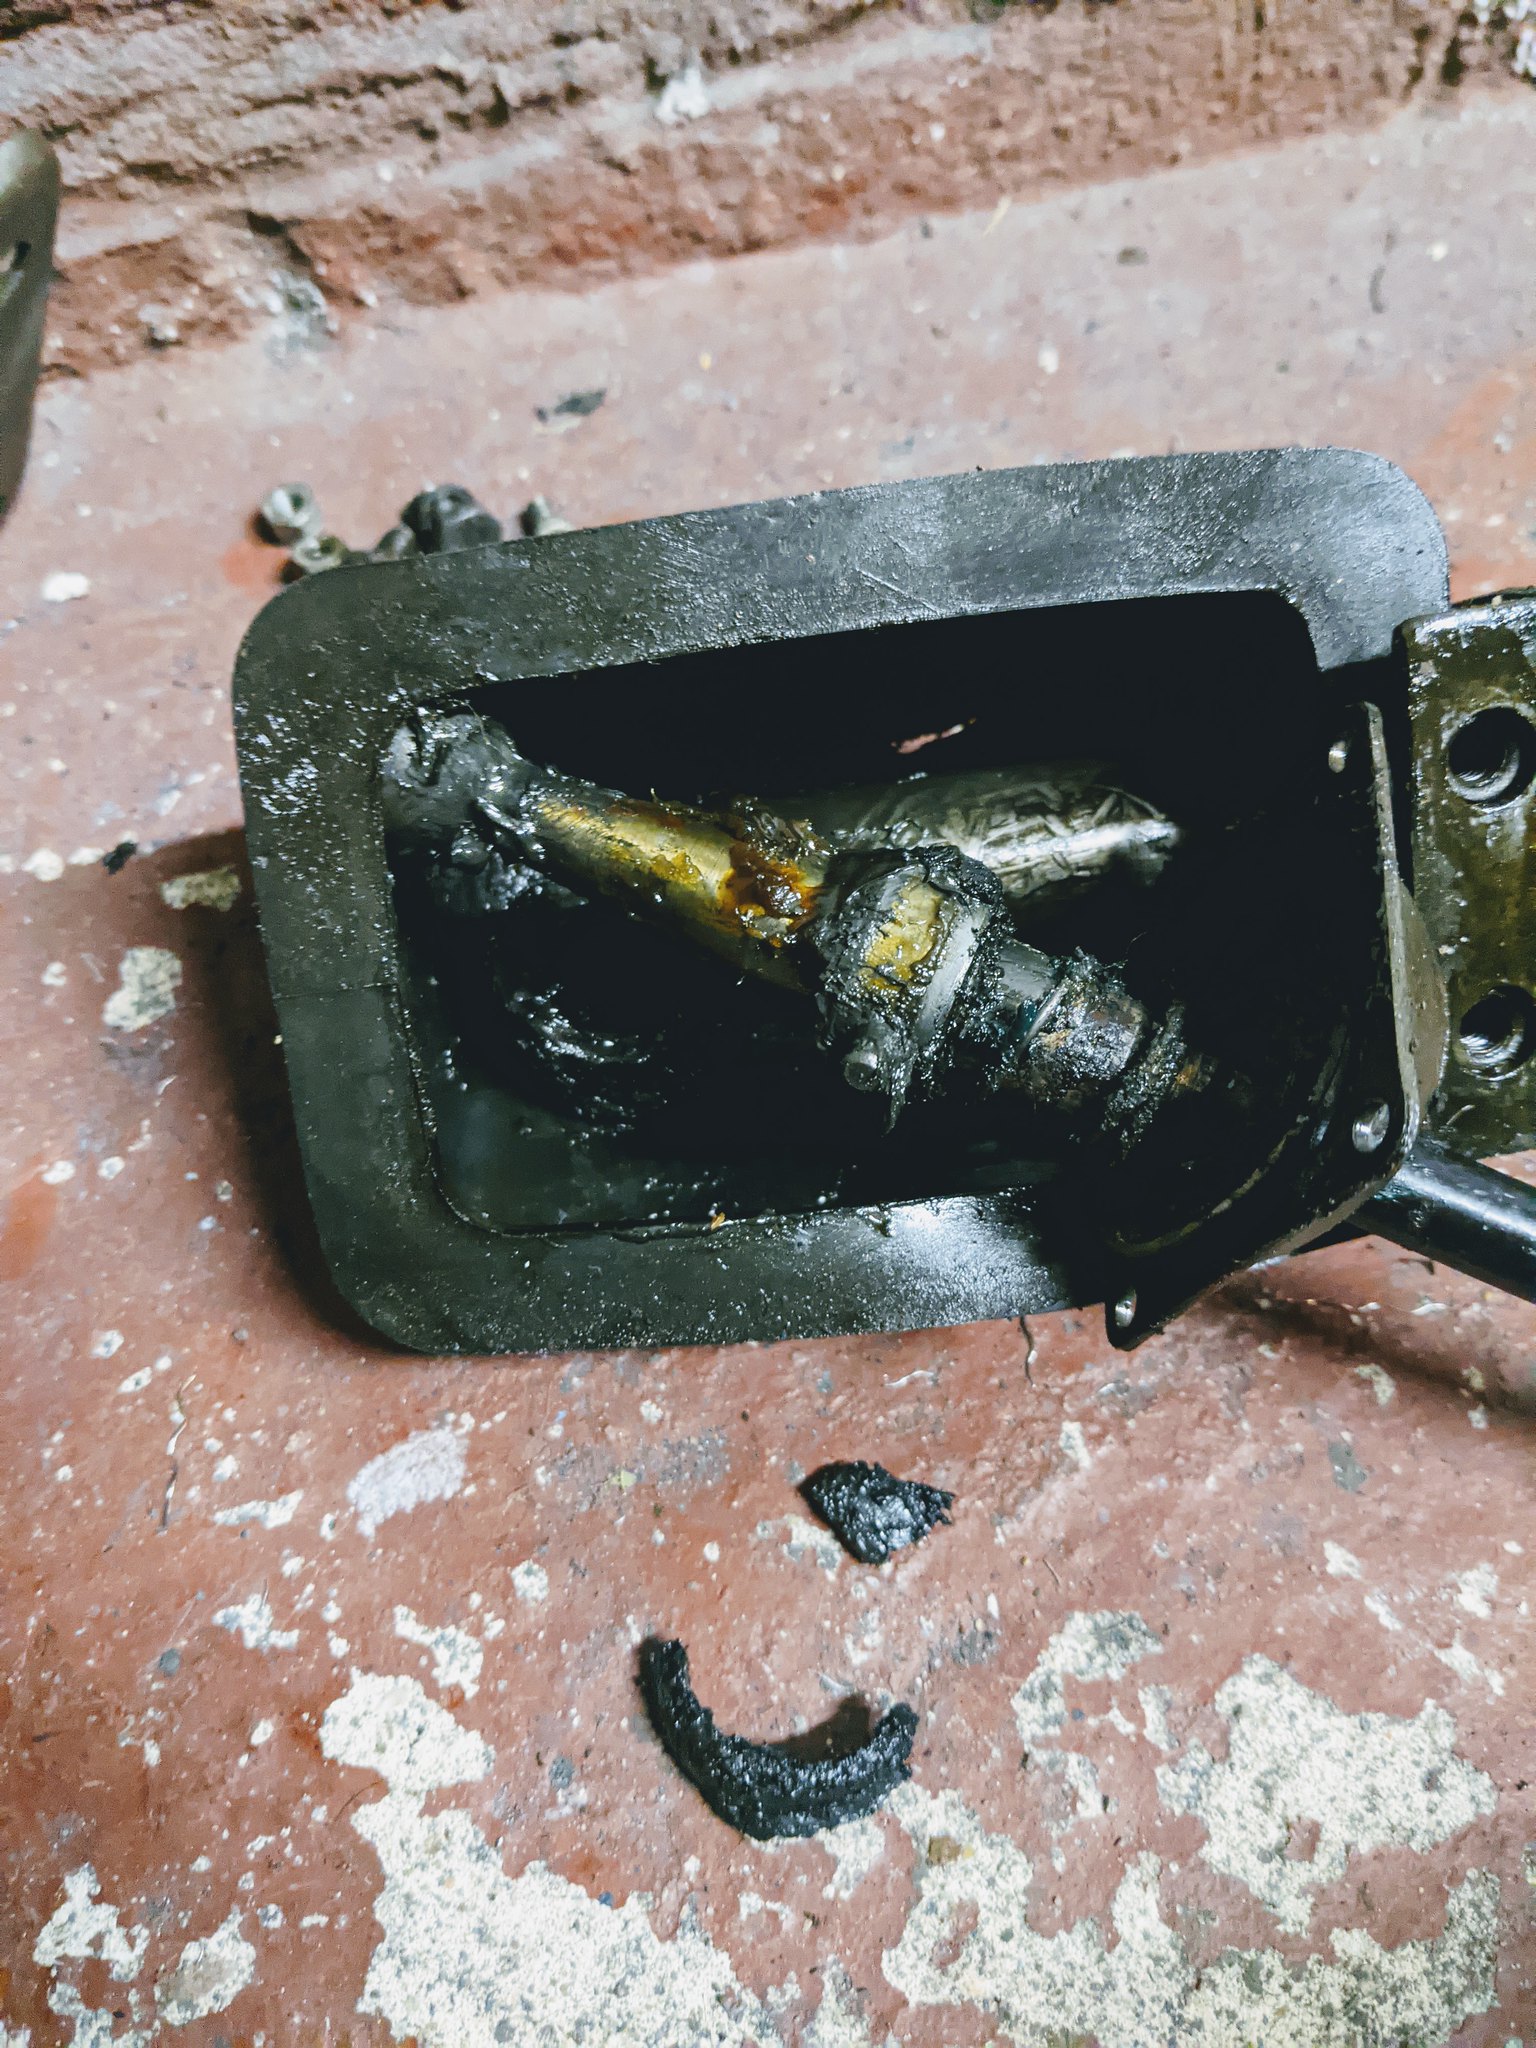
As for the gear lever cup, what gear leaver cup
 PXL_20201109_193746399 by Godfrey Hatton, on Flickr
I understand this is quite normal for these to disintegrate like this, so an upgraded nylotron ball will be used. Are there any other wear items I need to be renewing while I’m here?
Pog
PXL_20201109_191925810 by Godfrey Hatton, on FlickrHere’s the entire gear linkage assy as pulled off the car. I’m aware the shaft wears where it passes through the rear bracket. The rest of the shaft’s diameter is 25.5mm, this one has quite a bit of play in it:
PXL_20201109_191651457 by Godfrey Hatton, on FlickrLuckily I have a couple other shafts that came with the spares with the car. The best of these appears to have no wear whatsoever, so that’ll get switched over. Do the plastic bearing brackets get replaced to or are these unobtainium? I’ll also be changing the flexi coupling for a reman item, how does it attach to the shaft?
PXL_20201109_191853216 by Godfrey Hatton, on FlickrThe rubber dust cover has a tear in it, are replacements available or would a puncture patch be adequate?
PXL_20201109_192016054 by Godfrey Hatton, on FlickrAs for the gear lever cup, what gear leaver cup
PXL_20201109_193746399 by Godfrey Hatton, on FlickrI understand this is quite normal for these to disintegrate like this, so an upgraded nylotron ball will be used. Are there any other wear items I need to be renewing while I’m here?
Pog
Young Imp Members Registrar
-
phatbob
- Posts: 77
- Joined: Mon Apr 26, 2004 12:55 pm
- Club Member: Yes
- Car Model: Hillman Super Imp.
- Location: Warrington, England
- Has thanked: 38 times
- Been thanked: 22 times
Re: EHK 744G - 1969 Super - BACK ON ITS WHEELS!
I'd change the plastic bushes too as new ones are now available again. You can stiffen-up a worn flexible couling by putting a slotted length of garden hose over the spring bit and clamping it on with some jubilee clips. Add more jubilee clips for more stiffness!  Just make sure that the screw bit of the hose clip doesn't foul the crossmember. I don't think that new flexicouplings are available at the moment.
Astronomy is looking up!
-
colimp66
- Posts: 702
- Joined: Wed Dec 17, 2008 8:17 pm
- Club Member: Yes
- Car Model: 1970 Hillman Imp Deluxe.. "The Pest"
- Location: Dunbar, East Lothian, Scotland
- Has thanked: 60 times
- Been thanked: 53 times
Re: EHK 744G - 1969 Super - BACK ON ITS WHEELS!
Pog,
I bought a new nylotron gear ball and the nylon bushes for the gear shaft last week from Malcolm so they are available for you.
Cheers
Col.
I bought a new nylotron gear ball and the nylon bushes for the gear shaft last week from Malcolm so they are available for you.
Cheers
Col.
-
bazzateer
- Posts: 1269
- Joined: Sun Apr 02, 2006 12:27 pm
- Club Member: Yes
- Car Model: 68 Chamois Sport, 72 Imp Sport, 76 Datsun 260Z
- Location: Watford and very occasionally Fareham
- Has thanked: 68 times
- Been thanked: 88 times
Re: EHK 744G - 1969 Super - BACK ON ITS WHEELS!
There was a chap in the Netherlands making these a couple of years ago. Pretty sure Dennis Allt popped in to collect some from him during Going Dutch in 2018.
If I told you I was a pathological liar, would you believe me?
Barry Blackmore - Chiltern ACO, apparently.......................
Barry Blackmore - Chiltern ACO, apparently.......................
-
philgsmith
- Posts: 298
- Joined: Mon Jan 03, 2011 9:26 pm
- Club Member: Yes
- Car Model: Imp - deluxe, BMW320d Touring, MGF, MGTF
- Has thanked: 36 times
- Been thanked: 20 times
Re: EHK 744G - 1969 Super - BACK ON ITS WHEELS!
Hi Pog
Great to see the car back its wheels - well done, you're making great progress..
Phil
Great to see the car back its wheels - well done, you're making great progress..
Phil
When you're in a hole - stop digging/too much to do, too little time