EHK 744G - 1969 Super - Interior coming along nicely

Post Reply
User avatar
John A Ross
Posts: 403
Joined: Mon Oct 01, 2018 10:30 am
Club Member: Yes
Car Model: TOO MANY !
Location: Stirling Scotland
Has thanked: 240 times
Been thanked: 216 times
Contact:

Re: EHK 744G - 1969 Super - IT'S PAINTED!!

Post by John A Ross »

Big mile stone Godfrey, like already said, watch the paint :-)

Bit of waxoyl or other wax will go miles on anything screwed into painted areas and especially trim clips. Make sure you clean all the trim parts behind very well, I put trims back on once and seen some sort of stain on the paint, polished out but I had nicked the paint pressing in the plastic clips and a bit of bron stuff has already started !

I took so much car as well, was gutting.

John
- John A. Ross
-----------------
https://www.nx16.com || https://www.hillmanimp.org || Or find me on Facebook !
User avatar
impmann
Posts: 545
Joined: Tue Sep 09, 2003 11:27 am
Club Member: Yes
Car Model: ...er, one or two
Location: Midlands
Has thanked: 20 times
Been thanked: 73 times

Re: EHK 744G - 1969 Super - IT'S PAINTED!!

Post by impmann »

Looks lovely - as ever, if you need anything or need to look at how something goes together, just give me a shout. 8)
Tim Morgan
Imps since 1987... one or two of them. ;-)
Pog
Posts: 142
Joined: Sat Aug 24, 2013 4:55 pm
Club Member: Yes
Car Model: 1969 Super 'Betty'
Location: Northampton, UK
Has thanked: 10 times
Been thanked: 37 times

Re: EHK 744G - 1969 Super - IT'S PAINTED!!

Post by Pog »

John A Ross wrote: Thu Apr 20, 2023 9:16 am
I took so much car as well, was gutting.

John
Oh John, I bet! Dick goes to me "you will chip the paint and if you don't you can start building my cars" :lol:

Fortunately I've been given half a tin of left over paint, which will be fantastic for all those little touch in's that I will inevitably have to do!

Pog
Young Imp Members Registrar
Pog
Posts: 142
Joined: Sat Aug 24, 2013 4:55 pm
Club Member: Yes
Car Model: 1969 Super 'Betty'
Location: Northampton, UK
Has thanked: 10 times
Been thanked: 37 times

Re: EHK 744G - 1969 Super - IT'S PAINTED!!

Post by Pog »

impmann wrote: Thu Apr 20, 2023 10:14 am Looks lovely - as ever, if you need anything or need to look at how something goes together, just give me a shout. 8)
Ah thanks Tim, you know I will! :lol:

Pog
Young Imp Members Registrar
Pog
Posts: 142
Joined: Sat Aug 24, 2013 4:55 pm
Club Member: Yes
Car Model: 1969 Super 'Betty'
Location: Northampton, UK
Has thanked: 10 times
Been thanked: 37 times

Re: EHK 744G - 1969 Super - Pog 1, Heater Hose 0

Post by Pog »

Hi all,

Blimey, where does the time go, can't believe it's July already! Lots of weekends away recently so not as much time spent in the garage, sorry it's been a while since the last update. Last couple of weeks though I've made some good progress.

1st step was to protect the freshly painted shell. Bilt Hamber's finest Dynax S-50 now resides in every nook and crevice I could squeeze it into, what a satisfyingly messy job that was! Application was dead simple though, hopefully that should keep the brown stuff at bay for another few decades!

ImagePXL_20230610_150001821 by Godfrey Hatton, on Flickr

Next up, something I've been dreading, hearing nothing but how difficult they are to fit:

ImagePXL_20230709_112257511.MP by Godfrey Hatton, on Flickr

Wow, you guys weren't lying huh! So glad I did the O/S first, I was amazed when it literally went straight in without any hassle. If I hadn't realised it was actually doable, I'd have totally given up on the N/S :lol: The natural curve in the pipe just kept wanting to kink where it passed through from the sill into the wing. Battled for well over an hour, inch by inch, but got there in the end. Backs of my hands took a beating, the things we do eh? But another tick off the ol' list.

ImagePXL_20230709_124823766 by Godfrey Hatton, on Flickr

Now then. Am I right in thinking the wiring harness takes the same route through the O/S? How the bloomin' heck do you feed this lot, plug connectors and all, though the same space now occupied by hose? It's a brand new loom from Auto sparks btw.

ImagePXL_20230709_142323953 by Godfrey Hatton, on Flickr

Any advice much appreciated!
Pog
Young Imp Members Registrar
The Nun
Posts: 2928
Joined: Tue Jan 23, 2007 7:02 pm
Club Member: Yes
Car Model: Imp
Location: South
Has thanked: 77 times
Been thanked: 104 times

Re: EHK 744G - 1969 Super - Pog 1, Heater Hose 0

Post by The Nun »

Loom needs to go in before the hose, you'll never get it through afterwards. Bind the loom up tight plugs and all with tape then guide it through with some draw string
Peter Nunn...ey im member 00033
User avatar
Uncle Henry
Posts: 464
Joined: Wed Jan 27, 2021 9:12 am
Club Member: Yes
Car Model: Imp deluxe
Has thanked: 468 times
Been thanked: 172 times

Re: EHK 744G - 1969 Super - Pog 1, Heater Hose 0

Post by Uncle Henry »

Might be too late now, Peter, unless the hose comes back out ?

UH
Stans best mate.
User avatar
impmann
Posts: 545
Joined: Tue Sep 09, 2003 11:27 am
Club Member: Yes
Car Model: ...er, one or two
Location: Midlands
Has thanked: 20 times
Been thanked: 73 times

Re: EHK 744G - 1969 Super - Pog 1, Heater Hose 0

Post by impmann »

Hey chap,

Pull the heater pipe back through *the sill* not through the inner wing, so you won't have the same issues with the kinks.

Now bind loom with masking tape to protect the plugs.

Feed a piece of copper wire (such as from twin and earth mains cable from a house) down the heater channel.

Fix this copper wire the the dashboard end of the loom using tape.

Pull the copper wire back through, whilst feeding the loom into the rear pocket.

Once through, refeed the heater pipe - if it helps, reuse the copper wire to assist the pipe through the heater channel.

Then feed the rest of the loom through the inner wing into the engine bay - use tape to protect the connectors and plugs.

Hope that makes sense.

If you need a hand, just shout.
8)
Tim Morgan
Imps since 1987... one or two of them. ;-)
Pog
Posts: 142
Joined: Sat Aug 24, 2013 4:55 pm
Club Member: Yes
Car Model: 1969 Super 'Betty'
Location: Northampton, UK
Has thanked: 10 times
Been thanked: 37 times

Re: EHK 744G - 1969 Super - Pog 0, Heater Hose 1

Post by Pog »

:oops: Every day’s a school day! Can you tell this is my first car restoration :lol:

Thanks all, this is why I love the forum, you’re all a fount of knowledge!

Before I put the wiring in the wrong way, what’s the correct positioning of the loom? The original was already removed when I got the car, so I don’t have any reference to go from.

ImagePXL_20230713_171905850 by Godfrey Hatton, on Flickr

Am I right in thinking:
1. Engine bay
2. Either the alternator wiring or radio feed wire I opted for
3. Dashboard and front wiring

Cheers,
Pog
Young Imp Members Registrar
bks974c
Posts: 1401
Joined: Thu Aug 19, 2004 5:26 pm
Club Member: Yes
Car Model: all the above
Location: Edinburgh, Scotland
Has thanked: 152 times
Been thanked: 243 times

Re: EHK 744G - 1969 Super - Pog 0, Heater Hose 1

Post by bks974c »

Yes, correct 👍

Scott
Pog
Posts: 142
Joined: Sat Aug 24, 2013 4:55 pm
Club Member: Yes
Car Model: 1969 Super 'Betty'
Location: Northampton, UK
Has thanked: 10 times
Been thanked: 37 times

Re: EHK 744G - 1969 Super - Pog 0, Heater Hose 1

Post by Pog »

Thanks Tim for the advice. Entire hose had to come out in the end, what an absolute faff that was! Honestly made the hose job look easy.

ImagePXL_20230717_185850864 by Godfrey Hatton, on Flickr

Got there in the end though, without damaging any wires too which was a relief. Gonna forget about wires for the time being as it scares me and crack on with the rest of the interior build - I'll be tackling the sound deadening whilst I wait for a parcel from Lesley Smith to arrive with the carpet and headlining kit. I'll update you all soon.

Pog
Young Imp Members Registrar
Pog
Posts: 142
Joined: Sat Aug 24, 2013 4:55 pm
Club Member: Yes
Car Model: 1969 Super 'Betty'
Location: Northampton, UK
Has thanked: 10 times
Been thanked: 37 times

Re: EHK 744G - 1969 Super - Interior coming along nicely

Post by Pog »

Hi all,

Had a few days off last week and was able to spend some serious time working on the car. Got quite a bit done, so apologies for the long update!

As per my previous post, next job I wanted to tackle was the sound deadening, so crack on with that I did:

ImagePXL_20230812_193402201 by Godfrey Hatton, on Flickr

ImagePXL_20230815_115322426 by Godfrey Hatton, on Flickr

ImagePXL_20230811_184754544 by Godfrey Hatton, on Flickr

I've been using Dodo Mat's DEADN hex pads and Super Liner as part of their 'car kit', which I think is amazing value at £85 for both rolls and it's been great stuff to work with, so I highly recommend it to anyone looking to quieten their car's interior. The super liner can be a tad fiddly as it wants to stick to anything including itself as soon as the backing is removed and you only really get the one shot with the adhesive, you just have to be careful and confident in the application. It already feels much less 'echoey' when I'm sat inside so I'm hopeful it'll be effective on the road. I measured and left holes in the insulation so I can drill holes for the rear seat belts that I plan to fit.

Couldn't help myself and wanted to see how the seats looked, so fitted the rear bench, I'm absolutely buzzing for how the grey tweed looks against the blue, it's exactly how I pictured it in my head.

ImagePXL_20230815_142209762 by Godfrey Hatton, on Flickr

Tired of being hunched in the interior, I thought I'd start bolting shiny things back to the exterior, which is such a good feeling!

She can see again 8)

ImagePXL_20230811_175501652~2 by Godfrey Hatton, on Flickr

And now I'll be able to see behind me :wink:

ImagePXL_20230813_125157333 by Godfrey Hatton, on Flickr

ImagePXL_20230813_154932260 by Godfrey Hatton, on Flickr

Rather pleased with this next one, definitely would have been easier with a second pair of hands, but I preserved by balancing it on my head whilst I got the hinge screws in :lol: Newly refurbished stays from Mr Human are absolutely superb and work perfectly. The screen is one of Jeff Day's new and improved jobs, should never rust again!

ImagePXL_20230815_171552471 by Godfrey Hatton, on Flickr

Next mini project was the heater matrix assy. I'd already taken the matrix itself to a rad specialist in Northampton who flushed and pressure tested it, which came back all OK. I rebuilt the box with new seals and a new hardboard back. Should all help in making sure the air goes only goes where it's supposed to.

ImagePXL_20230816_121811741 by Godfrey Hatton, on Flickr

ImagePXL_20230816_123754634.MP by Godfrey Hatton, on Flickr

ImagePXL_20230816_135933893.MP by Godfrey Hatton, on Flickr

Fitting it under the dash was a bit of a battle, getting the bolt holes lined up and ensuring it matched the vent holes on the dash at the same time took some persuading, but got there in the end. Careful application of aluminium tape should further help seal any gaps and make it as effective as it can be.

ImagePXL_20230816_153027049 by Godfrey Hatton, on Flickr

ImagePXL_20230816_153036300~2 by Godfrey Hatton, on Flickr

And that's as far as I got, a productive few days for sure. Next job will be the carpet and then the headlining, which I'm psyching myself up for.

Any advise or comments welcomed as always,
Pog
Young Imp Members Registrar
User avatar
John A Ross
Posts: 403
Joined: Mon Oct 01, 2018 10:30 am
Club Member: Yes
Car Model: TOO MANY !
Location: Stirling Scotland
Has thanked: 240 times
Been thanked: 216 times
Contact:

Re: EHK 744G - 1969 Super - Interior coming along nicely

Post by John A Ross »

The seats look great

And yes its wlays nice to see it when it gets its "face" back on :-)

Well done
- John A. Ross
-----------------
https://www.nx16.com || https://www.hillmanimp.org || Or find me on Facebook !
oli
Posts: 327
Joined: Tue Jul 03, 2007 10:48 am
Club Member: Yes
Car Model: Hillman Imp Super Safari Beige 1972
Location: Norwich
Has thanked: 16 times
Been thanked: 28 times

Re: EHK 744G - 1969 Super - Interior coming along nicely

Post by oli »

Packing either side of the heater matrix with exhaust silencer wadding is the best way I have found to ensure that all of the airflow has to pass through the matrix without going around it - this gives an absolutely brilliant heater.
Pog
Posts: 142
Joined: Sat Aug 24, 2013 4:55 pm
Club Member: Yes
Car Model: 1969 Super 'Betty'
Location: Northampton, UK
Has thanked: 10 times
Been thanked: 37 times

Re: EHK 744G - 1969 Super - Interior coming along nicely

Post by Pog »

Hi all,

Nearly there with the carpet, I've decided to have a stab at making my own from scratch, as I came across the original jute underlay whilst rummaging in the attic, totally forgot I kept it! I've read lots of people say this is the best way to ensure it fits as good as the originals, so that's what I've done:

Using the original jute items as templates on a new roll of felt underlay

ImagePXL_20230927_151711113 by Godfrey Hatton, on Flickr

Took my time cutting them down bit by bit to get them fitting nicely, now I can just cut the carpet around them oversize and glue to the felt, folding the edges over the back, simples!

ImagePXL_20231002_112037797 by Godfrey Hatton, on Flickr

Now I just need some advice on this next bit. I totally realised the wiper assembly needs to be fitted before the heater box, silly me. So that's back out and I've no idea how this next bit goes as I didn't remove it, should there be a spacer on this side of the spindle so that it pokes out the scuttle the correct amount? Or do I just need one of Bob Picton's stainless spacers on the other side and that holds it in place?

ImagePXL_20231002_141915918 by Godfrey Hatton, on Flickr

Thanks in advance,
Pog
Young Imp Members Registrar
oli
Posts: 327
Joined: Tue Jul 03, 2007 10:48 am
Club Member: Yes
Car Model: Hillman Imp Super Safari Beige 1972
Location: Norwich
Has thanked: 16 times
Been thanked: 28 times

Re: EHK 744G - 1969 Super - Interior coming along nicely

Post by oli »

There should be a rubber 'sleeve' around the column part that spaces them down from the inside face of the scuttle panel, a piece of 3/4" heater hose or such will suffice. Just trim it until you have the correct amount of spindle showing on the outside for the seal / lock nut to go on the outside.

By the way, you may want to run the motor to see which way the spiral turns with the wheelboxes as you have them currently fitted (I think you have them upside down), as it will make the wiper arms want to travel downwards from the bottom of the screen instead of upwards.
The Nun
Posts: 2928
Joined: Tue Jan 23, 2007 7:02 pm
Club Member: Yes
Car Model: Imp
Location: South
Has thanked: 77 times
Been thanked: 104 times

Re: EHK 744G - 1969 Super - Interior coming along nicely

Post by The Nun »

20231003_102039.jpg
You do not have the required permissions to view the files attached to this post.
Peter Nunn...ey im member 00033
User avatar
ImpManiac
Posts: 1855
Joined: Tue Feb 01, 2005 3:48 pm
Club Member: Yes
Car Model: Singer Chamois
Location: Houghton Regis, Bedfordshire
Has thanked: 184 times
Been thanked: 13 times

Re: EHK 744G - 1969 Super - Interior coming along nicely

Post by ImpManiac »

Great work, Pog! :mrgreen: I love the colour of the bodywork, and the seat colour combination really sets the car off nicely.

IM 8)
Paul Harrison
imp: a small demon : FIEND : a mischievous child : URCHIN
maniac: Raging with disordered intellect: affected with mania: MAD
User avatar
impmann
Posts: 545
Joined: Tue Sep 09, 2003 11:27 am
Club Member: Yes
Car Model: ...er, one or two
Location: Midlands
Has thanked: 20 times
Been thanked: 73 times

Re: EHK 744G - 1969 Super - Interior coming along nicely

Post by impmann »

If you are missing those rubber sleeves, I've just stripped a wiper rack out of a dead shell and have got it all complete in the garage. Give me a shout if that helps, mate. 8)
Tim Morgan
Imps since 1987... one or two of them. ;-)
Pog
Posts: 142
Joined: Sat Aug 24, 2013 4:55 pm
Club Member: Yes
Car Model: 1969 Super 'Betty'
Location: Northampton, UK
Has thanked: 10 times
Been thanked: 37 times

Re: EHK 744G - 1969 Super - Interior coming along nicely

Post by Pog »

ImpManiac wrote: Tue Oct 03, 2023 12:53 pm Great work, Pog! :mrgreen: I love the colour of the bodywork, and the seat colour combination really sets the car off nicely.

IM 8)
Appreciate it, thanks IM!

Thanks all, amazing help as always, at least I was in the right ball park of it needing something. Should be able to find something suitable Tim, I'll let you know if I get stuck.

I'm dead chuffed with how the carpet is looking, finished the main floor sections yesterday:

Cutting out the carpet from the underlay templates:
ImagePXL_20231003_115844587 by Godfrey Hatton, on Flickr

Folding over and sticking it to the back:
ImagePXL_20231003_154607357 by Godfrey Hatton, on Flickr

The finished result, as good as any carpet kit I've seen online I think 8) I'm contemplating cutting out a rubber mat and asking someone with a serious sewing machine to sew it to the driver's pedal area, would you guys agree?:
ImagePXL_20231003_154650009.MP by Godfrey Hatton, on Flickr

Had to see how it looks like the car. It needs some tickling around the steering column area to improve the creasing around the front tunnel, but it needs to come out so I can stick down the sills, wheel arch sections etc, so I'll take care of that. The rear seat back and parcel shelf will also get some of the same carpet too. I'm really excited how it's coming together :D
ImagePXL_20231003_163510266 by Godfrey Hatton, on Flickr

Will keep you posted!

Pog
Young Imp Members Registrar
bks974c
Posts: 1401
Joined: Thu Aug 19, 2004 5:26 pm
Club Member: Yes
Car Model: all the above
Location: Edinburgh, Scotland
Has thanked: 152 times
Been thanked: 243 times

Re: EHK 744G - 1969 Super - Interior coming along nicely

Post by bks974c »

Re heel pad, I wouldn't bother and use cover mats as more protection for the carpet.

I prefer rubber ones, you can remove them at shows and show off the lovely interior.

Scott
User avatar
ImpManiac
Posts: 1855
Joined: Tue Feb 01, 2005 3:48 pm
Club Member: Yes
Car Model: Singer Chamois
Location: Houghton Regis, Bedfordshire
Has thanked: 184 times
Been thanked: 13 times

Re: EHK 744G - 1969 Super - Interior coming along nicely

Post by ImpManiac »

bks974c wrote: Wed Oct 04, 2023 12:28 pm Re heel pad, I wouldn't bother and use cover mats as more protection for the carpet.

I prefer rubber ones, you can remove them at shows and show off the lovely interior.

Scott
Indeed. :) If the rubber mat needs to be secured slightly more effectively, then you could always fit the hook side of a hook and loop ("Velcro") material to the rubber mat. That ought to hold it securely enough to the carpet. :idea:

Keep up the great work! 8)

IM 8)
Paul Harrison
imp: a small demon : FIEND : a mischievous child : URCHIN
maniac: Raging with disordered intellect: affected with mania: MAD
The Nun
Posts: 2928
Joined: Tue Jan 23, 2007 7:02 pm
Club Member: Yes
Car Model: Imp
Location: South
Has thanked: 77 times
Been thanked: 104 times

Re: EHK 744G - 1969 Super - Interior coming along nicely

Post by The Nun »

You wouldn't get that standard of finish from anything you bought ready made on line, the only way is do it yourself or ask a pro car trimmer to do it as per the originals. All the ready made ones I've seen arent as per the originals even though they always say made to original patterns, what original pattern I've no idea.
Peter Nunn...ey im member 00033
Neil
Posts: 94
Joined: Thu Aug 06, 2020 11:05 pm
Club Member: Yes
Car Model: Hillman imp
Location: Woodbidge, suffolk
Has thanked: 10 times
Been thanked: 85 times

Re: EHK 744G - 1969 Super - Interior coming along nicely

Post by Neil »

Looking good!

Great timing doing your carpet now. I will shortly be looking at doing the carpet and now know what I should be aiming for (mine didn’t come with any carpets)

… I reckon you will get yours on the road before mine ?
Pog
Posts: 142
Joined: Sat Aug 24, 2013 4:55 pm
Club Member: Yes
Car Model: 1969 Super 'Betty'
Location: Northampton, UK
Has thanked: 10 times
Been thanked: 37 times

Re: EHK 744G - 1969 Super - Interior coming along nicely

Post by Pog »

Hey all,

Well, another winter gone, how time flies! Apologies for the lack of updates, but I haven't been completely idle...

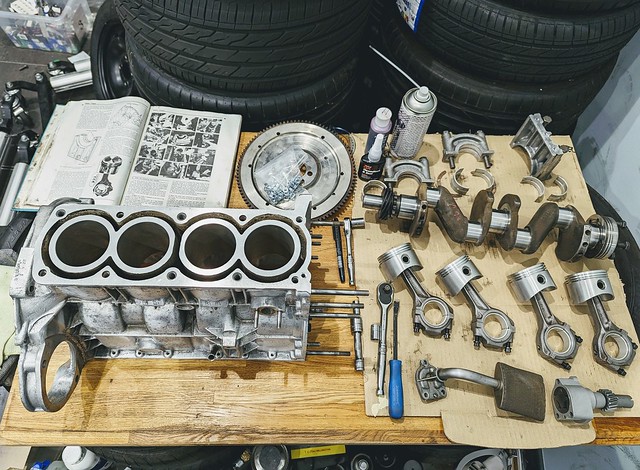
Back in January I was finally able to collect all my engine bits that I'd left with Mr Maynard almost a full year ago ( :shock: ) - can't believe it took so long but here we are. For those who've followed this build from the beginning may remember it all started with a seized standard mk2 engine I bought from eBay for £9... well that same engine has been given a new lease of life and will become the heart of my own Imp, full circle!

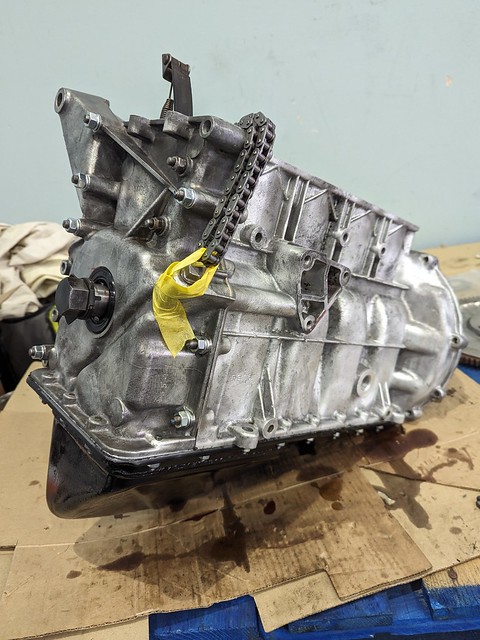
Here it all is ready for assembly
ImagePXL_20240301_143255411 by Godfrey Hatton, on Flickr

I've kept it conservative, it's still an 875, but I've gone the full 9 yards with it to make it the best it can be - +020 overbore, skimmed deck, ground and polished crank with oversize bearings, lightened and balanced flywheel, new oil pump, tapped the block for oil drain and new timing chain. The head is a 533 that I asked Mark to convert to an upgraded sport spec - new enlarged valves, colsibro guides, comp springs, comp buckets, M14 cam, light porting and matching to inlet and exhaust manifolds (twin stroms and a proper imp sport exhaust). Like I say, not crazy specs, but should make for a lovely little fast road engine, or at least that's the plan!

I took all the bits into my work and used my lunch breaks to build the short block, all my colleagues thought I was mental! I struggled with snapping a couple of piston rings, but otherwise enjoyed the process and proud I tackled it myself.
ImagePXL_20240406_151007273.MP by Godfrey Hatton, on Flickr

ImagePXL_20240406_154634422 by Godfrey Hatton, on Flickr

Bit nervous about putting the head on and timing it up correctly, so I'll do that a bit later when I can get some help from someone who knows what they're doing!

Another little project I tackled was freshening up the bog brush oil cooler. As I've seen many people suggest, this was very therapeutic straightening all the fins one by one before giving it a coat of black HVT, looking good as new.

Image
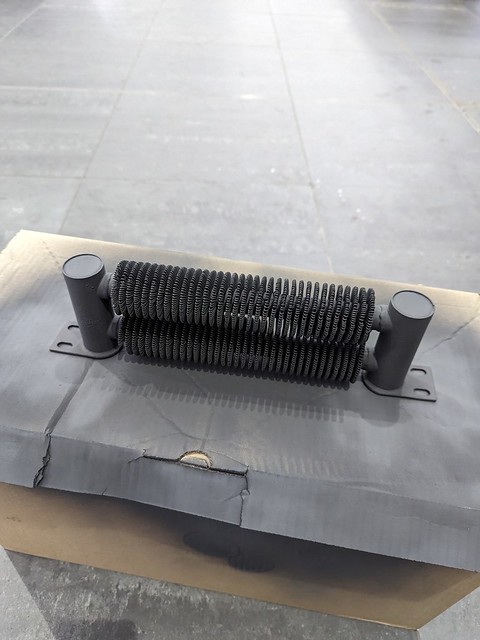
PXL_20240327_080835707.MP by Godfrey Hatton, on Flickr

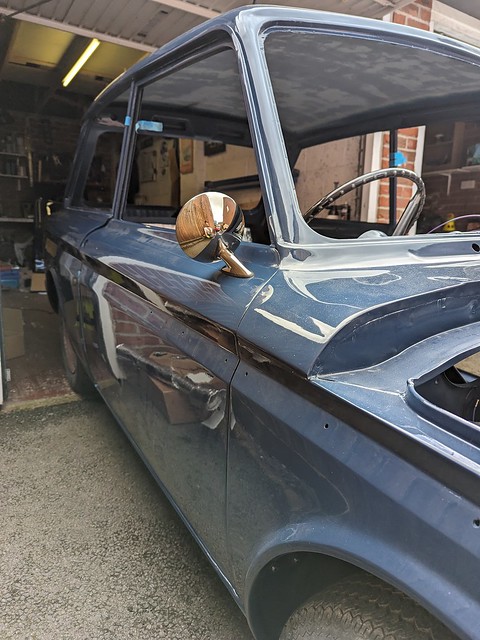
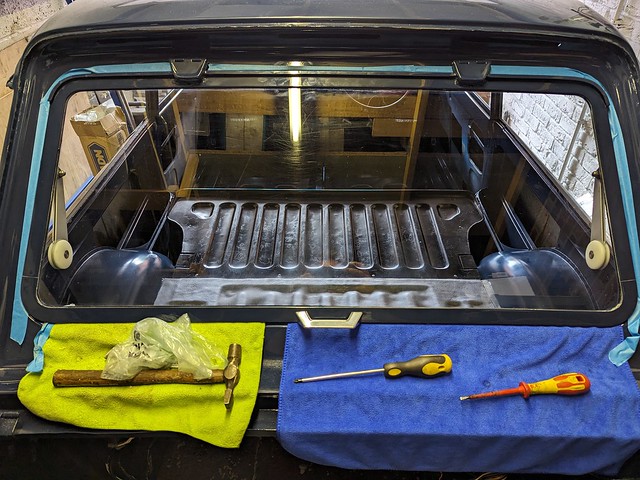
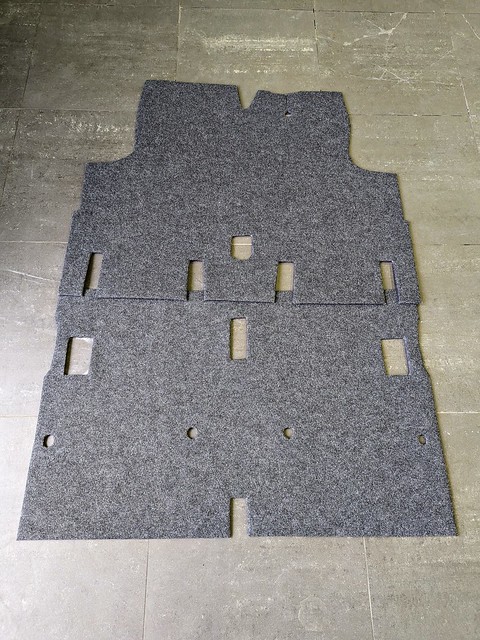
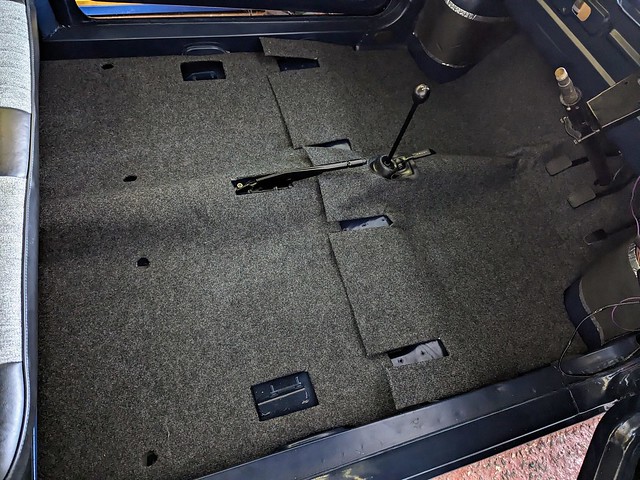
And my current job, which I need some guidance on, is the headlining. Kev and Ed from the Northampton area came round to get me started way back in Oct and we ran out time on the day. That weekend was the last good weekend we had before the temperature really dropped and the winter weather prevented me from finishing it. Now the weather is improving, I've picked up where we left off. I'm now 2/3rds in and really pleased how it's looking (the rear creases will come out once it's cut and tucked up like it does at the back):

Image
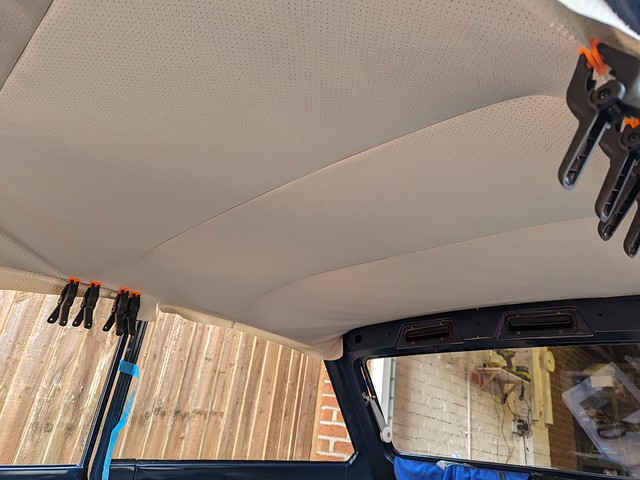
PXL_20240421_165935499 by Godfrey Hatton, on Flickr

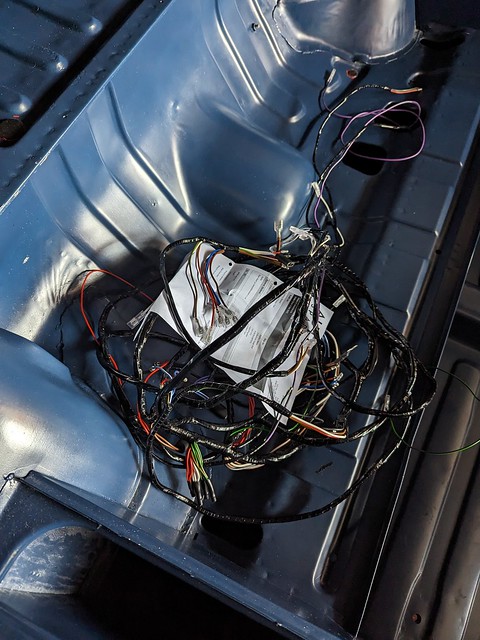
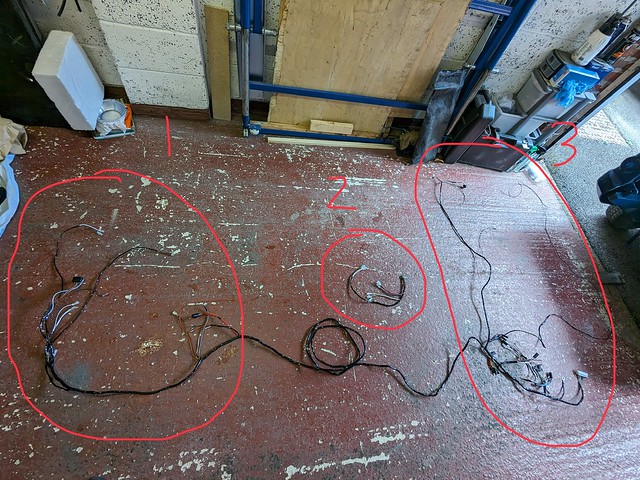
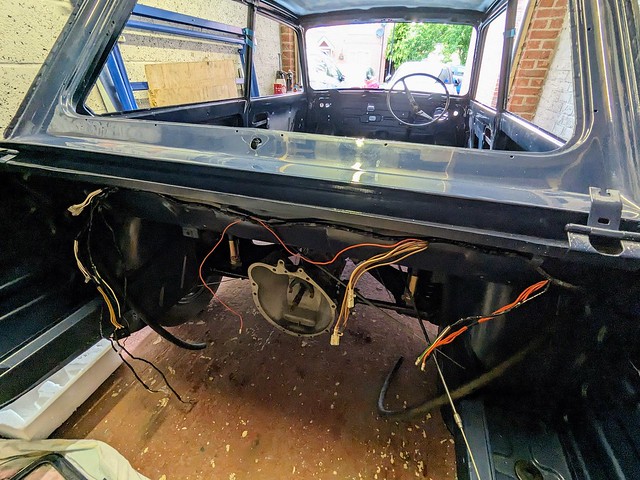
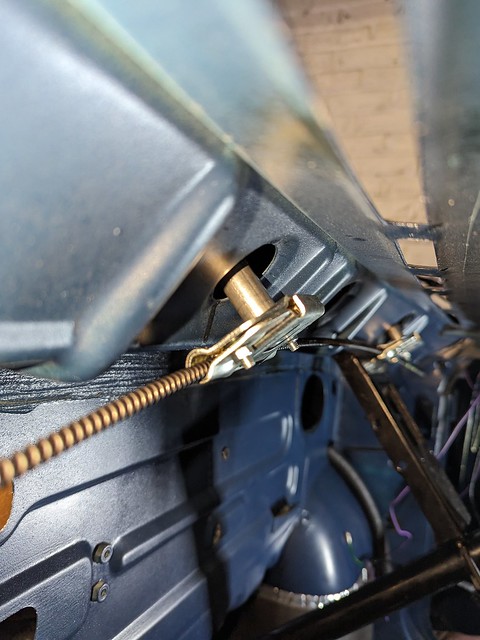
But the bit I need help with is - I have no idea how the wiring should go before I glue the headlining fully in place. The harness was already removed when I got the car, so I have zero reference for putting it back. The loom I'm using is a brand new one from Autosparks, correct for my mk3 Super - I've found the purple wire that I've fed up to the interior light, but I'm being told there should be a brown wire to go with it? I can't see any matching brown wires of similar length that could take the same route - has anyone else bought the same loom and could give me some pointers?

Image
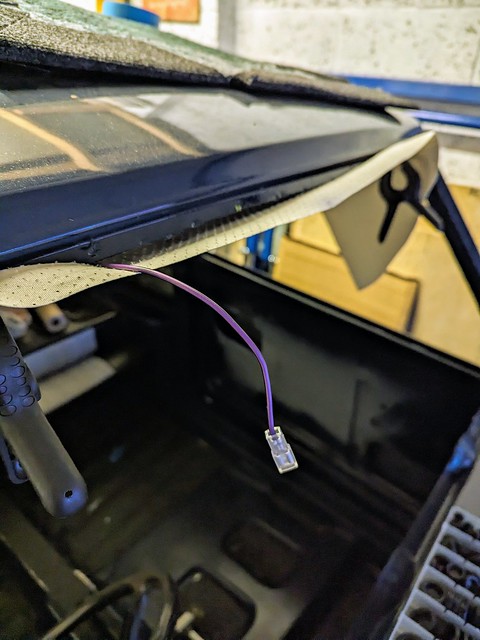
PXL_20240422_190934616 by Godfrey Hatton, on Flickr

ImagePXL_20240427_103536038 by Godfrey Hatton, on Flickr

Thanks in advance,
Pog
Young Imp Members Registrar
User avatar
Uncle Henry
Posts: 464
Joined: Wed Jan 27, 2021 9:12 am
Club Member: Yes
Car Model: Imp deluxe
Has thanked: 468 times
Been thanked: 172 times

Re: EHK 744G - 1969 Super - Interior coming along nicely

Post by Uncle Henry »

Lovely ! Well done, you ! Head down and get it finished in time for National ?

8)

UH
Stans best mate.
User avatar
impmann
Posts: 545
Joined: Tue Sep 09, 2003 11:27 am
Club Member: Yes
Car Model: ...er, one or two
Location: Midlands
Has thanked: 20 times
Been thanked: 73 times

Re: EHK 744G - 1969 Super - Interior coming along nicely

Post by impmann »

We will get that wiring sorted next week, mate. :-) Two heads and all that...
Tim Morgan
Imps since 1987... one or two of them. ;-)
Post Reply